Remote control of client desktop
With 2ConnectMe Video Consult Guest app installed on your client PC, agent service staff is able to control your client Windows / Mac OS / Ubuntu desktop including keyboard and mouse. It is the best tools for service staff to trouble shoot the software or hardware issues on the client local PC.
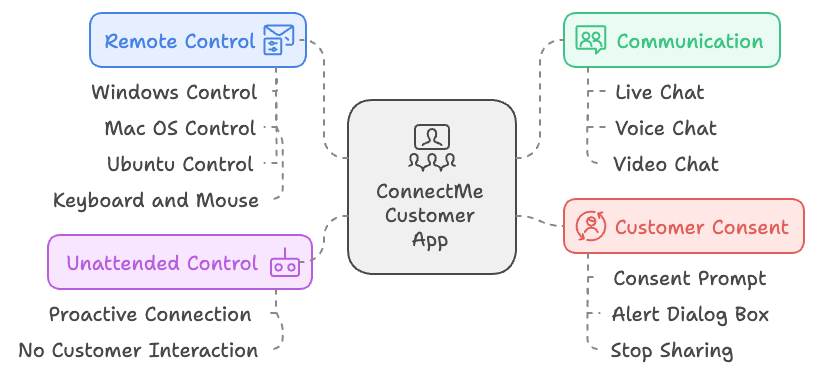
- Remote control of client desktop including keyboard mouse while having live chat with client together with voice video chat.
- With the mobile browser (Android or iOS) or apps on Apple App Store or Google Play Store, agent service staff uses fingers gesture to control remote client desktop mouse and directly types thorugh soft-keyboard.
- In order to ensure the client consent of sharing local desktop control to service staff, 2ConnectMe will prompt the warning alert dialog box to ask client such permission. Meanwhile, client can stop such sharing local desktop at anytime.
- In Unattended Control mode of 2ConnectMe Video Consult Guest app, agent is able proactively to connect to your client PC, without client interaction, and remote control its desktop keyboard mouse.
2ConnectMe Video Consult Guest App
In order to share local desktop control to service staff, your client has to install “2ConnectMe Video Consult Guest” app to connect to service staff. They can be downloaded from the App store, e.g. Microsoft Store for Windows, or downloaded from 2ConnectMe website , Apple App Store for Mac OS or deb binary for GNOME Linux desktop.
For the details of 2ConnectMe Video Consult Guest App, please refer here.


How it works?
Remote control your client desktop can be working under two scenarios.
- In Unattended Control mode, the client is away from desktop PC while service staff proactively connects and controls the client desktop.
- In live chat mode, the client is in either text chat, voice chat or video chat with service staff. Service staff ask client permission to allow remote control client desktop PC.
Remote control client desktop (Unattended Contol mode)
In unattended control mode, client grants such permission of service staff through initial home screen 2ConnectMe Video Consult Guest app as shown below .
Step 1: Enable Unattended Access mode of ConnectMe Video Cosnult Guest app
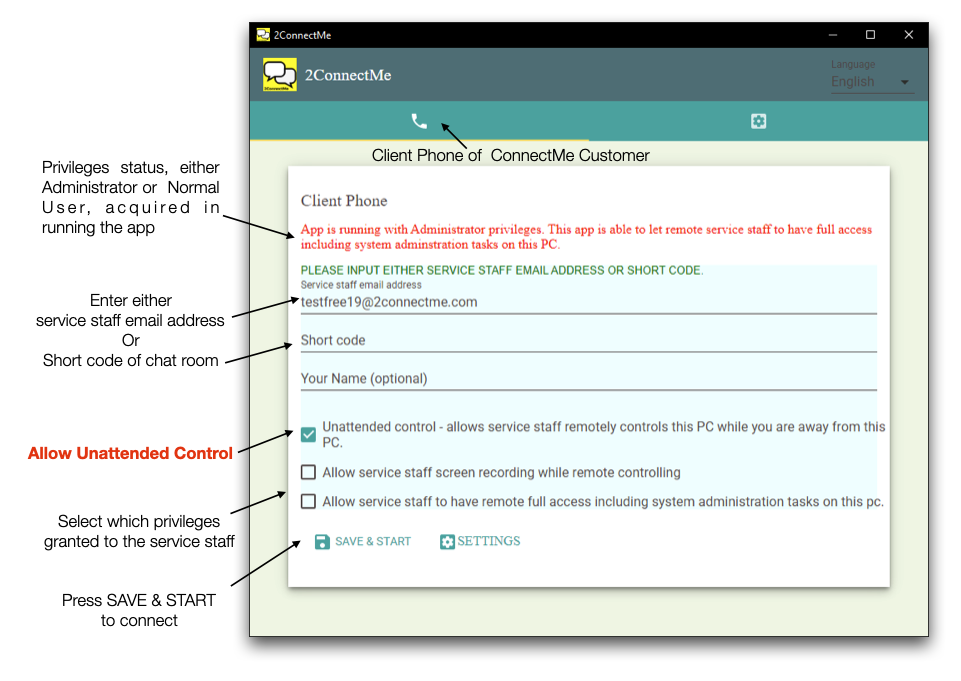
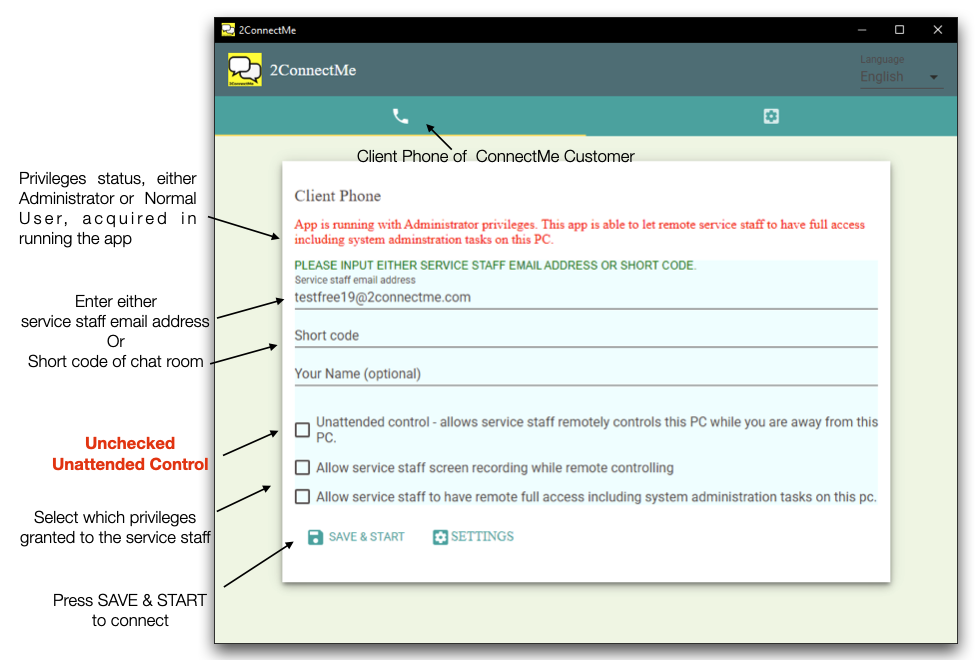
In 2ConnectMe Video Consult Guest app above, the checkbox for Unattended Control is to let client permit remote service staff controlling this client desktop while client is away from this PC. The input fileds of service staff email address or short code of chat room above is to specify only those agents registered with this email address or chat room able to control this client desktop.
For 2ConnectMe Video Consult Guest for Windows, the privileges for remote service staff is pre-granted before connection, i.e. to perform administration tasks and video screen recording on the client PC.
In the above screen of 2ConnectMe Video Consult Guest app, for example, only agent with registered email testfree19@2connectme.com is able to connect and control this desktop when the client is away from desktop PC. No privledge is granted to service staff for performing administration tasks and screen recording on this client PC.
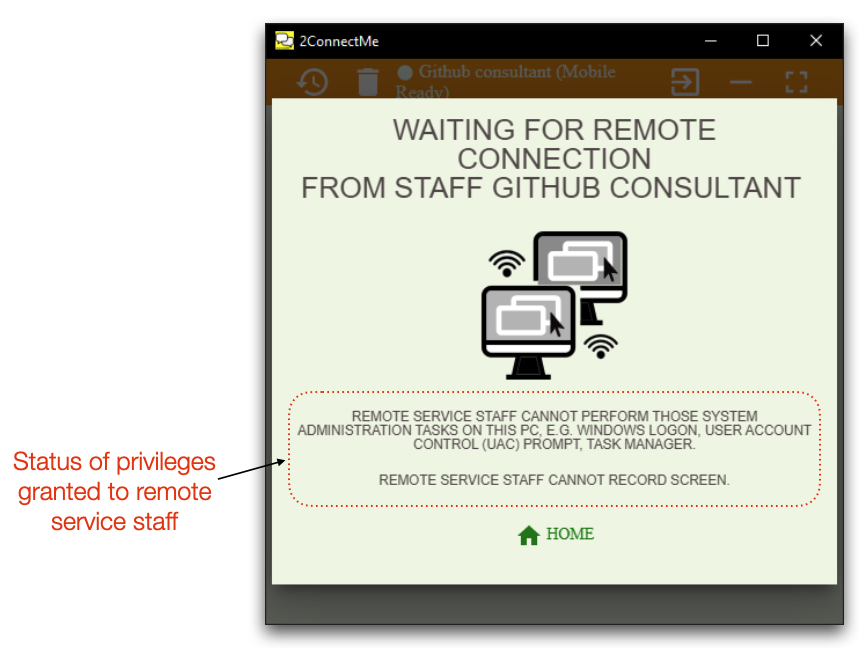
After pressing SAVE & START button, the 2ConnectMe Video Consult app is awaiting for remote services staff to connect at anytime. This screen also indicates the status of privileges pre-granted to service staff. In the screen below, service staff is not allowed from performing administration tasks and screen recording.
Step 2: Service staff proactively connects Client App desktop
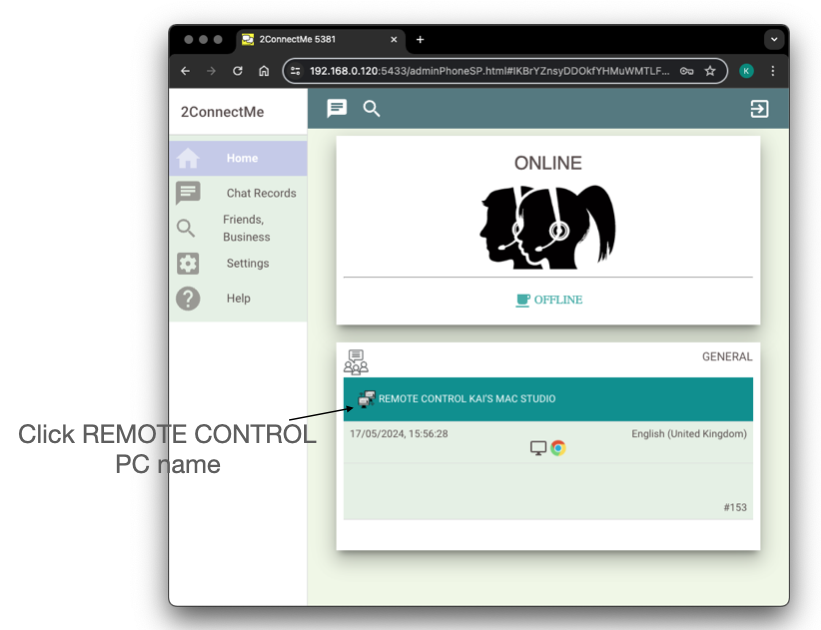
In the 2ConnectMe Paid Video Consult app above, the 2ConnectMe Video Consult Guest desktop is shown and click the “REMOTE CONTROL” button to start control such remote desktop PC directly.
Step 3: Service staff selects which screen of client desktop to share
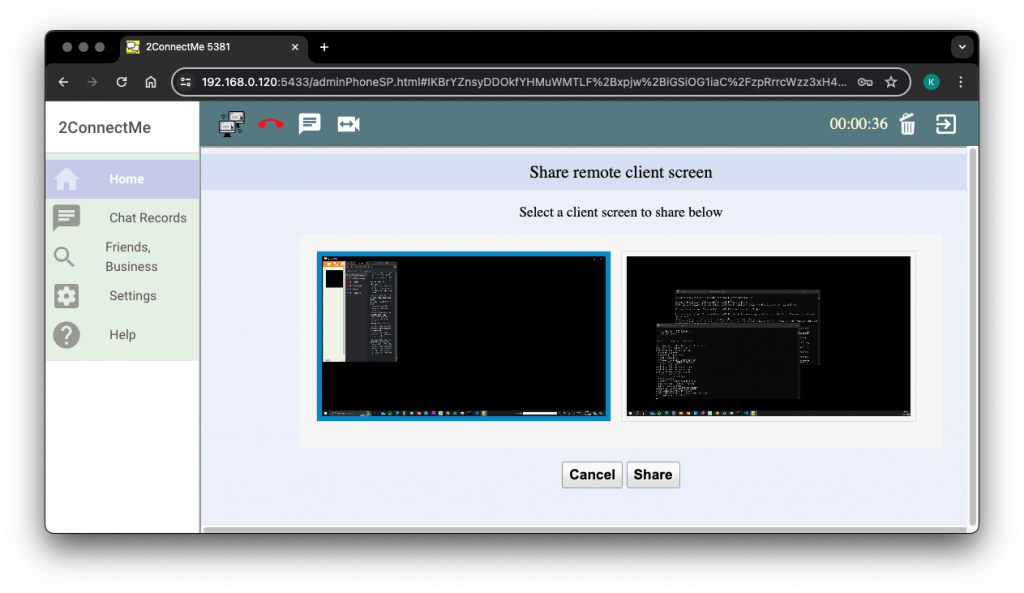
in case client PC desktop with multiple monitor screens, service staff will be prompted to select which screen to share for remote control as shown above.
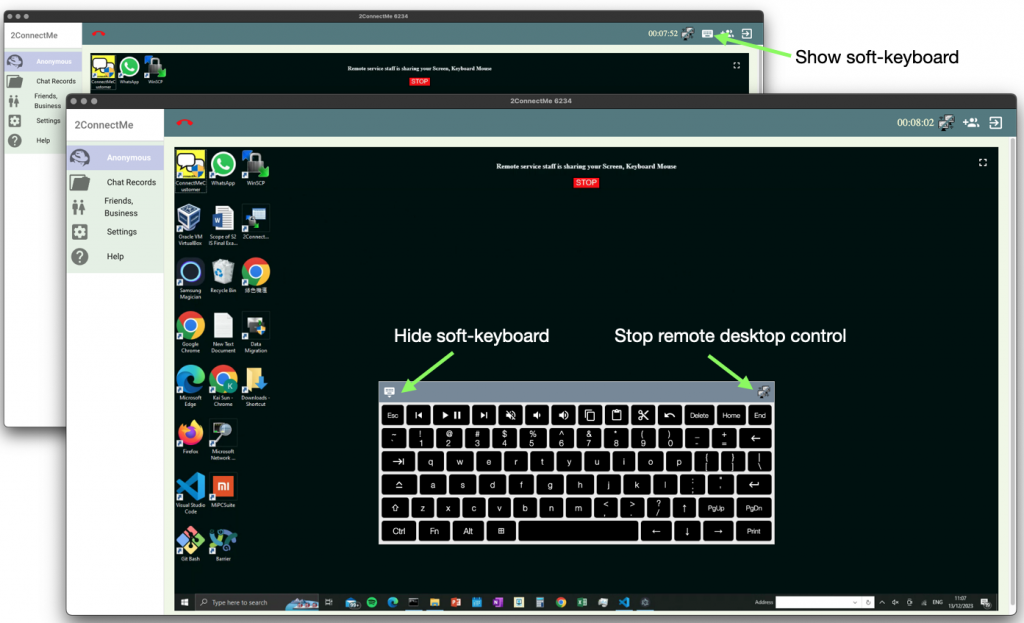
Step 4: Service staff control remote client desktop keyboard mouse
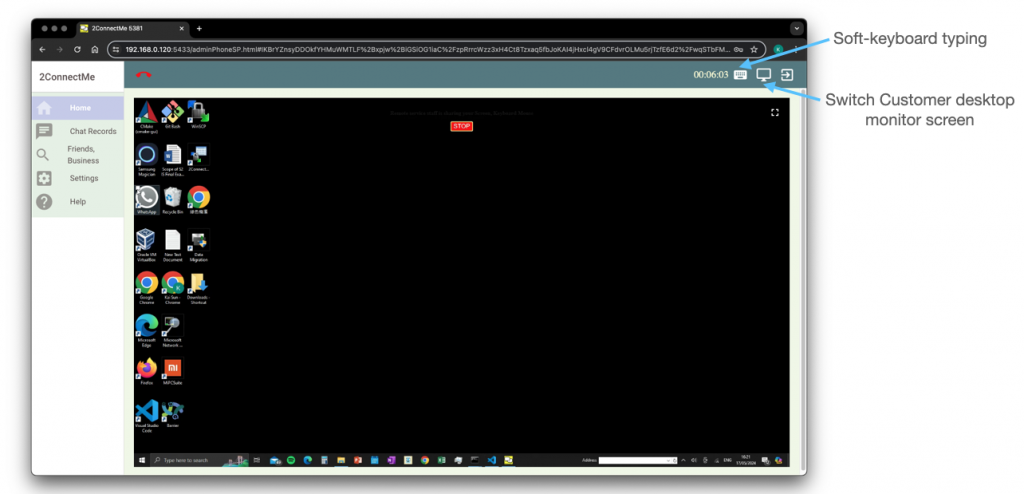
Service staff is able to have full control of remote client desktop PC. Soft-keyboard typing and switch client desktop monitor screen is also suported as shown in the app screen above.
Client desktop PC keyboard mappings
The keyboard layout of client desktop PC must be aligned with service staff keyboard. Currentlly, only keyboard layout “United States International” is supported in the current release. Details here.
Gestures for controlling remote mouse
in the mobile app, 2ConnectMe Paid Video Consult on iOS and Android, genstures are supported to control remote mouse. Details here.
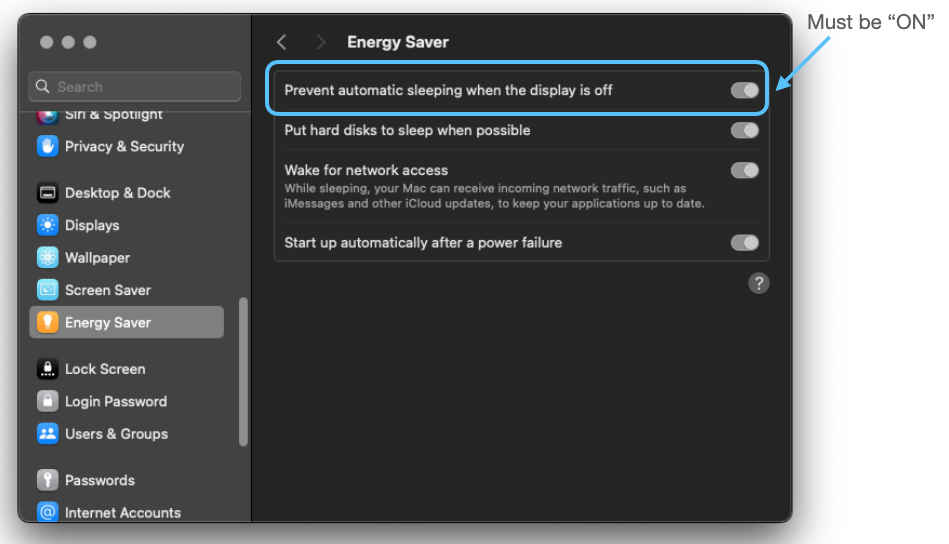
Step 5: Energy saving settings required in macOS
In Unattended Control mode of 2ConnectMe Video Consult Guest app, the power saving settings in macOS may put the system to SLEEP mode. During SLEEP mode, macOS is able to wake up through Wake for Network Access. Such Wake For Network Access (Wake-On-LAN) requires setup another computer or mobile device nearby on the same network to send data to wake up this macOS computer.
In oder to avoid such complicated settings on another computer to wake macOS computer, the macOS should avoid settings triggered in SLEEP mode.
In order to accomodate such macOS security concerns and work with our Unattended Control mode of 2ConnectMe Video Consult Guest, we recommend the following settings in energy saving mode in macOS settings.
Lock Screen settings on macOS
During remote control, lock Screen, screen saver and even screen off on macOS of client PC are all supported. That means any existing settings of your macOS is NO need any changes to support ConnectMe Video Consult Guest app.
Engery Saver settings on macOS
The option on “Prevent automatic sleeping when the display is off” must be “ON”
Step 6: Power & Sleep settings required in Windows
In Unattended Control mode 2ConnectMe Video Consult Guest app, the power & sleep settings in Windows may put the system to SLEEP mode. During SLEEP mode, Windows is able to wake up through Wake for Network Access. Such Wake For Network Access (Wake-On-LAN) requires setup another computer or mobile device nearby on the same network to send data to wake up this Windows computer.
In oder to avoid such complicated settings on another computer to wake Windows computer, it should avoid any settings triggering SLEEP mode.
Lock Screen, Screen Saver and Screen Off settings on Windows
During remote control, lock Screen, screen saver and even screen off on Windows of client PC are all supported. That means any existing settings on lock screen, screen saver and screen display off of Windows on Client PC is NO need any changes to support ConnectMe Video Consult Guest app.
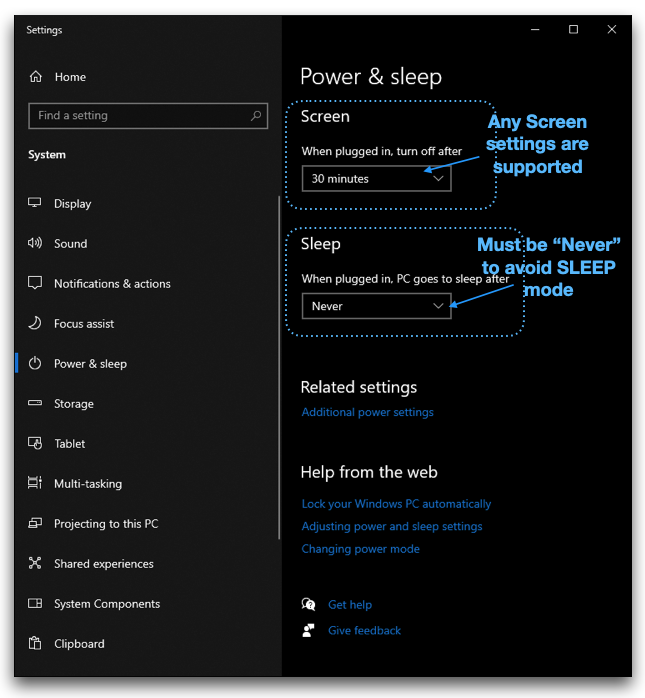
Power & Sleep settings
Sleep for Power saving must be “NEVER” while any Screen settings will do as shown below.
Remote control client desktop (live chat)
Step 1: Client contacts service staff
2ConnectMe Video Consult Guest app lets client to contact service staff either using service staff email address or service staff private chat room short code number. The service staff email address here is the email address used in agent registration of 2ConnectMe service. Please do remember “Uncheck” the Unattended Control checkbox as we are remote control client desktop durng live chat now.
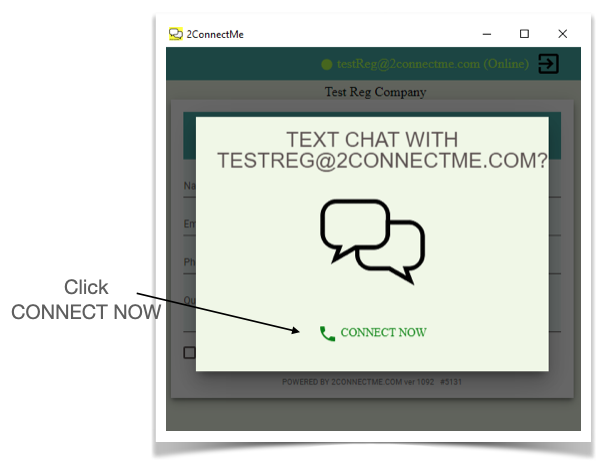
Once 2ConnectMe finds the sevice staff availability, client clicks CONNECT NOW to start connection to service staff.
Step 2: Agent service staff requests to control remote client client keyboard mouse
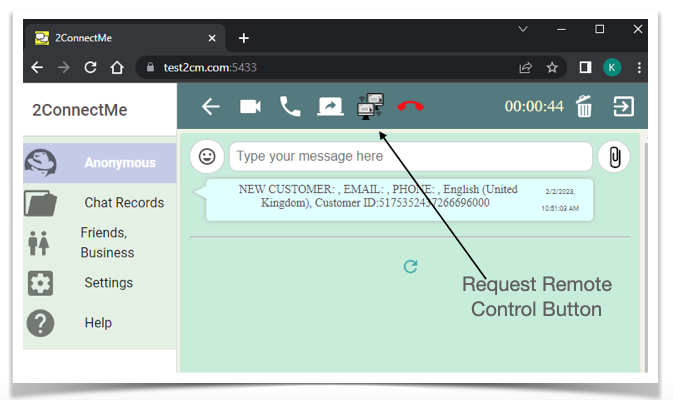
While service staff gets connected with client, service staff can press Request Remote Control button for asking client keyboard mouse control.
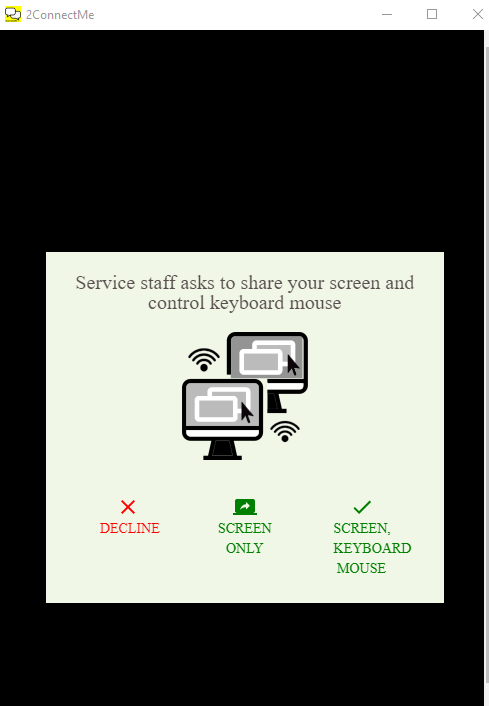
Step 3: Client Approval on sharing SCREEN KEYBOARD MOUSE
In order to protect client from malcious contact attack, client has to approve service staff request for every sharing local keyboad mouse as screen below.
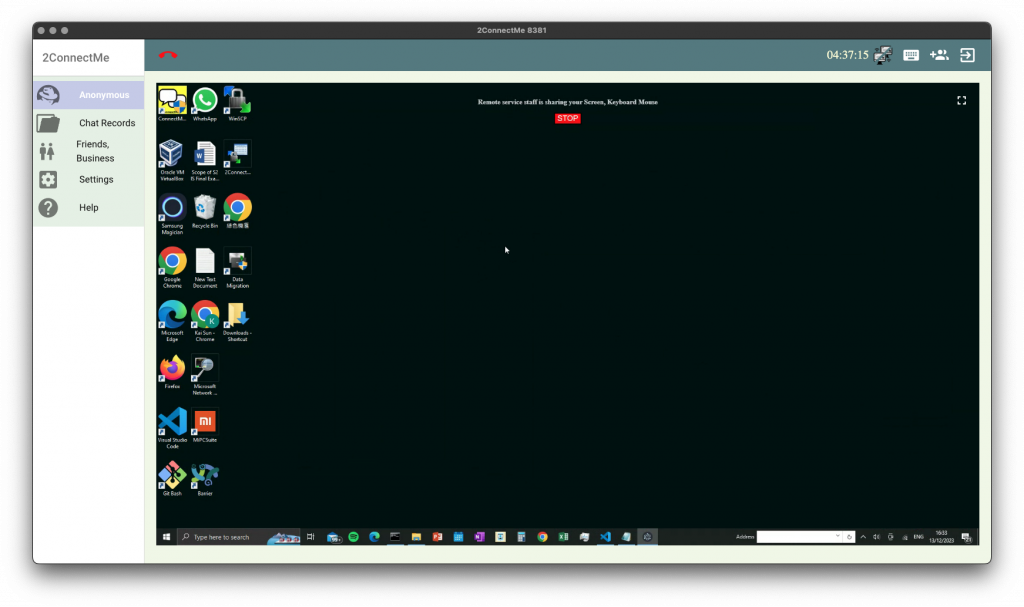
Step 4: Agent starts remote control client desktop
Remote control client keyboard mouse
Whenever the agent service staff console is in FRONT or FOCUS, either in browser or an agent app installed, the agent local keyboard and mouse will become the remote keyboard and mouse of client PC. Agent is freely to control client remote desktop through the local keyboard mouse.
Whenever you find character typing on local keyboard is different from character shown on the client desktop, it is highly likely due to different keyboard layout between Agent and Client PC. It is recommended both should be with “United States U.S. keyboard” layout. For Ubuntu, “United Stated U.S. International” keyboard layout has been verified alright. Feel free contact us in case of any keyboard mapping issues found on your local PC.
Accsssory keys mappings
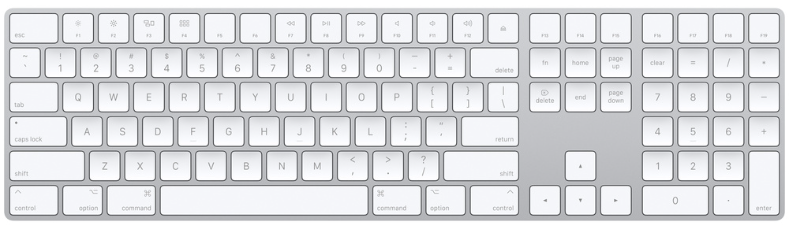
The accessory keys, Control ^, Option вҢҘ and Command вҢҳ for macOS and windows Ctrl, Alt and Win вҠһ are different. It is necessary to have key mappings when the operating systems in agent PC and client PC are different
macOS keyboard with “English (United States) U.S.” layout
Windows keyboard with “English (United States) US” layout
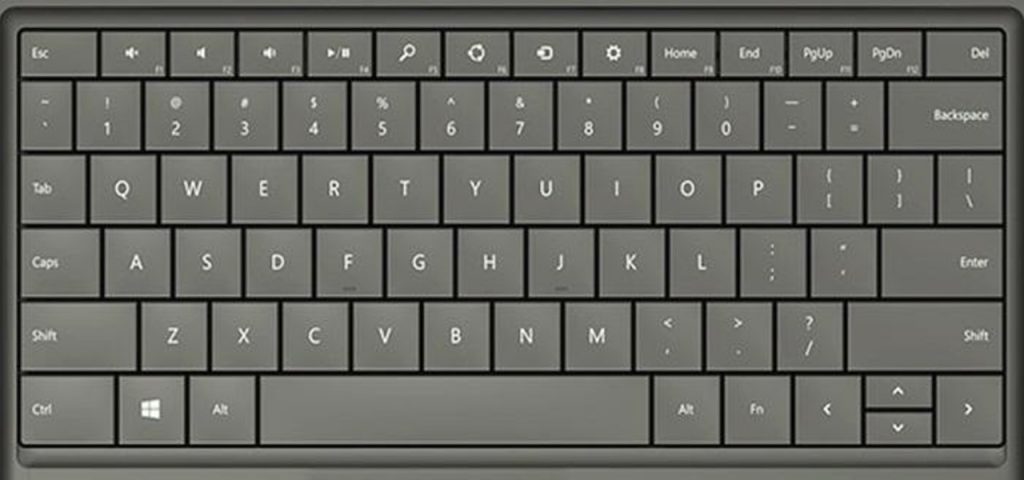
Key mappings between macOS, Windows and Ubuntu
| macOS | Windows | Ubuntu |
|---|---|---|
| Command вҢҳ | Win вҠһ | Super |
| Option вҢҘ | Alt | Alt |
| Control ^ | Control | Control |
Common global shortcut keys mappings
Shortcuts re-mapping is required for agent console at Windows controlling client macOS desktop.
Agent console at Windows -> control -> Client macOS desktop
| Function | Windows shortcuts | macOS shortcuts |
|---|---|---|
| Copy | Ctrl + C | вҢҳ + C |
| Paste | Ctrl + V | вҢҳ + V |
| Cut | Ctrl + X | вҢҳ + X |
| Undo | Ctrl + Z | вҢҳ + Z |
| Search | Ctrl + F | вҢҳ + F |
| Select All | Ctrl + A | вҢҳ + A |
| Replace | Ctrl + H | вҢҳ + H |
Conflicts in Windows Key and Command вҢҳ Key in shortcut keys
To type Copy shortcuts in macOS of client, for example, if agent presses Win вҠһ + C to simulate the remote вҢҳ + C of macOS of client, agent local Windows itself will trigger to prompt the undesirable Windows Start menu. In order to avoid typing Windows Win вҠһ key from having such side effects, the shortcuts typed in agent will be re-mapped to macOS shortcuts in the table above.
In other word, agent still types Ctrl + C key for copy shortcuts. 2ConnectMe will remap it to вҢҳ + C shortcuts of remote client macOS. In fact, it is what the shortcut keys re-mappings table illustrated above.
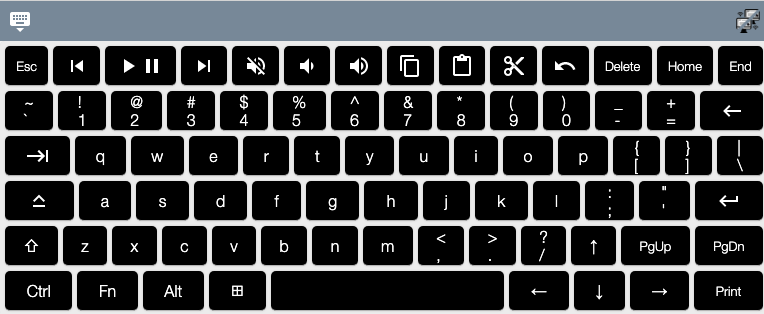
Soft-keyboard on agent service staff console
When agent service staff is working on Windows or macOS, the local keyboard is used as remote keyboard on client PC. There may be some keyboard shortcuts conflict between agent staff local keyboard and the keyboard on remote client PC as illustrated in shortcut keys remapping above.
To avoid such conflicts, WITHOUT shortcut keys remappings, soft-keyboard provides the convenient means to have direct typing on the remote client PC with multimedia and editor shortcuts keys. It is like a local keyboard of remote client desktop.
Currently, only “United States US” keyboard layout is available for soft-keyboard. Therefore, the keyboard settings of client and agent PC must be in “United States US” layout in order for soft-keyboard typing correct characters on client PC.
Remote Control Client desktop from mobile devices
MousePad and handwriting input
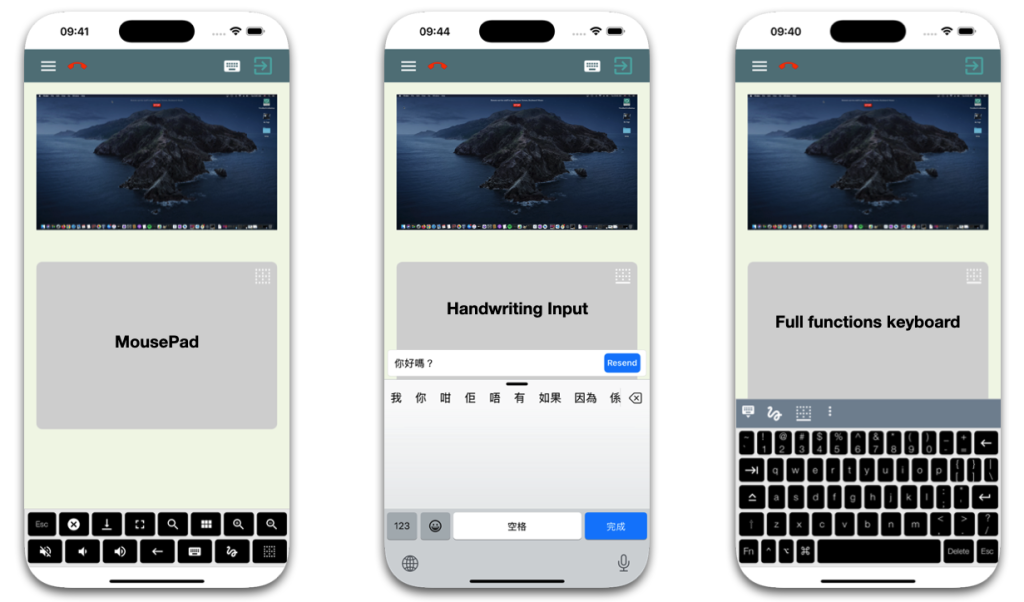
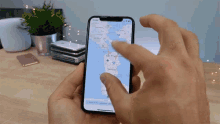
On mobile platforms including Android and iOS, a mouse pad area is for simulating the remote mouse operation through the touches gestures described below. In fact, user is also able to have direct touches on the screen area to control remote PC PC.
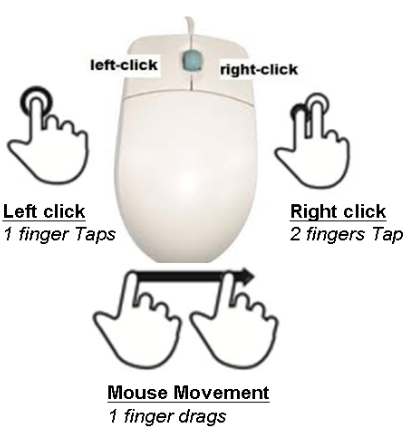
Gestures simulating mouse operations break the barriers in using small screen devices
The agent service staff console on mobile devices, either iOS and Android, are with the following gestures supported. It breaks the barriers of small screen device and empowers agent to control client desktop even on his own small screen mobile device.
- “1 finger moves” means MOUSE MOVE
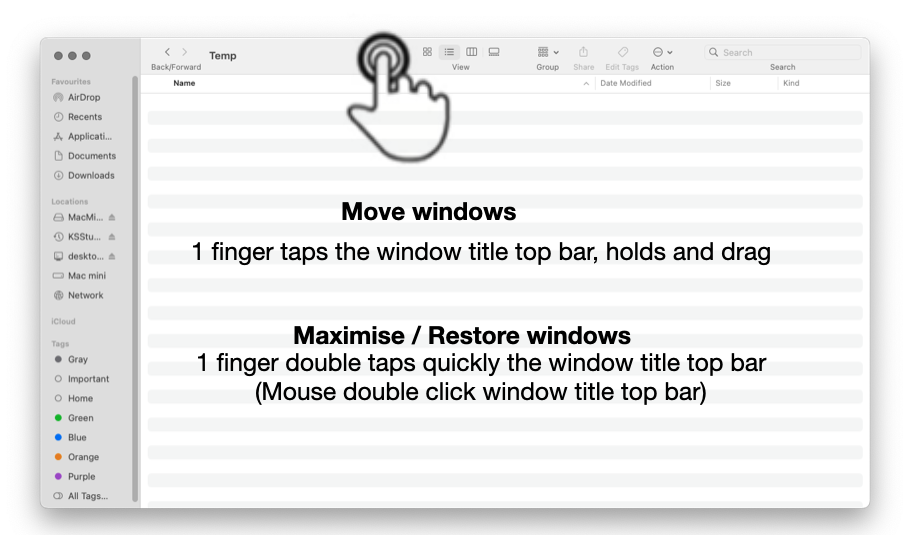
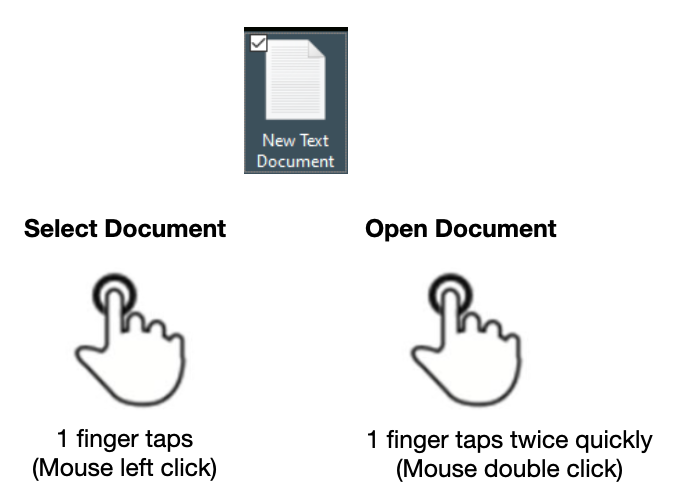
- “1 finger taps” means LEFT MOUSE CLICK
- “1 finger taps twice quickly” means DOUBLE CLICK
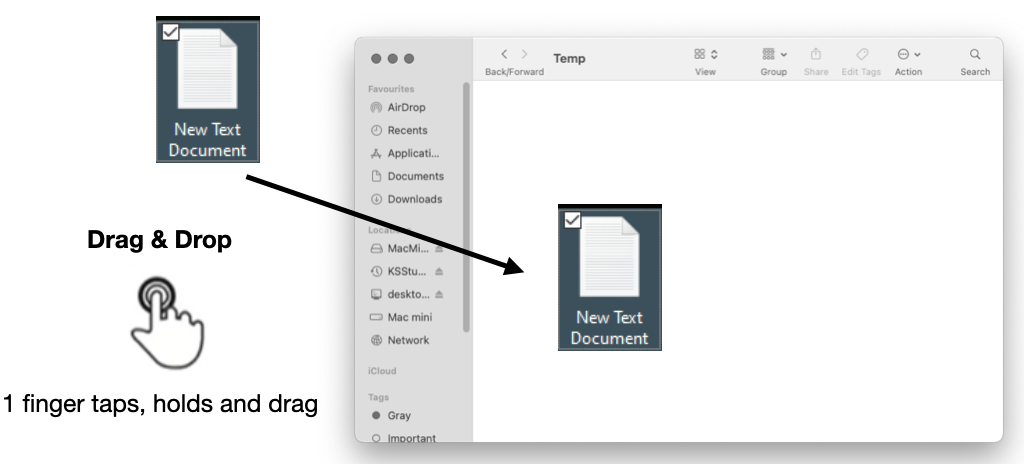
- “2 finger holds and moves” means DRAG & DROP
- “2 fingers tap” means RIGHT MOUSE CLICK
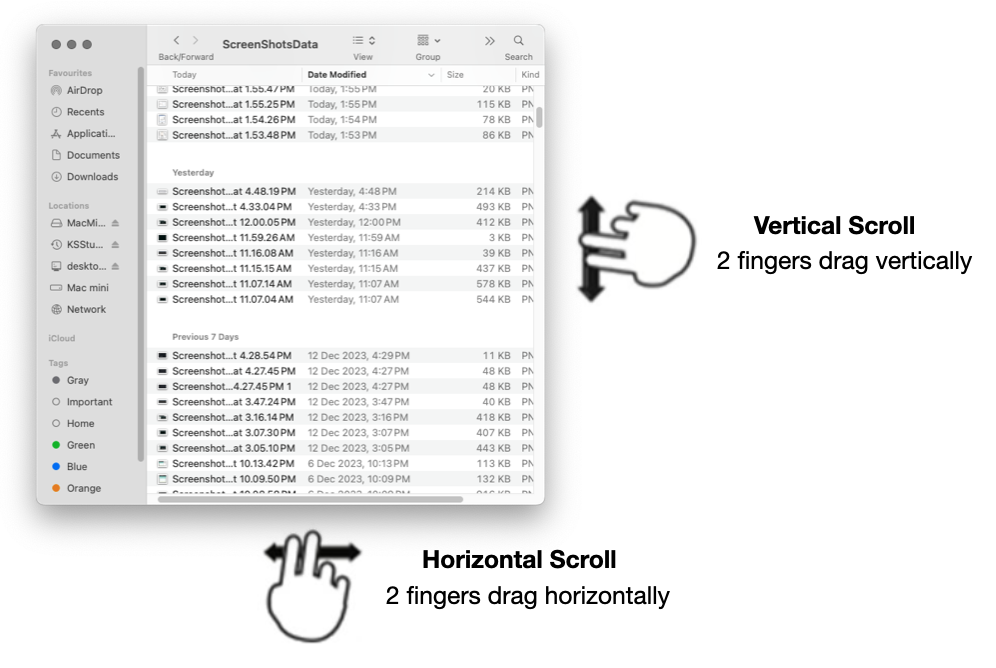
- “2 fingers drag” means MOUSE WHEEL SCROLLING
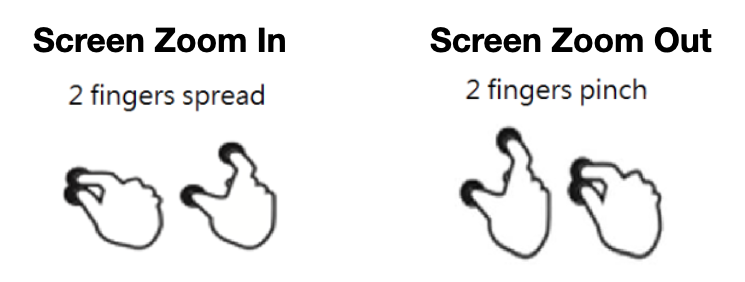
- “2 fingers pinch” means ZOOM OUT screen (Only supported in iOS)
- “2 fingers spread” means ZOOM IN screen (Only supported in iOS)
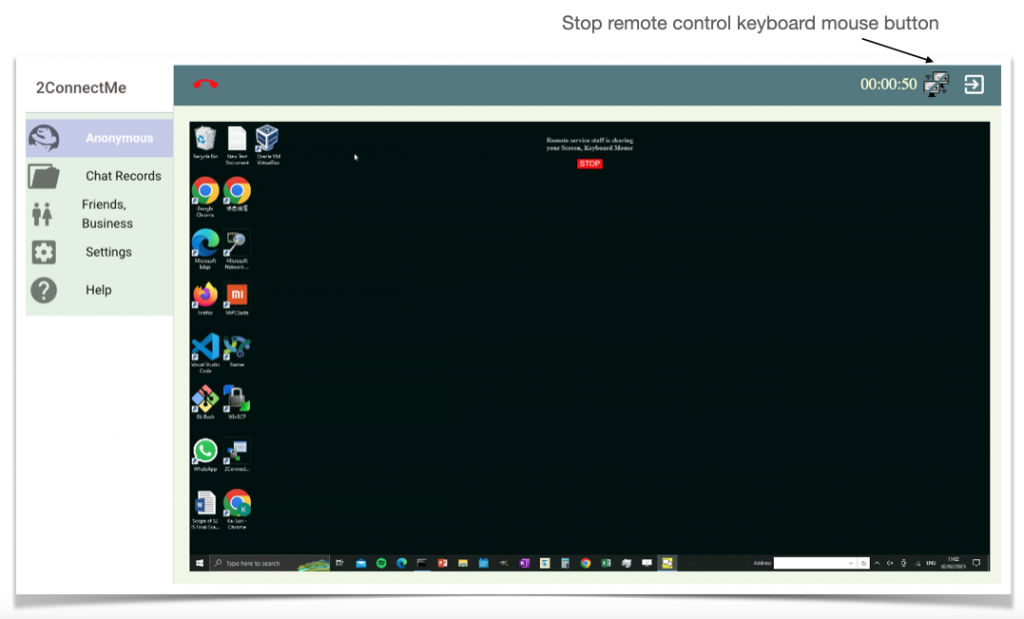
Step 5: Client Stops sharing
While client is sharing the local keyboard mouse, he can stop sharing at any time by pressing the STOP button on the desktop. This button is shown on the top middle of client screen during sharing control.

Step 6: Agent service staff STOPs remote control keyboard mouse
While agent is controlling client keyboard mouse remotely, agent can stop the control through the STOP button on the agent app.
Settings on PC
Keyboard Layout
Since agent use its own local keyboard to simulate the input for the remote client keyboard, both keyboard layout in macOS or Windows for agent and client must be the same. It is recommended to use “United States US” layout because the soft-keyboard, for the time being, only supports “United States US keyboard” layout.
For setup of keyboard layout of Windows and macOS, please refer to keyboard setup in Settings of Windows, macOS and Ubuntu.
Permissions required
2Connectme Video Consult Guest app is able to have voice video chat and share lcoal desktop keyboard mouse control with service staff. Operating System will ask user for permissions to access the following devices.
- Camera
- Microphone
- Screen recording to sharing screen
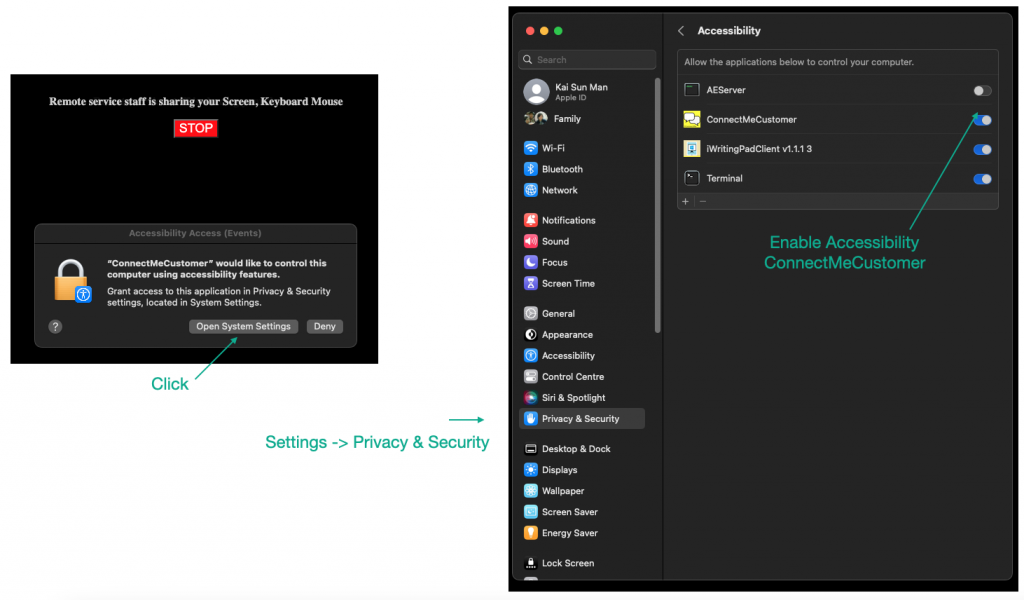
- Accessibility of remote control of keyboard mouse
Microsoft Windows and Ubuntu grants permission by default
Microsoft Windows and Ubuntu grants 2ConnectMe Video Consult Guest app with required permissions when the app is installed. Therefore, during the voice video screen sharing chat, there will be NO annoying sysem dialog box asking for user permission to access camera, microphone and screen sharing. The user experience is great.
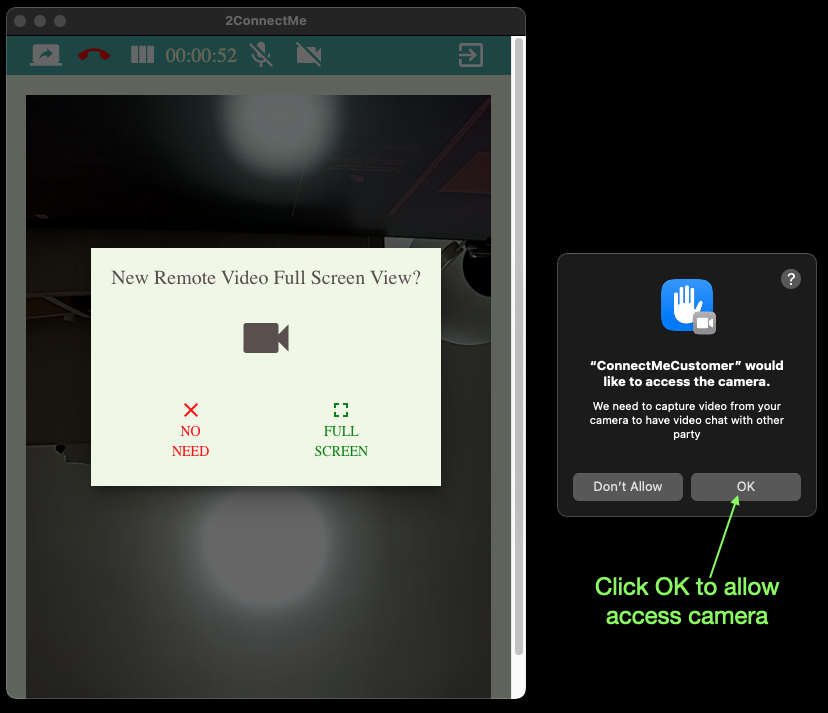
Apple MacOS grants permission on demand
MacOS does NOT grant any permission to the app when the app is installed. Instead, MacOS will ask user for each permission when the app accesses such system devices, e.g. camera, microphone. A system dialog to ask for user permissions will then be prompted by MacOS accordingly.
The following dialog box prompts illustrate settings required for each permission required.
Permission for accessing camera
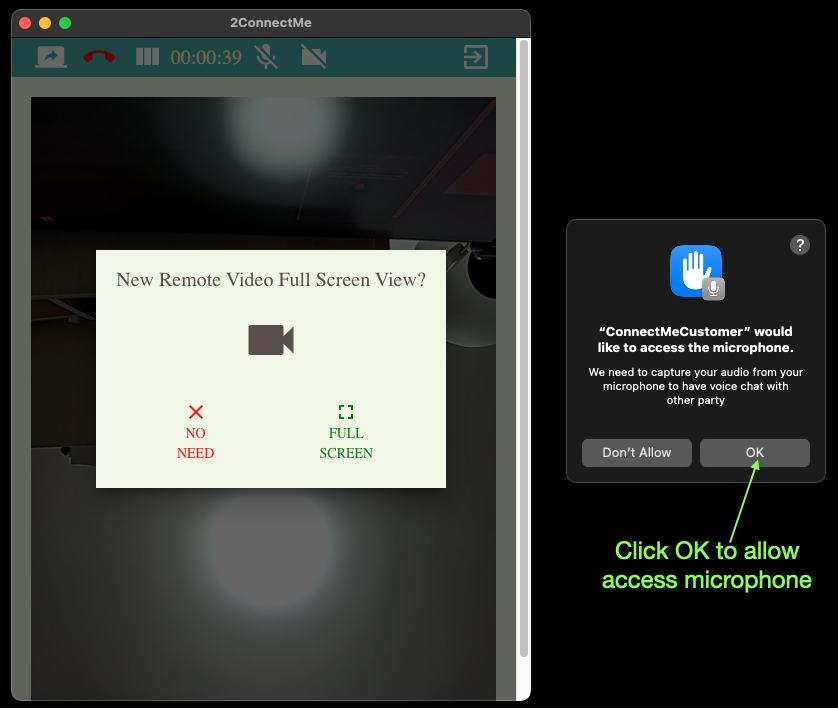
Permission for accessing microphone
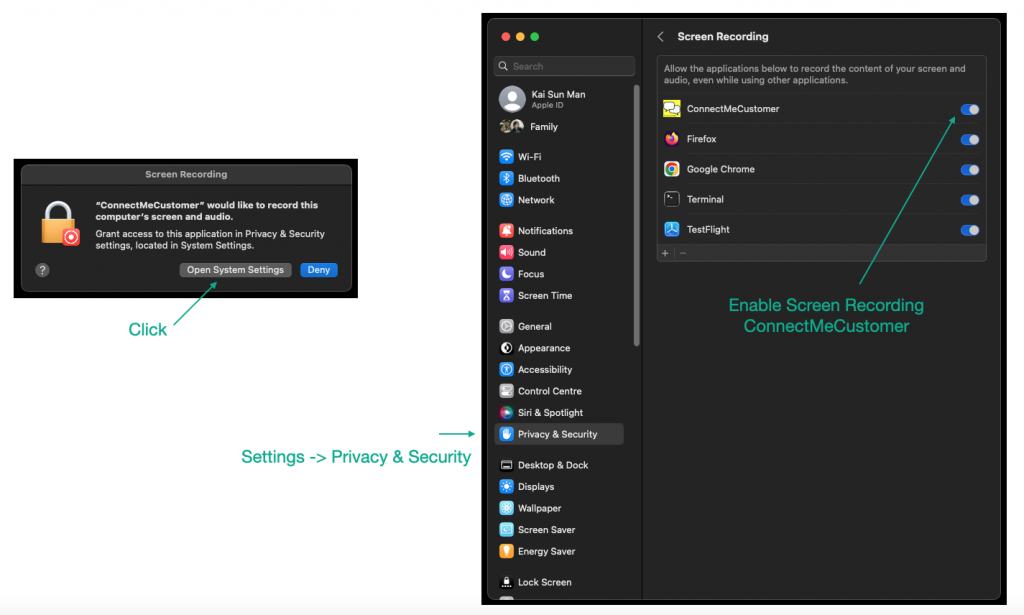
Permissons of screen recording
Permissions of accessibility of remote control keyboard mouse