Please refer to the latest Get Started documentation here
For the details of documentation directory, please refer to here
New User Guides (Outdated)
- Registration
- Ready to serve you
- Private Profile Settings – Customer Greeting & Agent Photo
- Public Profile Settings
- System Customisations
- Create New Agents
-
Integration – PopUp Chat Form & Floating Chat IconВ В


-
Integration – Auto Whisper Short TextВ
-
Integration – Click To Call Button
-
Integration – Direct Contact Form / Voice Chat / Video Chat on HTML web pageВ
-
Integration – Add Live Chat / Contact Form to Google SitesВ
-
Integration – Emails & MarketingВ


-
Integration – Notification BrowsersВ


- Create New Hotline / Chat Room
- Assign New Hotline Chat Room Agents
StartUp or Personal Usage
Registration
-
- Just spend 2 minutes to register a new account with your email address. This email address will be used as user ID to logon. Therefore, every email address can be registered once only. If you do not find the registration email in your Inbox in 1 minute, please check your Junk mailbox. Sometimes, email systems wrongly treat it as a Junk mail.
Watch Video: Sign Up Freehttps://www.youtube.com/embed/0ZjlyOrTgds
- Just spend 2 minutes to register a new account with your email address. This email address will be used as user ID to logon. Therefore, every email address can be registered once only. If you do not find the registration email in your Inbox in 1 minute, please check your Junk mailbox. Sometimes, email systems wrongly treat it as a Junk mail.
Sign Up Forever Free Plan
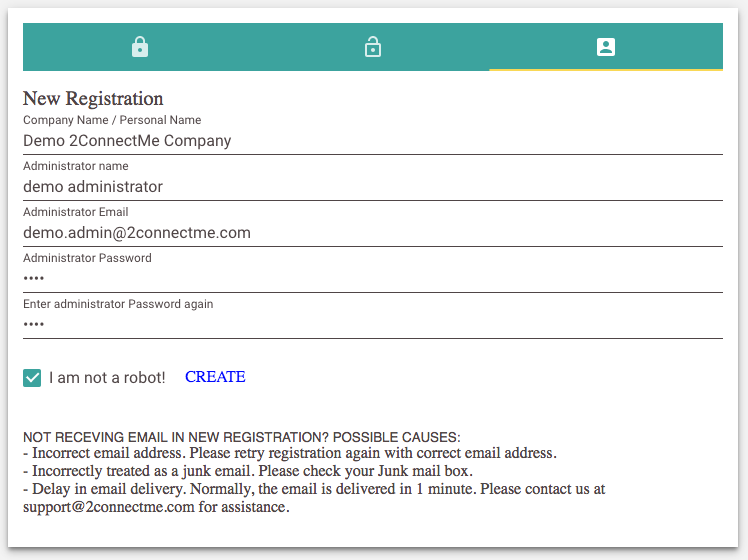
Step 1: New Company RegistrationВ В (Registration link here)
Step 1.1: Input your company information.
The key information is the email address to be registered. The email address will be used as administrator account to logon to 2ConnectMe.В Please be alerted that once the email address is registered as administrator account, it cannot be changed later. Therefore, please be careful in selecting your email address for administrator account.
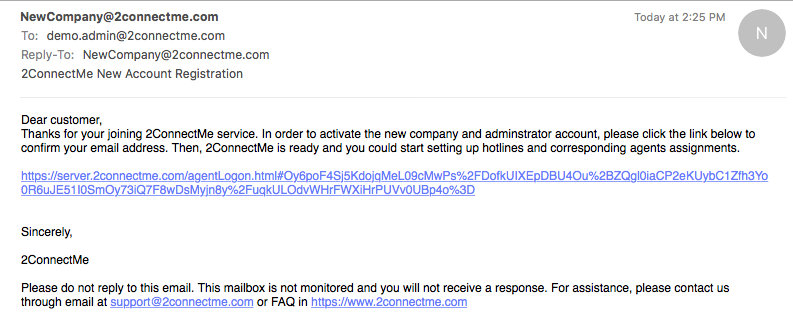
Step 1.2: Registered email address verification.
An validation email is sent to your registered email address. Just click to link to verify the address and it will divert you to agent desktop screen.В If you do not find the registration email in your Inbox in 1 minute, please check your Junk/Spam mailbox. Sometimes, email systems wrongly treat it as a Junk/Spam mail.
Step 1.3: Successful Company Activation & logon first time.
For the first time logon, initial setting wizard helps you setup the service with the minimal configurations. The Initial settings can be changed at any time later. However, it is highly recommended to input all the information to avoid unexpected behaviours of the service.
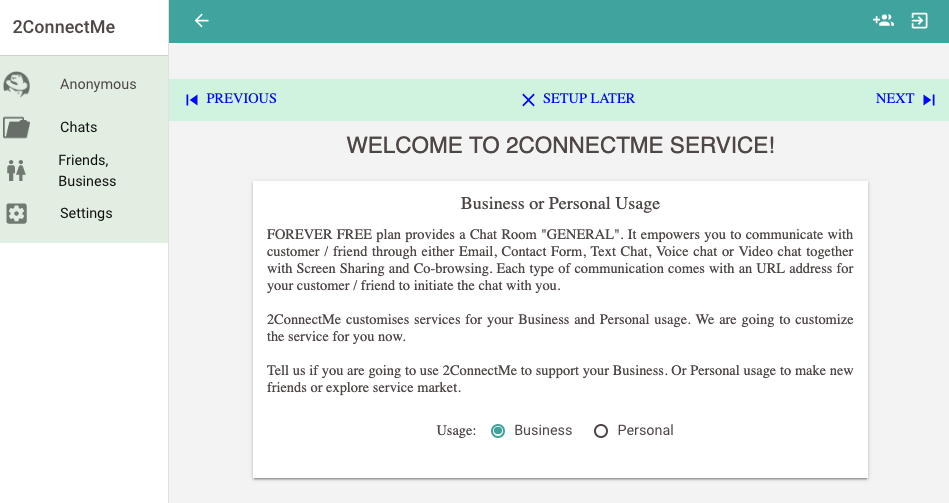
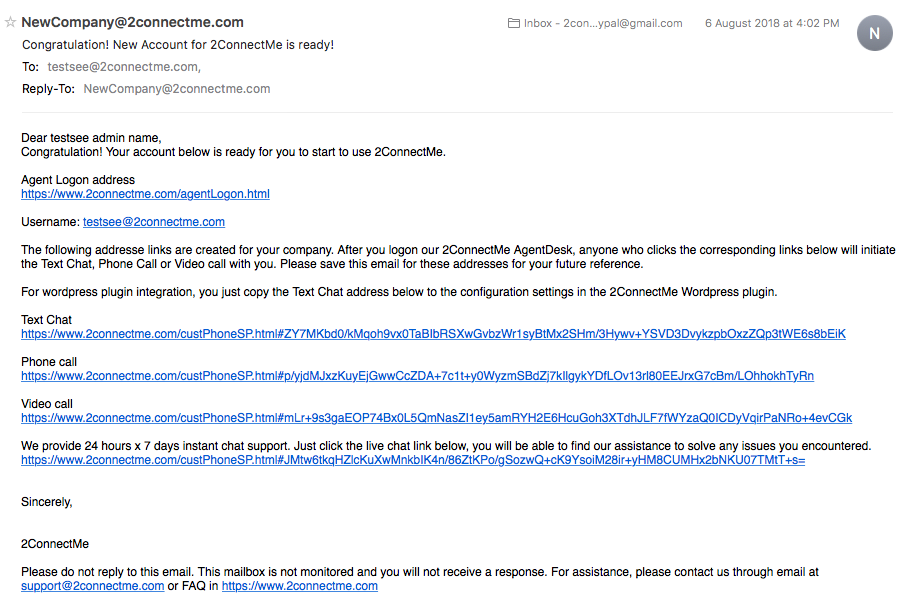
- After validation of your email address, theВ address link of chat room named “GENERAL” for text chat (contact form), voice chat and video chat will be sent to your registered email address.В If you do not find the “New Company” email in your Inbox in 1 minute, please check your Junk mailbox. Sometimes, email systems wrongly treat it as a Junk mail.
Sample Email here
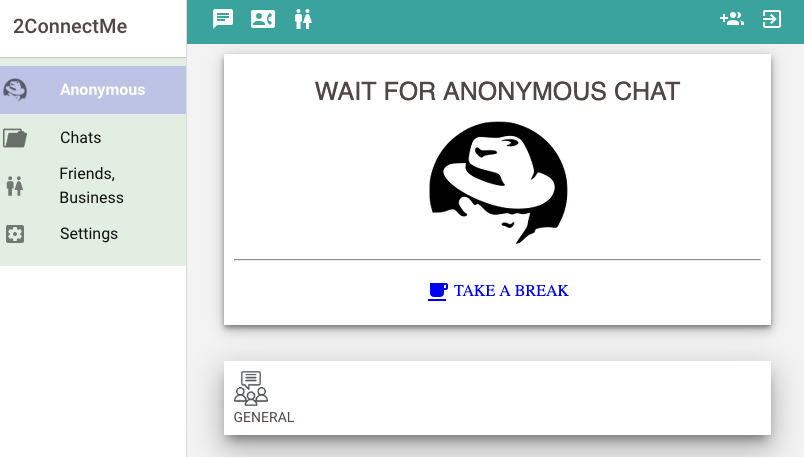
Ready to serve you
- Then, you have your own chat room immediately. Using the new administrator account created, you logon eitherВ mobile AppsВ or through aВ Browser, you become ready for the calls from customers / anonymous who click the chat room address. Then, you can just paste the chat room address link to your social media, e.g. facebook, youtube, linkedln, or your own meeting request for online meeting. Immediately Working. Yes, it is like a magic!
- For example, you may check the youtube video here which we put our live chat URL at the end of video descriptions as a public contact channel.
Example extracted from Descriptions of YouTube video.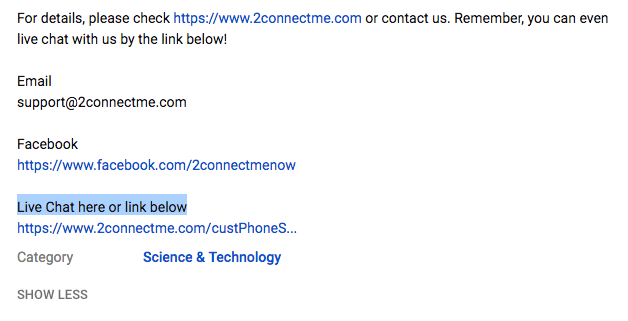
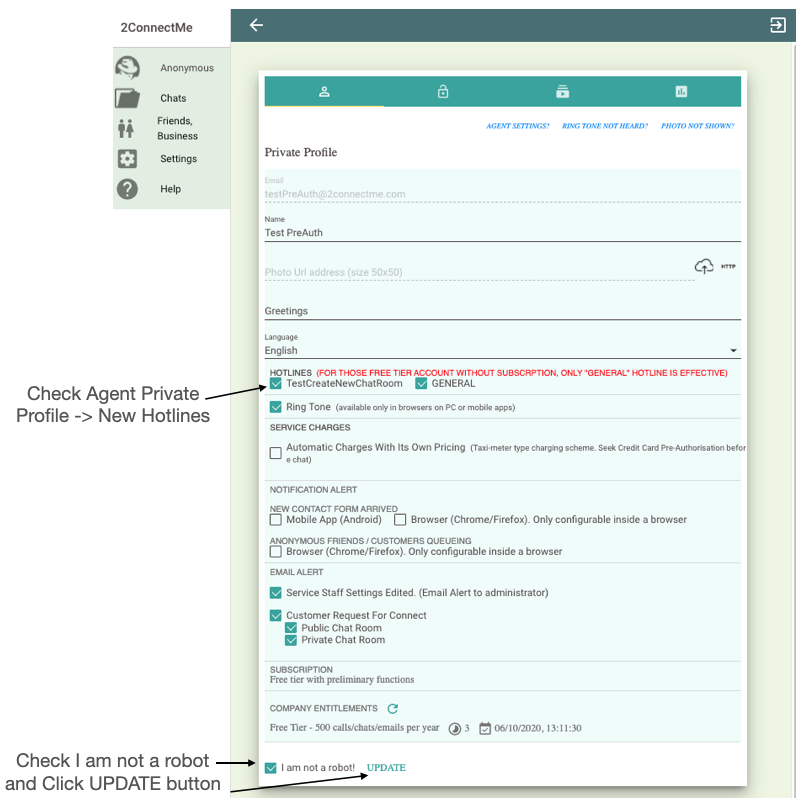
Private Profile Settings- Customer Greeting & Agent Photo
The Private Profile is for configuring the user information which is not shared with public. Particularly, the following fields are important as they are shown to customer at the beginning of each chat.
- Photo Url address
- Greeting to customer
Photo Url can be your actual image file to upload to 2ConnectMe Cloud drive, or your own Http URL link. Please take note that the image file in the 2ConnectMe Cloud drive could be shared with internet users even though “Allow Public Users to View” is not checked.
This Photo Url can also be blank and agent name based Avatar image is generated as agent photo.
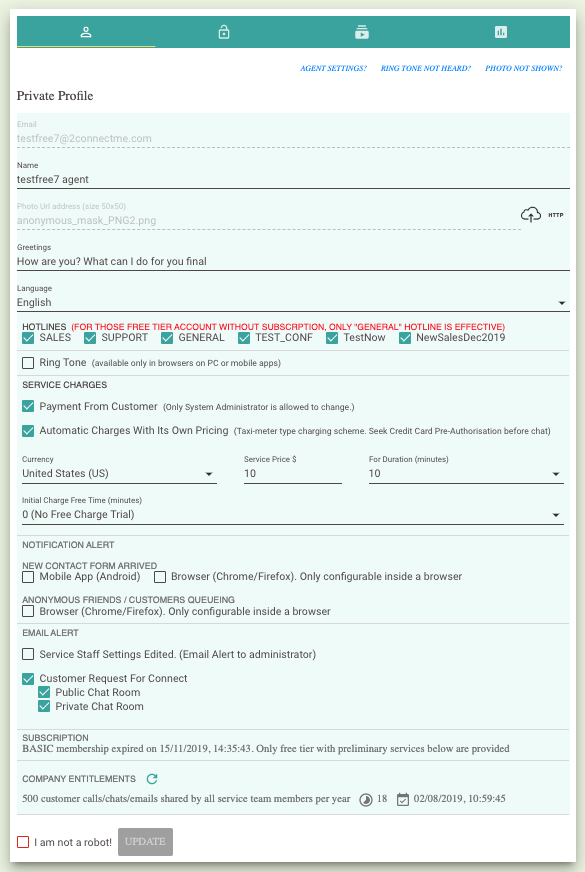
Hotlines / Chat room assignment checkbox is used to configure which hotline / chat room this agent will handle.
RingTone status. Please note that Android / iOS browsers do not allow playing ring tone due to security constraints.
Service Charges: This settings enable agent staff to charge customer during the chat. Two types of service charges method available below.
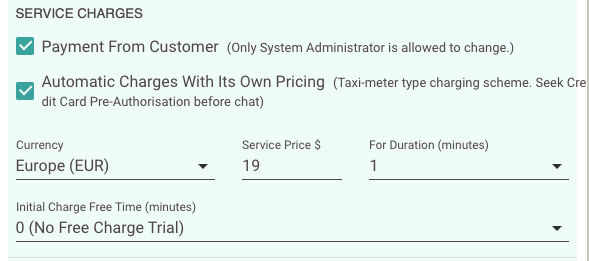
Payment from Customer
- It is Manual Payment Request that allows agent issues Payment Request to customer and let customer pay it through credit card on the fly.
- This option is enabled or disabled by System Administrator Only.
Automatic Charges with Its’ Own Pricing
- When the chat room is enabled with Automatic Charges and agents’ own pricing scheme, agent is able to setup his own pricing.
- Automatic Charges will trigger 2ConnectMe to charge the customer automatically according to the actual duration and pricing scheme of the chat rooms. It also requires customers to provide the credit card details for pre-authorisation before the chats. The final charge is calculated at the end of chats.
- It is a taxi meter like charging scheme. Initial minutes are provided for FREE. Then, it will charge for $ dollars for initial N minutes (minimum charges for initial N minutes). $ dollar will be charged even though the initial conversation is less than N minutes. After Nth minutes, it will charge at the flat rate $ dollars for N minutesВ pro-rata to the remaining duration of service provided.
- Agent’s own pricing scheme for automatic charges is only effective for his own Private Chat Room.
- For the details of pricing scheme setup for the service, please refer to Business Revenue – InApp Payment.
Please take note that
- the charging meter will be updated for every 30 seconds. The meter starts to charge the customer when either party press the red hangup button.В In case either party disconnects accidentally, e.g. due to network stability issues, for over 90 seconds without reconnection online again, 2ConnectMe backend server will still start to charge the customer automatically and both parties will be forced to terminated the chats.
- During the disconnection period and before 90 seconds timeout, the charging meter will stop counting until both parties get reconnected again. However, due to some network delay and stability, it may take up to 30 seconds for local client to detect such network disconnection.
- Again, 2ConnectMe will not store any customer financial information, e.g. credit card. The customer financial information will be sent to the 3rd party payment gateway solution provider, stripe.com. This eliminate the possibility of leakage of customer financial information from 2ConnectMe.
Company Entitlements
The status of COMANY ENTITLEMENTSВ (500 chats shared by all Agents). The figure above shows 3 of 500 chats (Free Tier) Company Entitlements are connected and used.
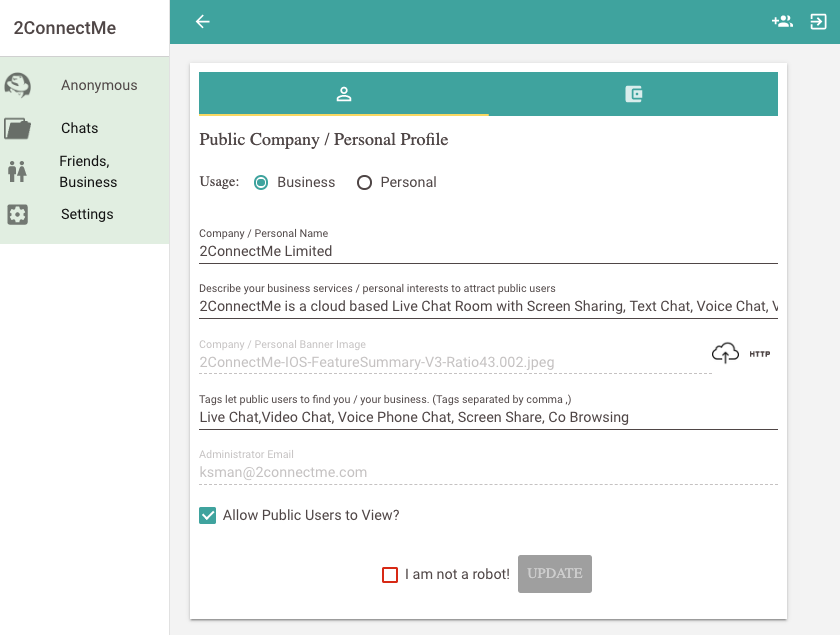
Public Profile Settings
Public Profile is the information for public users to understand your service or yourself. The information is only shared with public ONLY when you check the checkbox the “Allow Public Users to View” as shown in the screen below.
Banner image is shown in the header of your profile. You can upload an image file to 2ConnectMe Cloud drive, or your own URL link. Please take note that the image file in the 2ConnectMe Cloud drive could be shared with internet users even though “Allow Public Users to View” is not checked.
The Tags field contains the short words that could best describe your business or your characters for public users to find you.
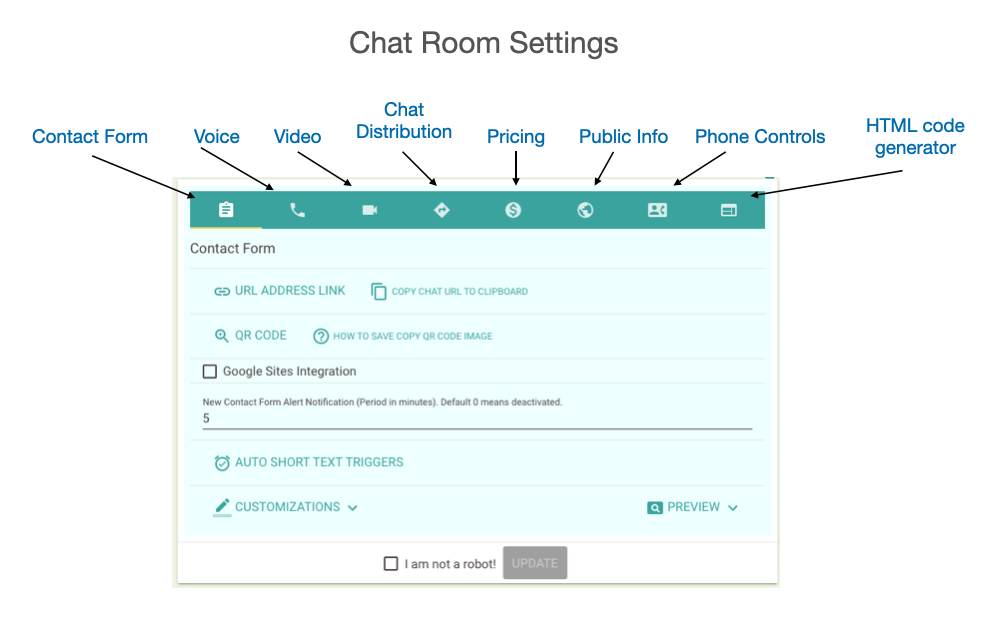
System Customisations
Chat Room Customisation
Each Chat Room is with its own sets of settings which covers almost all the ways how to handle the customer chats. The Chat Room behaviour can be completely different according to the settings (Forever Free plan provides a default Chat Room, GENERAL). The settings include but not limited to
-
- The url information for Text Chat, Voice and Video Chat.
- The layout and color theme of contact form and the behaviours of contact form, e.g. Google Sites support, Auto-Text Triggers…
- The priority of how to distribute the incoming chats to your agents,
- assign agents according to the quickest response to the request,
- assign the same agent to serve the same customer in the future chats,
- allow customers to leave email message when there is no idle agent.
- or allow customers to activate email alert when the agent is idle again.
- In App purchase, either Manual Payment Request or Automatic Charges
- Public Profile information in communications with customer, e.g. email.
- Restrict the chat buttons on Customer Phone and Agent Phone.
- HTML code generator for sticky Pop Up contact form on any html webpage.
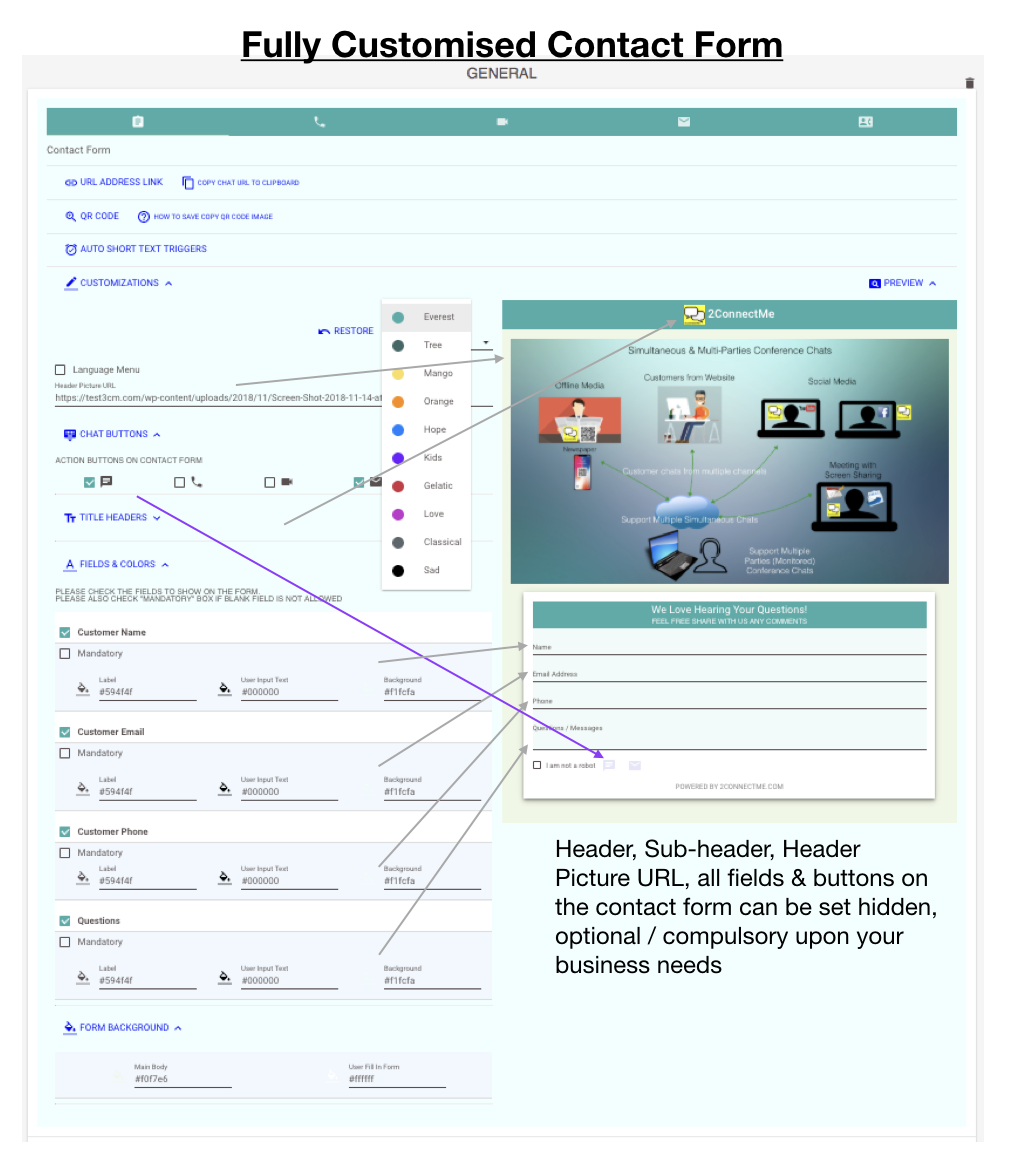
 Contact Form Customisation
- The Contact Form can be fully customised such as color theme, optional text fields, header picture, optional call buttons for text chat, voice and video call.
Screen: Contact Form customisation
Chat Assignment
Chat Assignment settings in the Chat Room provides more flexibility in distribution of chats to agents.
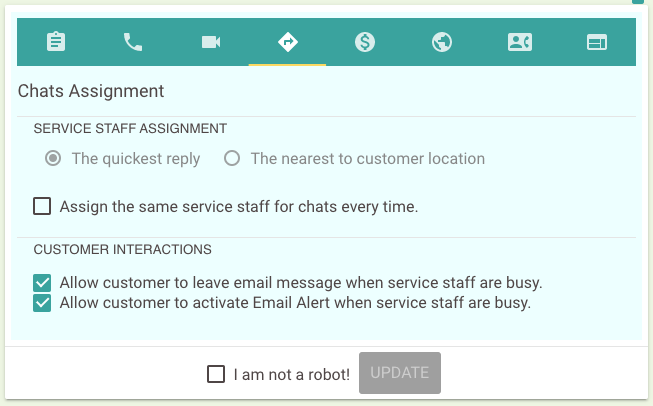
Service Staff Assignment
It tells 2ConnectMe distribution engine how to select agent to handle the customer chats.В Two options are provided.

- The quickest reply which means 2ConnectMe will select the agent who is the first one to reply to the request. This is the default.
- The nearest to the customer location which means 2ConnectMe will select the agent who is near to the customer place.В (This option is only available for those users with service subscription for Large Enterprise.)
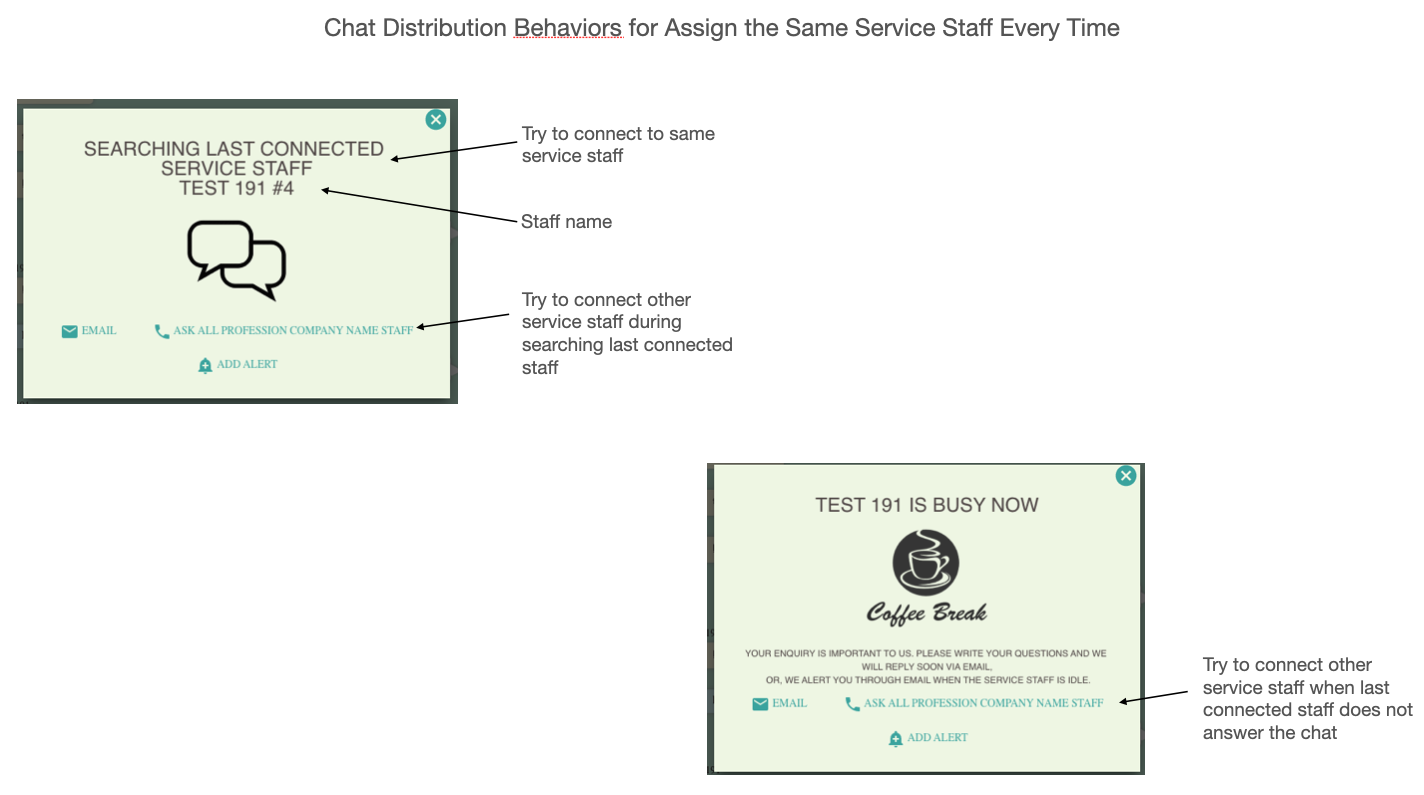
Assign the same service staff for chats every time
![]()
- Once the customer chat is answered by the agent, 2ConnectMe will try to assign the same agent to handle the same customer chats in the future.
- Meanwhile, customer is allowed to ask all other agents to answer the chat as well while waiting for the last connected agent.В The screens shown below are withВ “Ask All Agents” button in the chat distribution process.
 Customer Interactions

- Allow customer to leave email message when thereВ is no idle agent. Without this option checked, EMAIL button below will not be shown during the chat distribution process.
- Allow customer to activate email alert when there no no idle agent. Without this option checked, ADD ALERT button below will not be shown during the chat distribution process.
- The screens below illustrate where these EMAIL and ADD ALERT buttons are shown during chat distribution process.
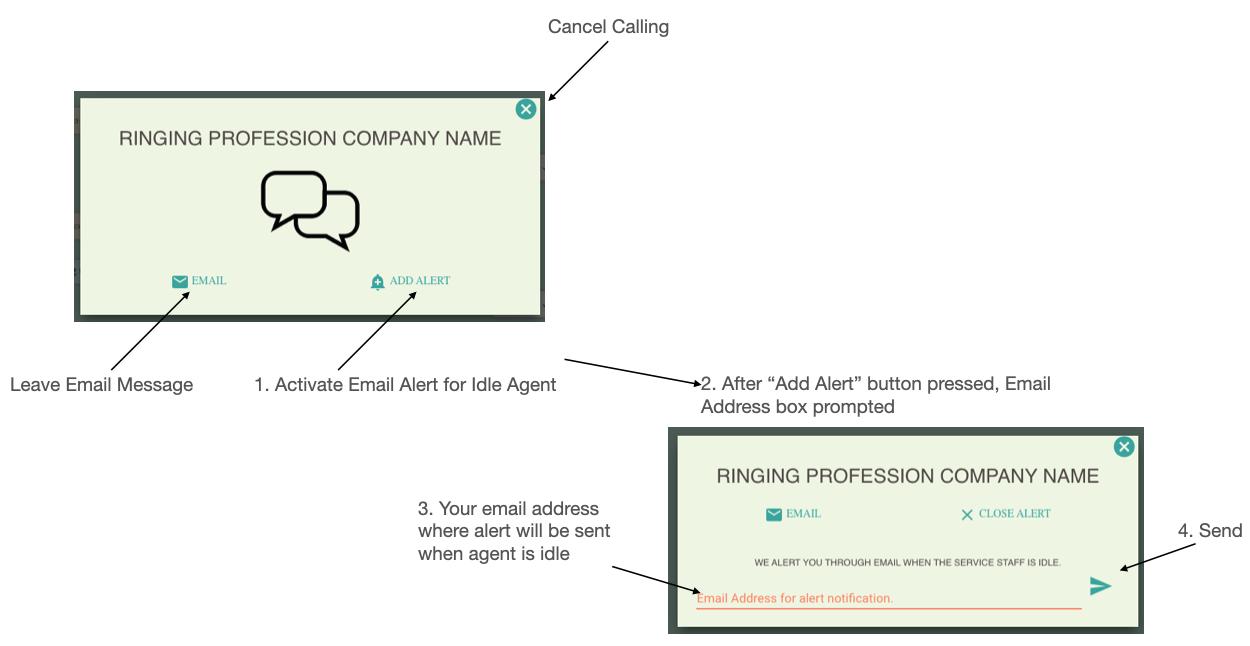 Allow customers to activate Email Alert
2ConnectMe backend server will send email to agents and customers where certain pre-defined condition occurs.
- Email sent to administrator when agent private profile is edited and saved.
- Email sent to agents and customer when customer “Add Alert” during waiting for agent to answer. Require to enable settings in Private Profile of Agent and Chat Room Settings as shown below.
Email Alert requires settings in the Chat Room and Agent Private Profile.
Settings in Chat Room – Chat Assignment as shown in the previous section above and option below. This settings is to enable the “Add Alert” button option for customer to add email alert during distributing chats to agents.
![]()
Settings in Private Profile of Agent
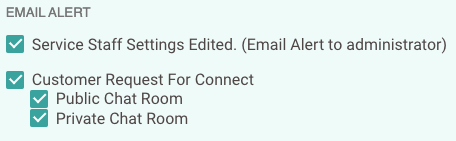
Email Alert settings aboveВ in Private Profile of Agent is to let agent to control if he would like to receive this email alert from 2ConnectMe.
Every email sent by the 2ConnectMe will consume the quota of 500 Company Entitlements.В
Pricing Scheme
For details of Pricing Scheme, please refer to Business Revenue – InApp Payment
Customer Phone & Agent phone Customisation
- The action buttons on the customer phone and agent phone can be customised for each of chat room. That means you can control what actions can be taken by agent and customer during the chat conversation for each of chat room.
The action buttons include
- Text ChatВ

- Voice Chat

- Video Chat

- Screen Sharing

- Conference Chat

- Simultaneous Customer Chats
 Screen: Configure Chat buttons on Customer Phone
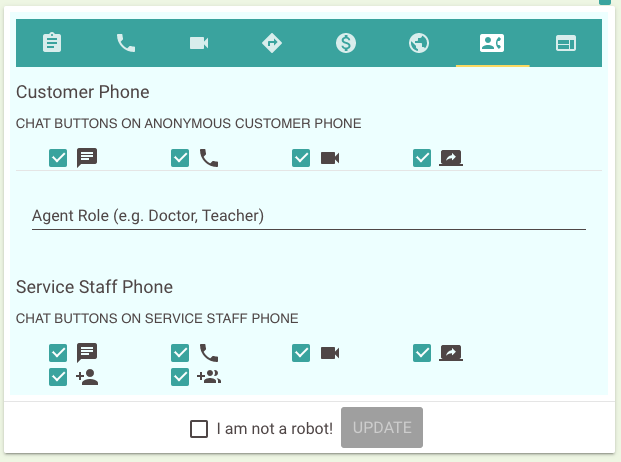
- Text ChatВ
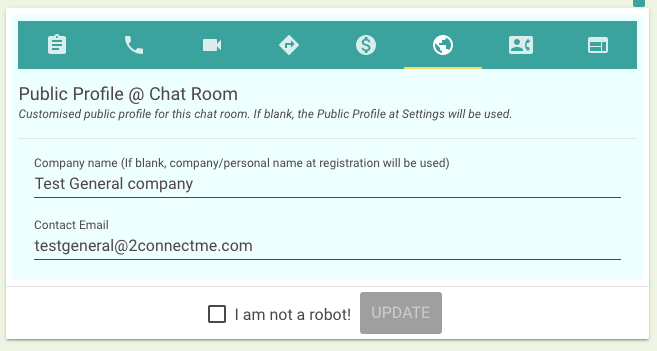
Public Profile @ chat room
During distributing customer chats to agents, there are scenarios to send email to customers to inform of idle agents status, Invoice Receipts, or Email message left. This public profile information will be used in such email to communicate with customers.
In other words, each chat room represents your separate client company in your email communications.
- Company Name and Contact Email which are used in automatic email sent to customer when customer leaves messages or service receipts. If this field is empty, the default company name and contact email from the Public Profile will be used instead.
Private Chat Room
Each agent is with his own Private Chat Room. Public Chat Room shares all the settings with Private Chat Room except that the customer chat in Private Chat Room will only be distributed to this specified agent only.
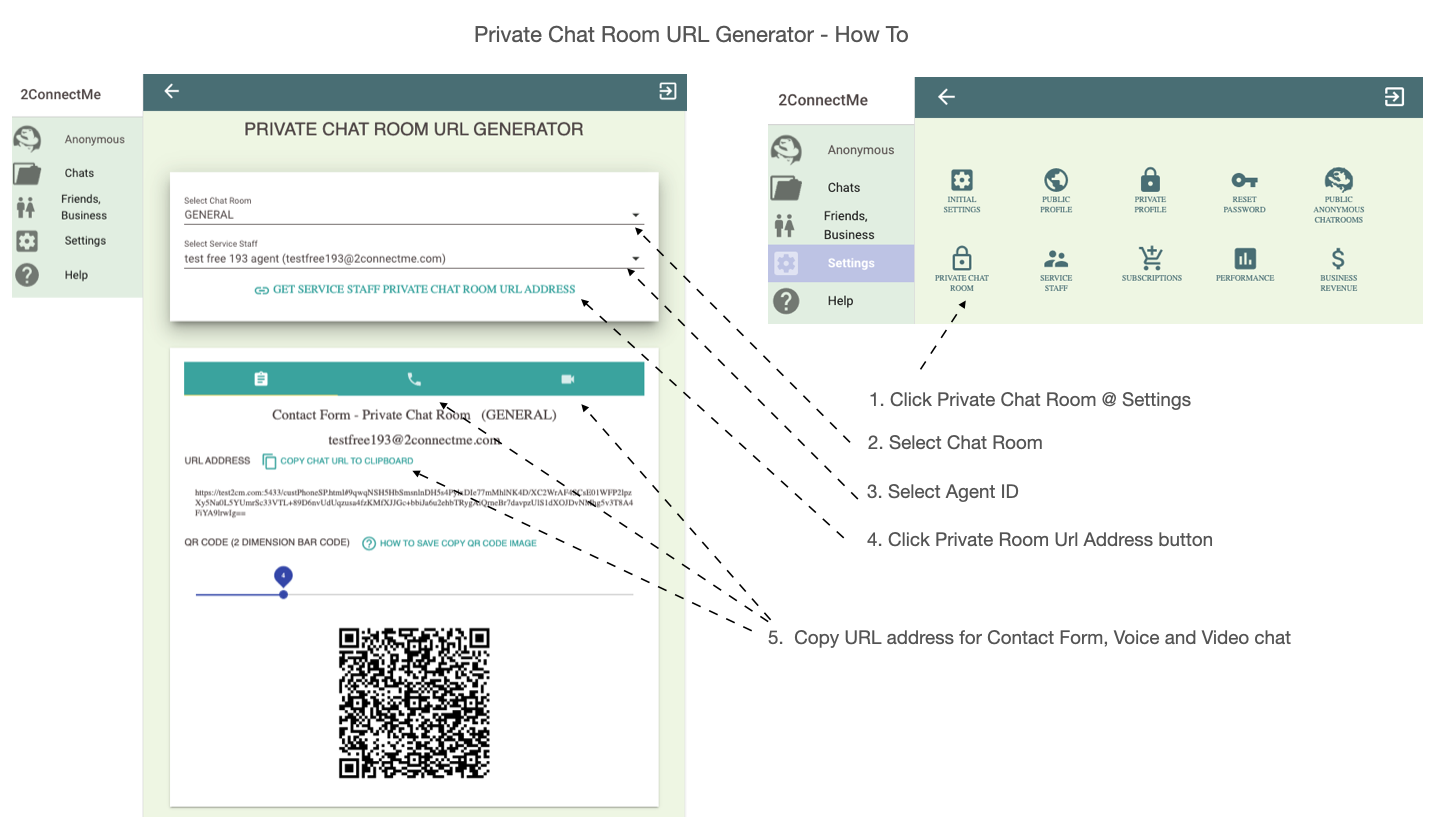 Private Chat Room URL Generator generates the URL link for Contact Form, Voice Chat and Video Chat.
Create New Agents
- Even with your Free Tier account, you are entitled to have any number of new agents to handle 500 customer chats/calls per year. (After 500 customer connected chats / calls for a year, the 2ConnectMe account administrator ,the 1st user opening the account,В is still able to handle the customer chats/calls.)
New Agent Creation
The free tier account already comes withВ unlimited number of agents.
The following illustrate how to add a new staff (Agent) to handle the customer from different hotlines chat rooms.
-
Go to Settings -> Service Staff
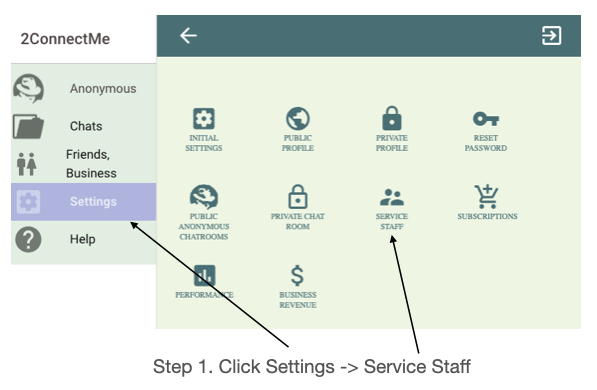
- Click New Service Staff Tab
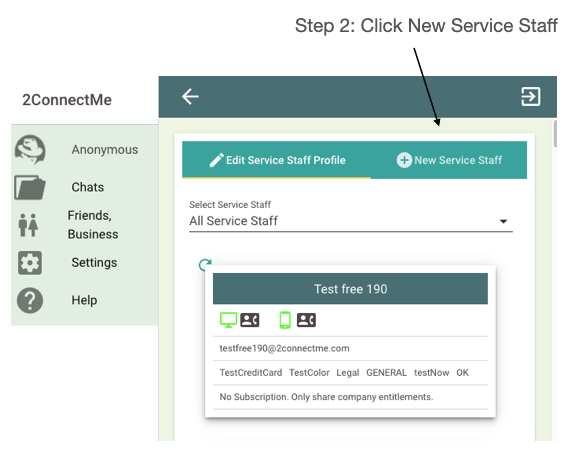
-
Enter Service Staff Information
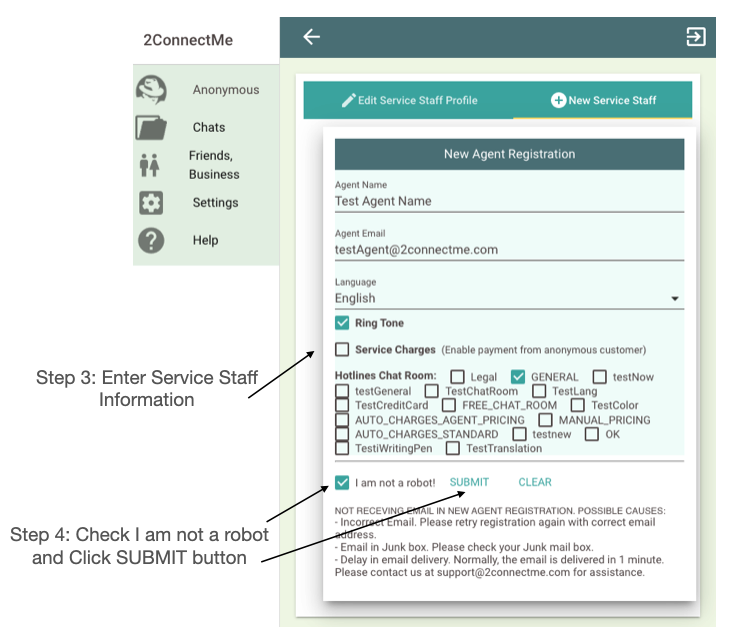
- Fill in the agent information and check the “Hotlines Chat Room” which this new agent will handle.В
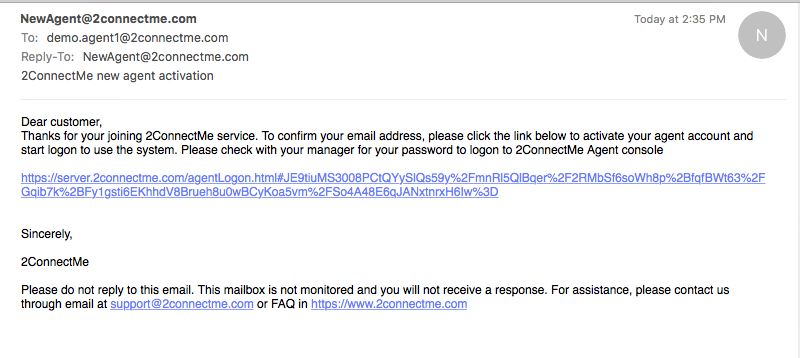
Agent registered email address verification
- An validation email is sent to your registered email address. Just click to link to verify the address and it will divert you to change password page for agent first logon.В If you do not find the “New Agent” email in your Inbox, please check your Junk mailbox. Sometimes, email systems wrongly treat it as Junk mail.
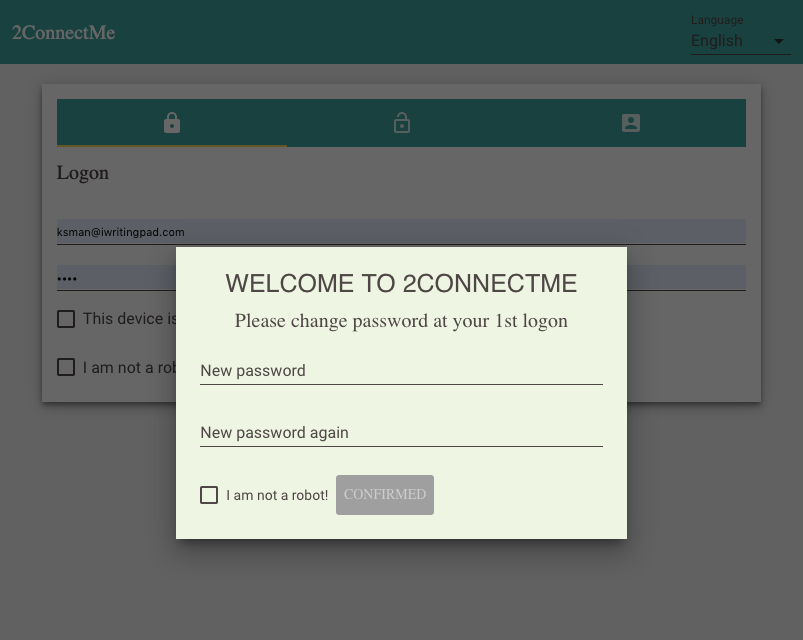
Agent Logon Screen First Time – Change Password
Successful Agent Logon
Integration – PopUp Contact Form and Floating Chat Icons
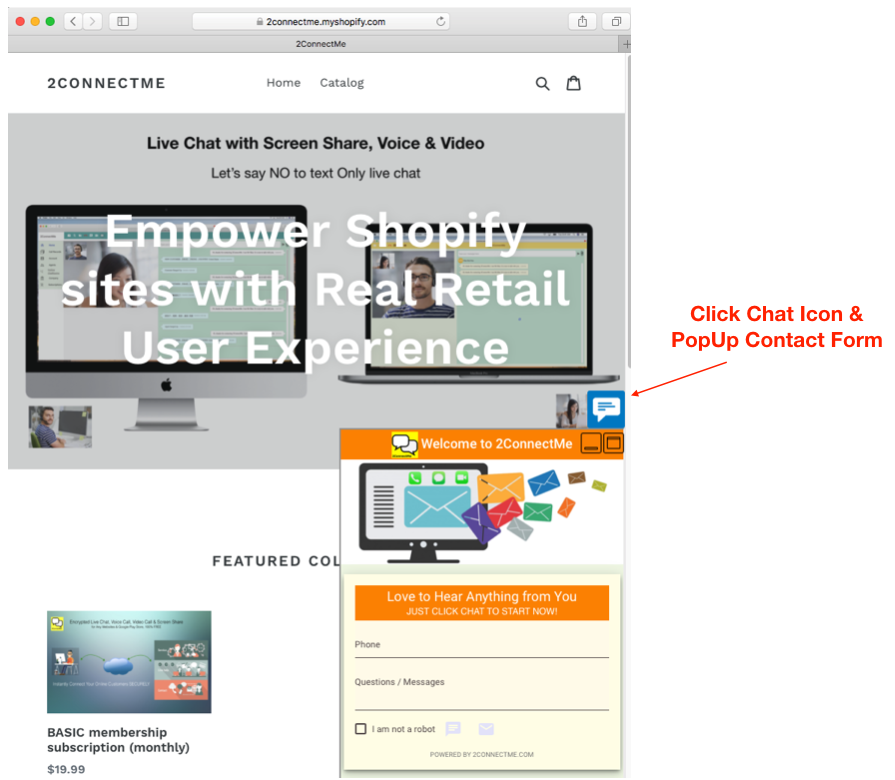
Floating Chat Icon is sticky on the webpages. Once user clicks or mouse hovers the floating icon, either the contact form, voice chat or video chat will pop up. This provides the most convenient channel to let customers to contact your business at any time. 2ConnectMe supports PopUp Form and Floating Chat Icon on WordPress, Shopify, or any normal HTML webpages.
В В WordPress Website
For those websites built on WordPress, we have WordPress Plugin for PopUp contact form.
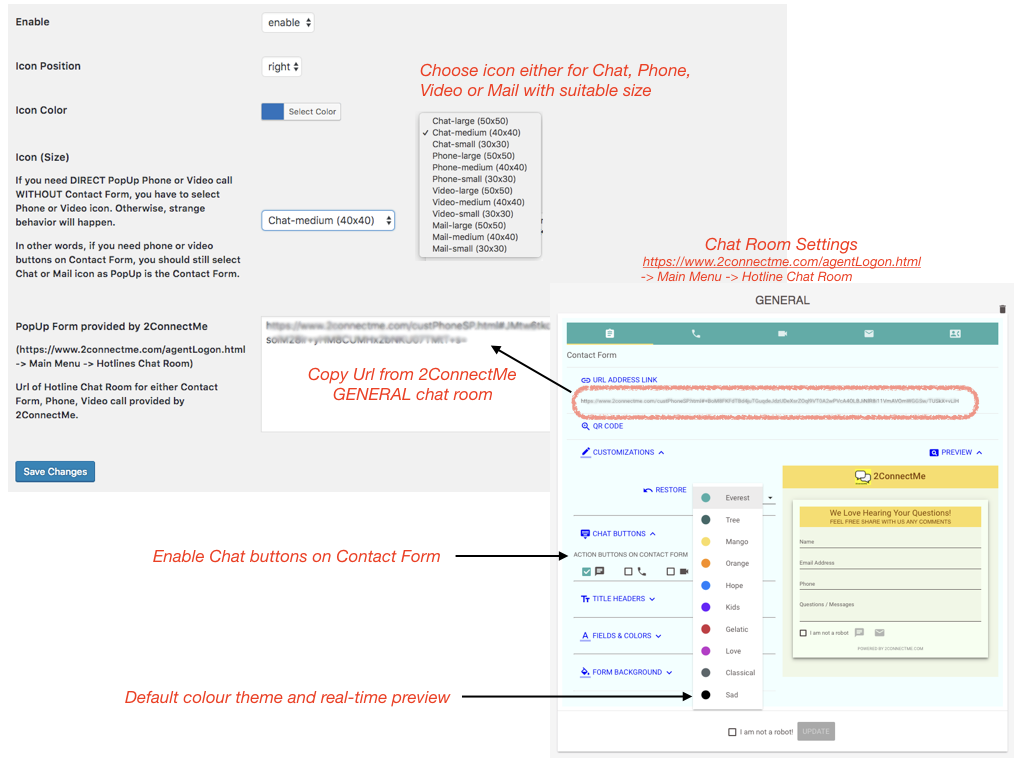
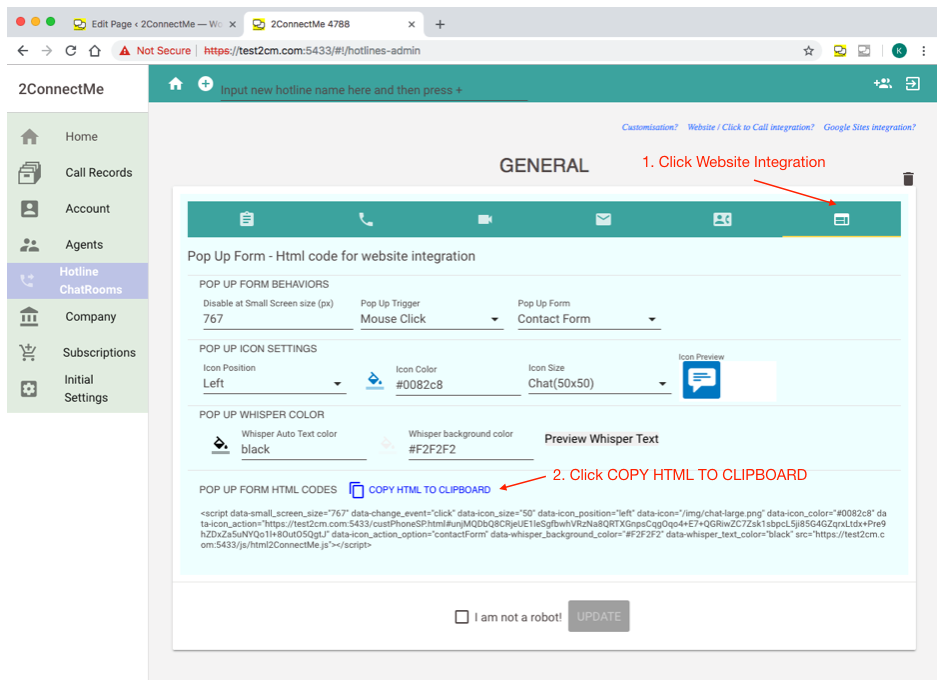
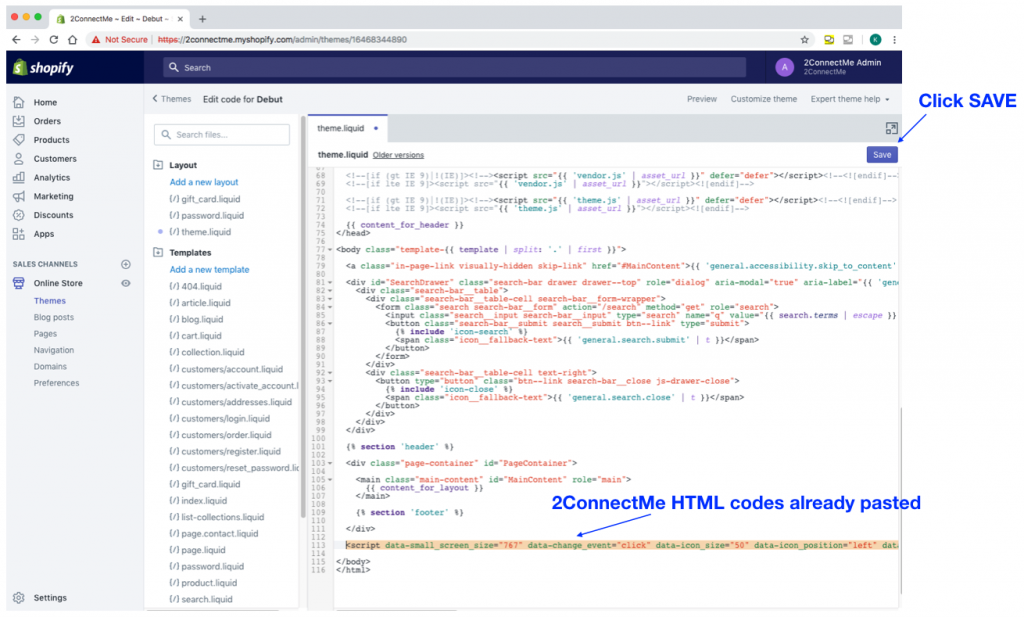
Screen: WordPress Plugin Settings 1. Install “Business Chat Room – 2ConnectMe”В plugin through WordPress store. 2. Activate the plugin through ‘Plugins’ menu in WordPress (Plugins -> Installed Plugins -> Activate “Business Chat Room – 2ConnectMe”) [Click Activate] 3. Open New Account in 2ConnectMe here – Only takes you less than 5 mins to complete. 4. Copy Url address for either “Contact Form”, В “Phone / Voice”, or “Video” of “GENERAL” hotline for WordPress in 2ConnectMe and Paste in WordPress Plugin. Setup HTML codes for chat room With 2ConnectMe Chat Room HTML codes generated above (Integration – HTML webpage), such HTML codes will be copied and pasted to the <body> of Shopify Theme. Details Setup Steps - Shopify
Open New Account in 2ConnectMe and copy & paste Url address of contact form
![]() В HTML webpages
В HTML webpages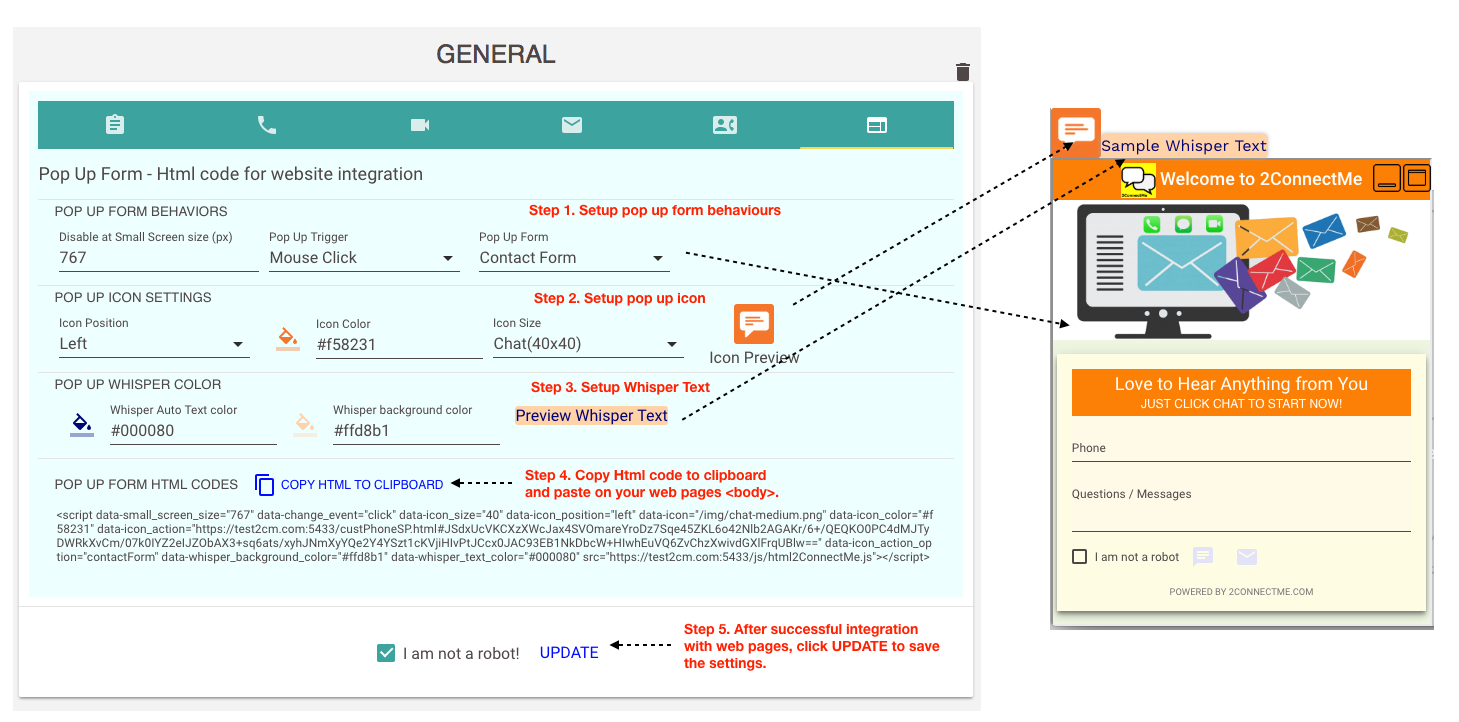
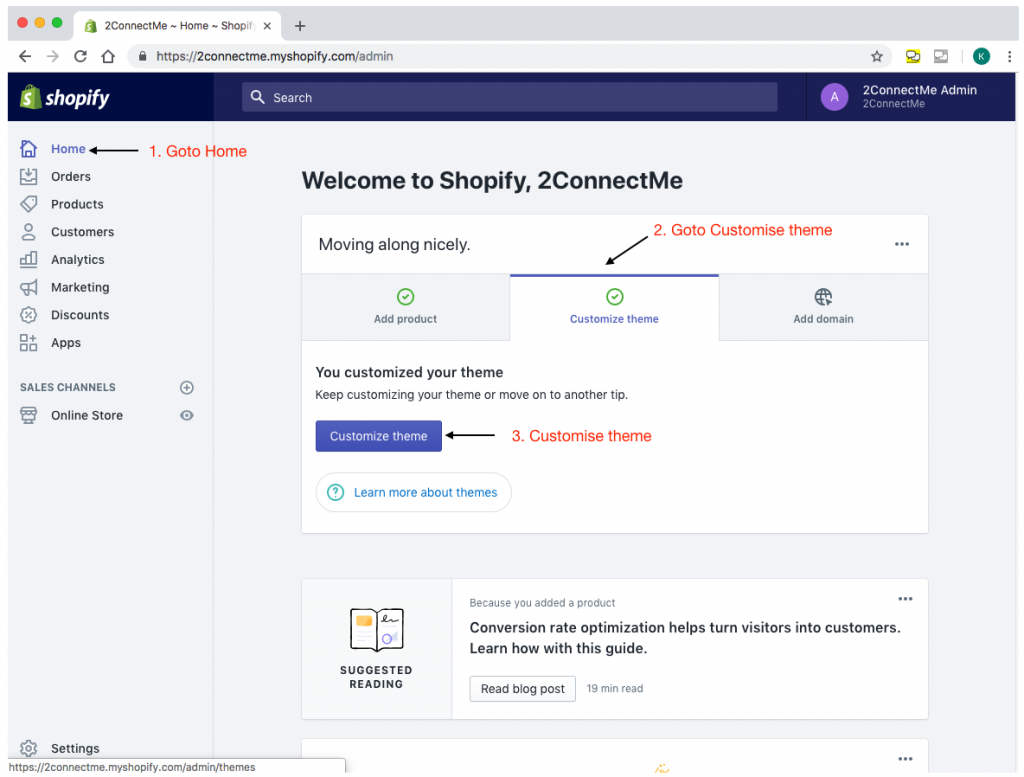
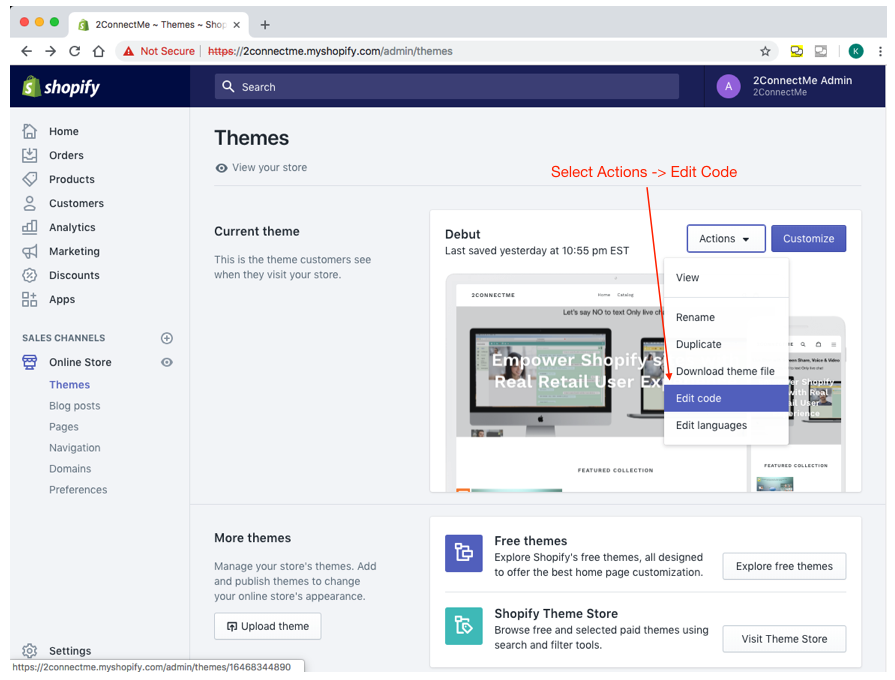
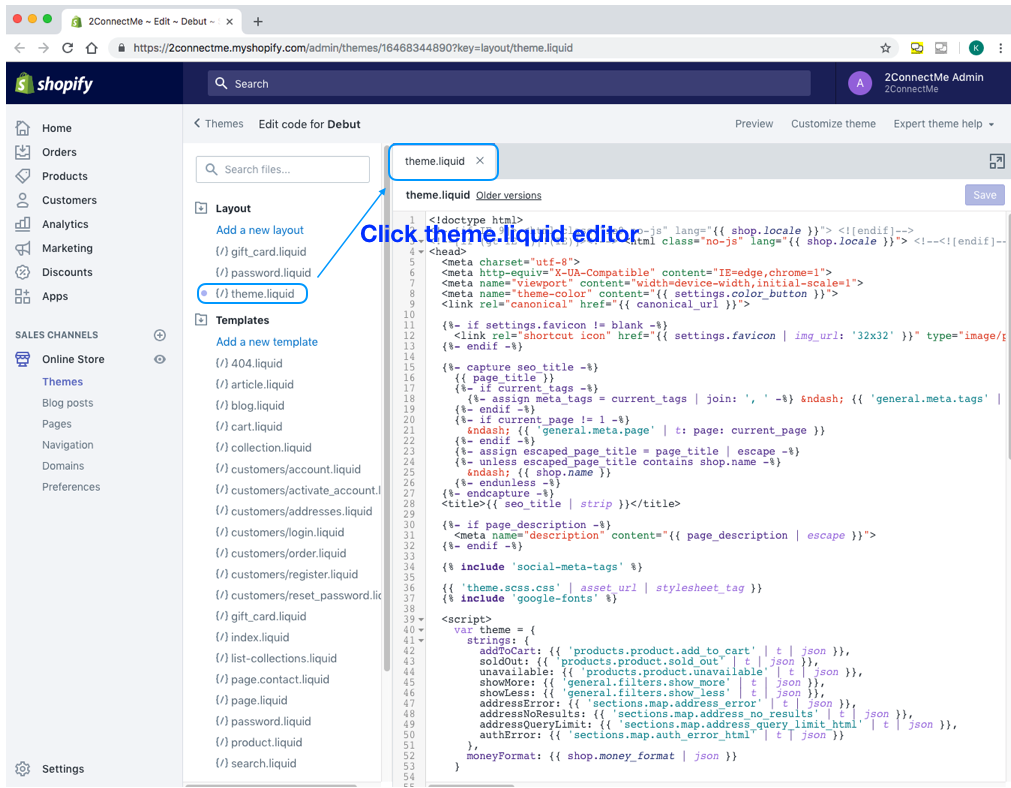
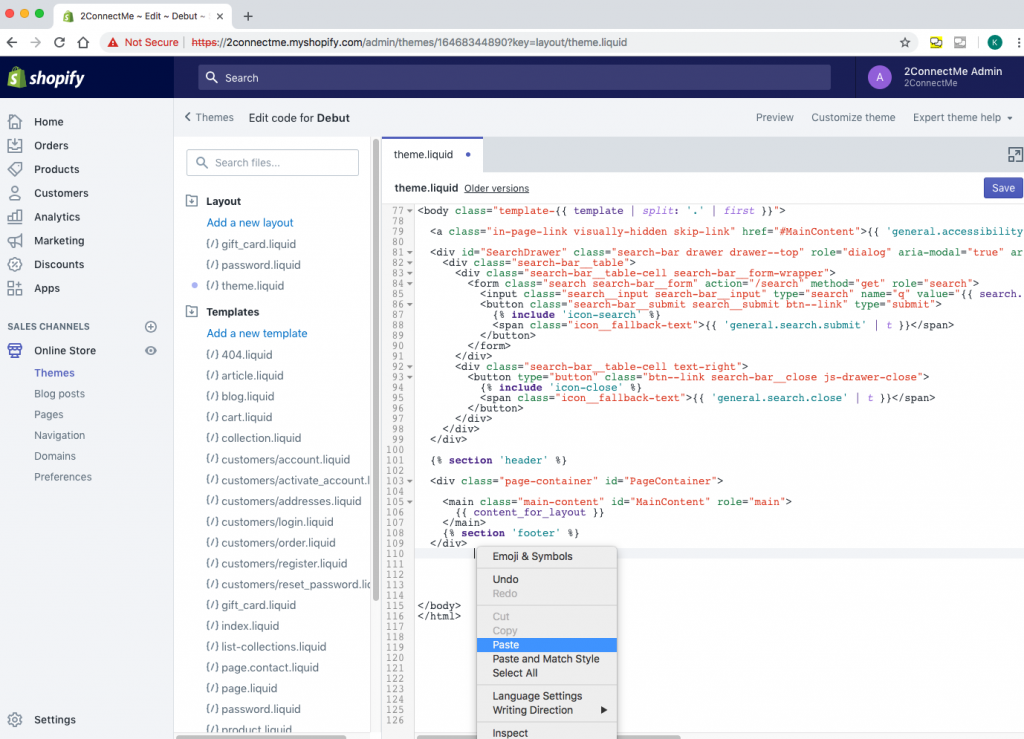
![]() В Shopify
В Shopify
Auto Whisper Short Text Triggers Setup (Optional)
In Hotline Chat Room menu, it can configure filters (conditions) to select particular web pages or customer clicks on the web page and stays there for some time as follows.
Screen: Auto Text Trigger Setup After the changes made and saved, the contact from URL address link will get updated. You have to update the corresponding 3rd party integration, e.g. WordPress / HTML pages / MailChimp / Outlook Clients / Google Sites.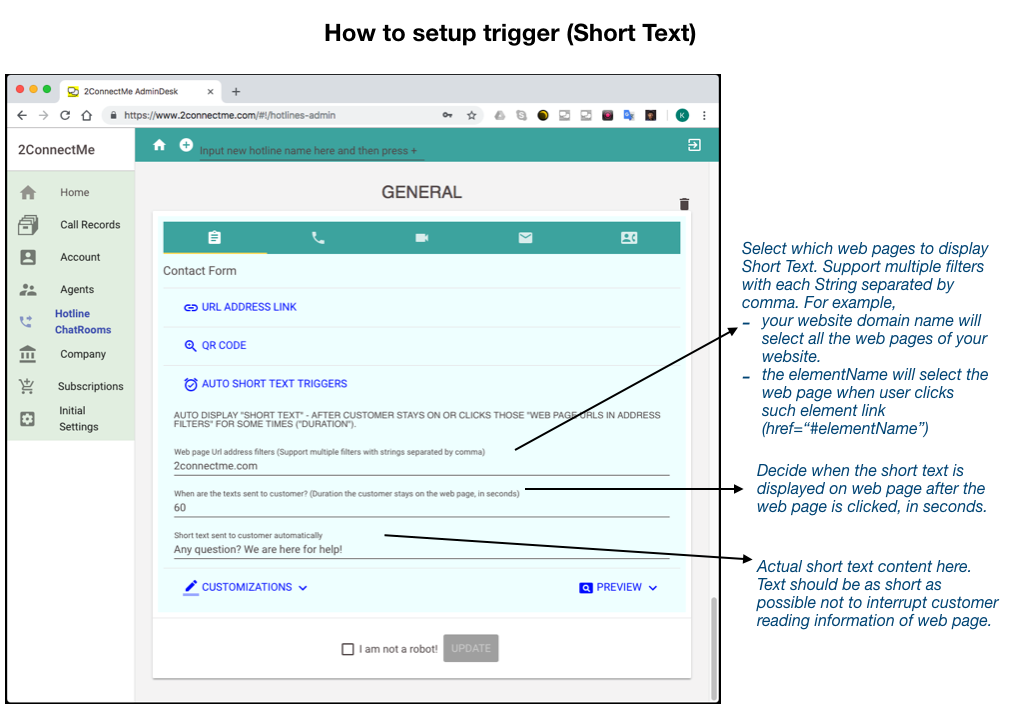
Integration “Click To Call” button (Also applicable to all websites )
If you need to create a custom “Click to Call” button on any location of website, you may
- create an image for your own, or
- find a license free icon for message , phone, video from internet, or
- any free text as you like,
put the image/icon/free text to where you like in the webpage, useВ В ![]() В (in WordPress Editor), or tag for standard html code,В to link such image / icon/ free text with URL of either contact form, direct phone call, or direct video call.
В (in WordPress Editor), or tag for standard html code,В to link such image / icon/ free text with URL of either contact form, direct phone call, or direct video call.
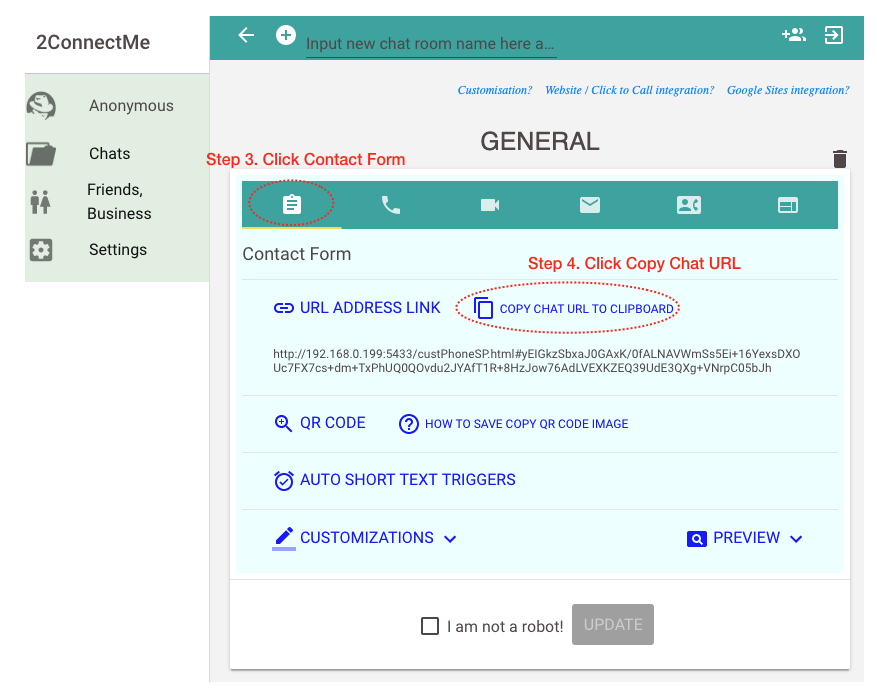
Where is Contact Form URL? - Contact Form tab
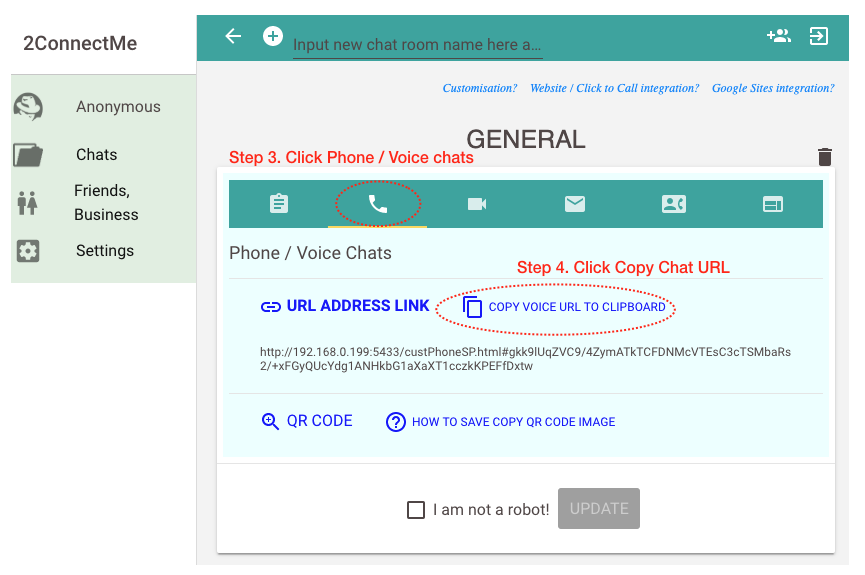
Where is direct Phone Call URL? - Phone tab
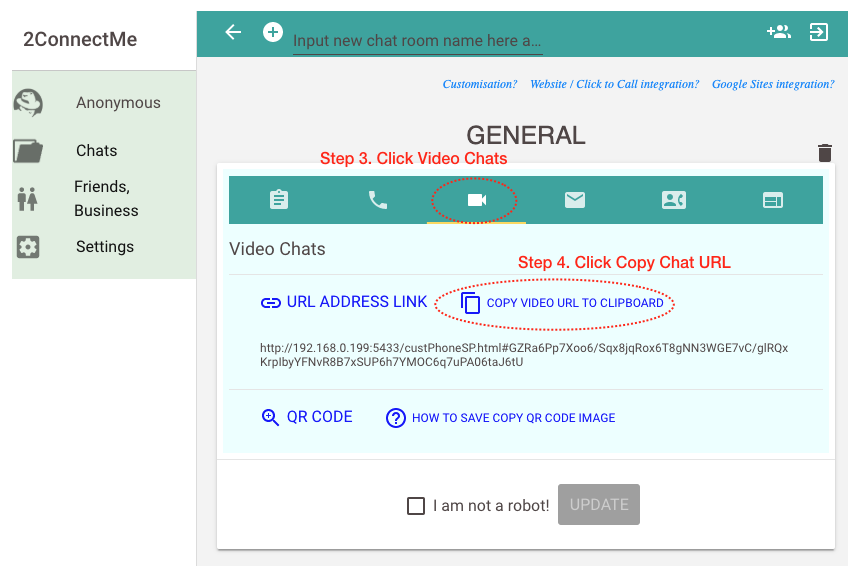
Where is direct Video Call URL? - Video tab
Integration – Direct Contact Form / Voice Chat / Video Chat on HTML webpage
Direct Contact Form / Voice Chat / Video Chat are forms directly shown on the webpage. It is normally put under <iFrame> of webpage.В The size of the form is responsive such that you have full control on where the form should be positioned on your web page. The size of the form will be adjusted automatically to fit the screen for your web page.
Due to new security restrictions of Google Chrome (ver 65 or later), you have to put additional security settings
allow=”microphone, camera”
as example shown below. You have to copy & paste your own chat room url highlighted in red below.
- <iframe src=”https://www.2connectme.com/custPhone.html/……” allow=”microphone; camera”></iframe
Where is Contact Form URL? - Contact Form tab Where is direct Phone Call URL? - Phone tab Where is direct Video Call URL? - Video tab
Integration – Add Live Chat / Contact Form to Google SitesВ
The latest Google Sites makes it a simple to create a site, no programming or design skills needed.Google Sites websites are responsive, which means they’re optimised for tablets and smartphones, too.
Integrating 2ConnectMe service to Google Sites is also simple without any programming or design skills.
For each of integration below, it requires to put the chat room URL link to the Google Sites settings. The chat room URL link can be found in Chat Room Hotline Settings below. You have to copy such URL link to your operating system clipboard for pasting it in the Google Sites settings afterwards.
Where is Contact Form URL? - Contact Form tab
Where is direct Phone Call URL? - Phone tab
Where is direct Video Call URL? - Video tab
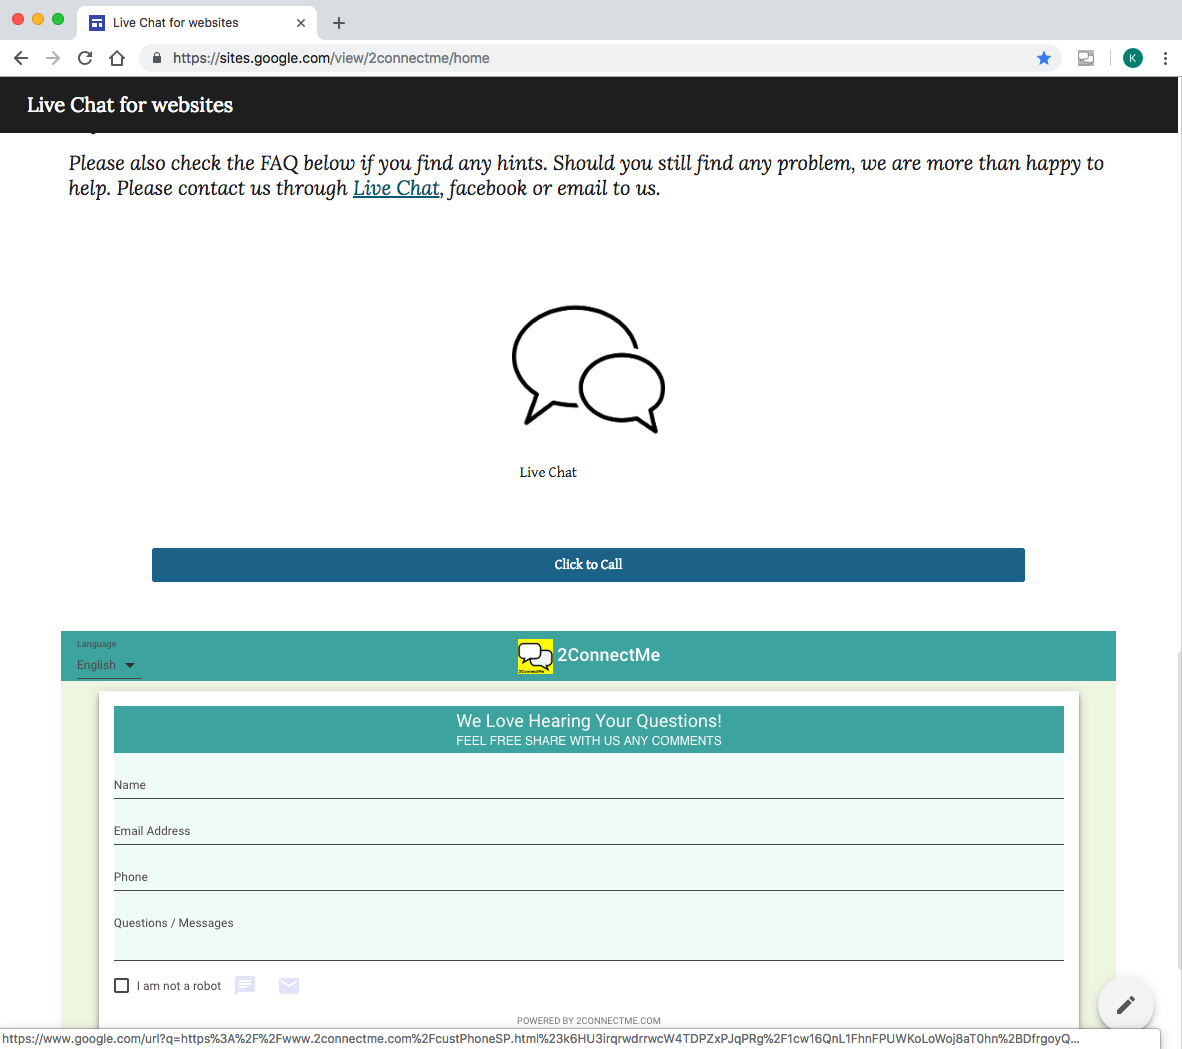
2ConnectMe supports the following integrations with Google Sites. For reference, the example website built with Google Sites integrated with 2ConnectMe Live Chat can be found here. The integrations, embed Contact Form, Click-to-Call button, Link Text to Live Chat, Link Image to Live Chat, are in the bottom of the home page of example website.
Screenshot: Example of integration in Google Sites
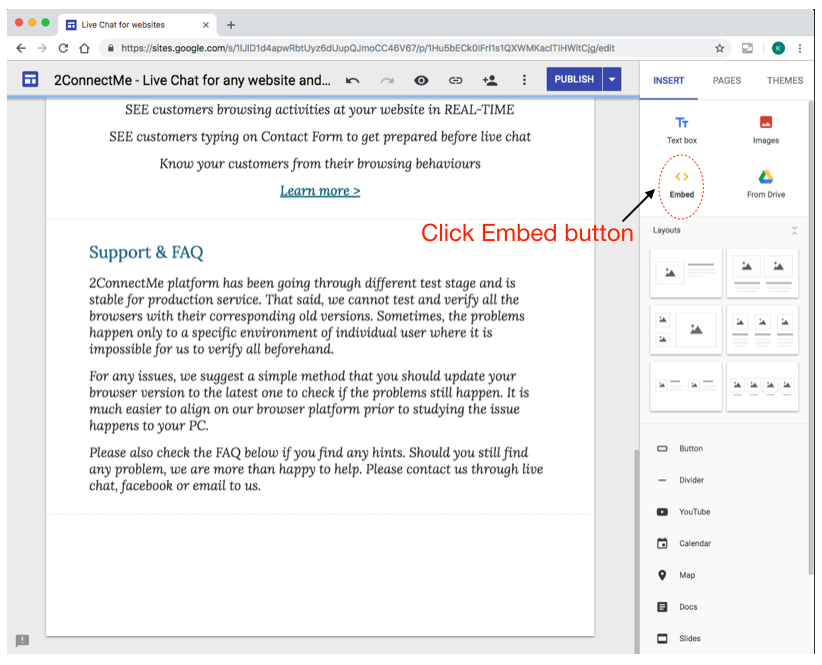
Embed Contact Form
Embed Contact Form on Google Site web page
Step 1. Go to your location of your edited page where you want to put the contact form. Then click the “Embed” button as shown below.
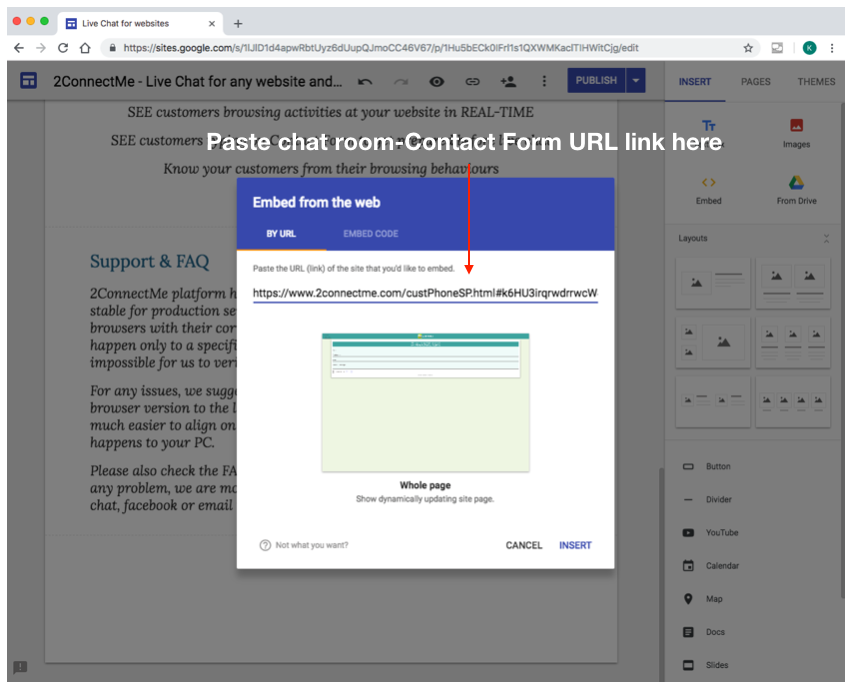
Step 2. Copy 2ConnectMe Chat Room – Contact Form URL link address and paste it here. Then press INSERT button to insert 2ConnectMe contact form on your page.
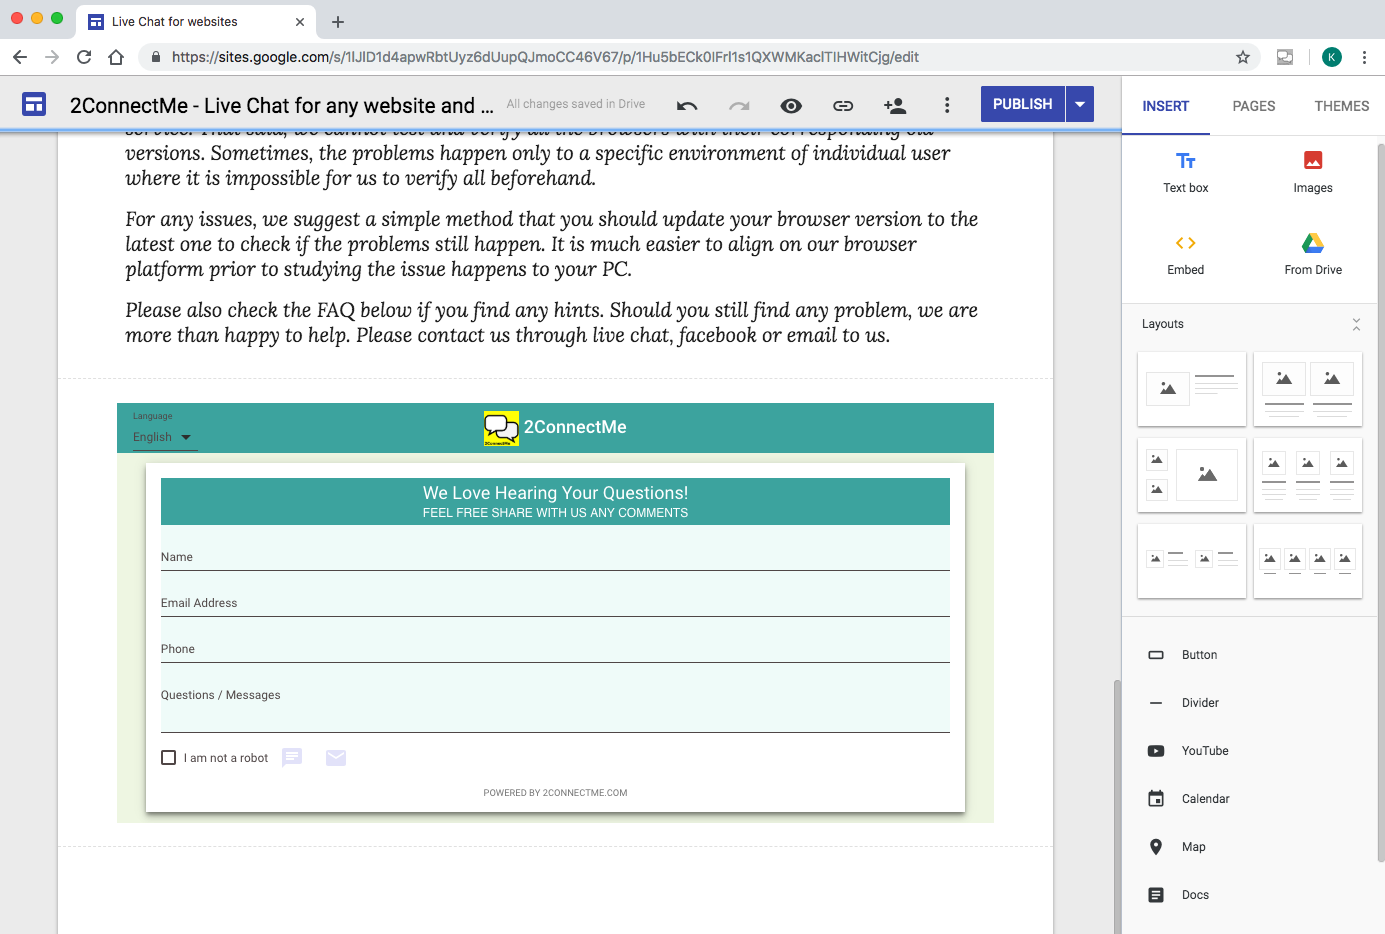
Step 3. Contact Form is immediately effective on your page.
Click to Call button
Click to Call button of Google Site
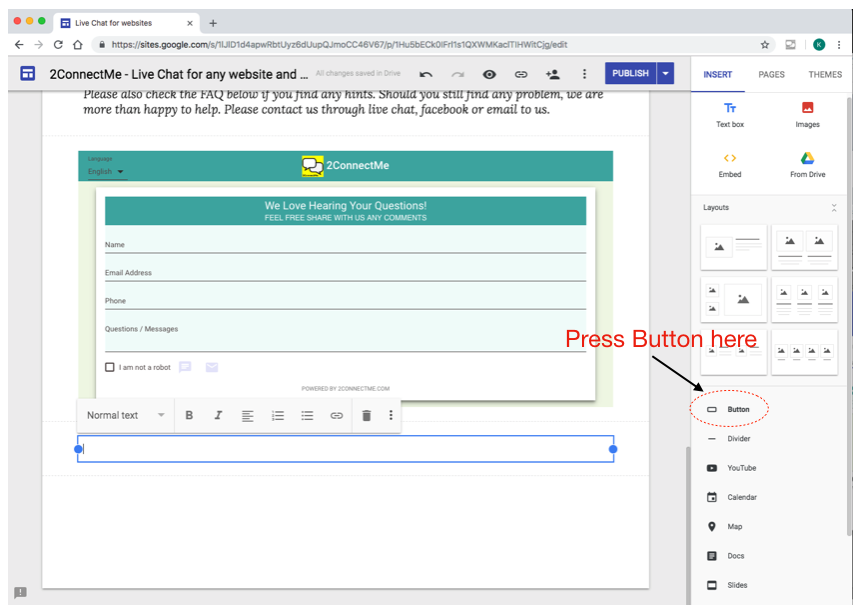
Step 1. Go to the location of your edited page where you would like to put your click to call button. Then, press Button icon.
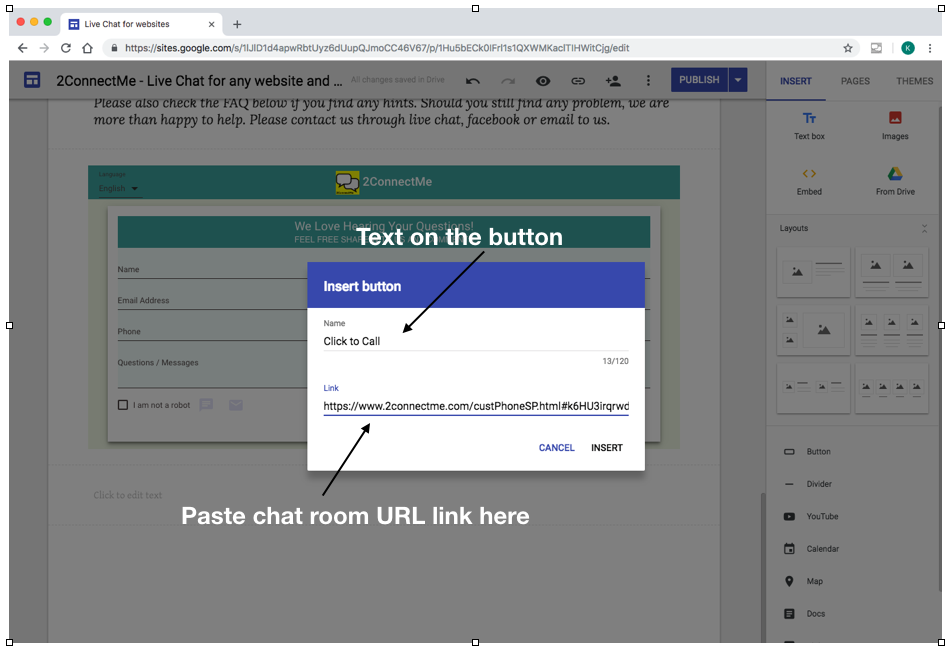
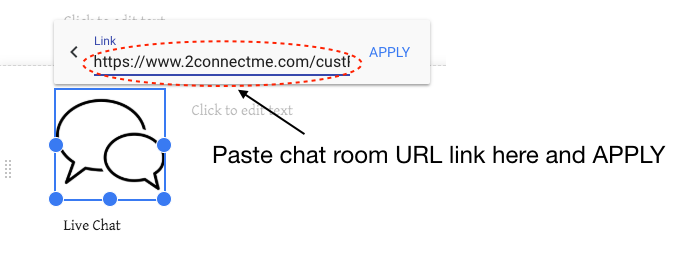
Step 2. Input the Text to be shown on the button and past URL link of chat room. It can be URL link for Contact Form, Voice Call or Video call which is subject to your business needs.
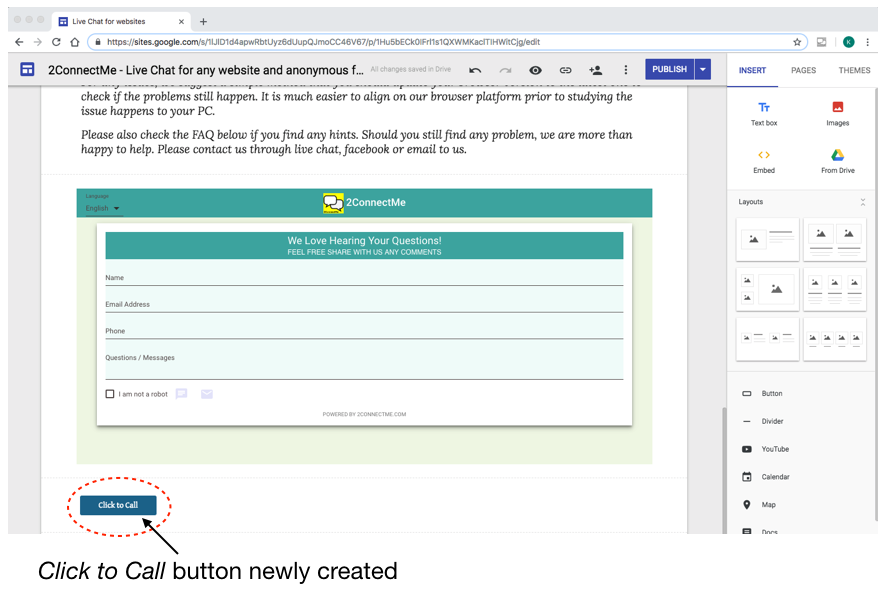
Step 3. Click to Call button creation completed.
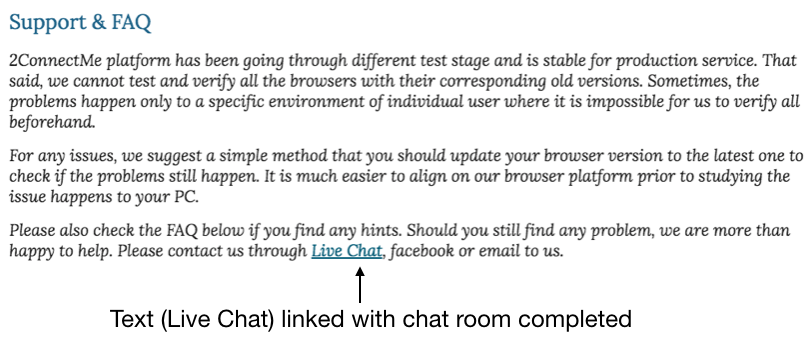
Link Text to Live Chat
Link Text to Live Chat on Google Site
Go the the text box where some texts you would like to link them to a chat room.
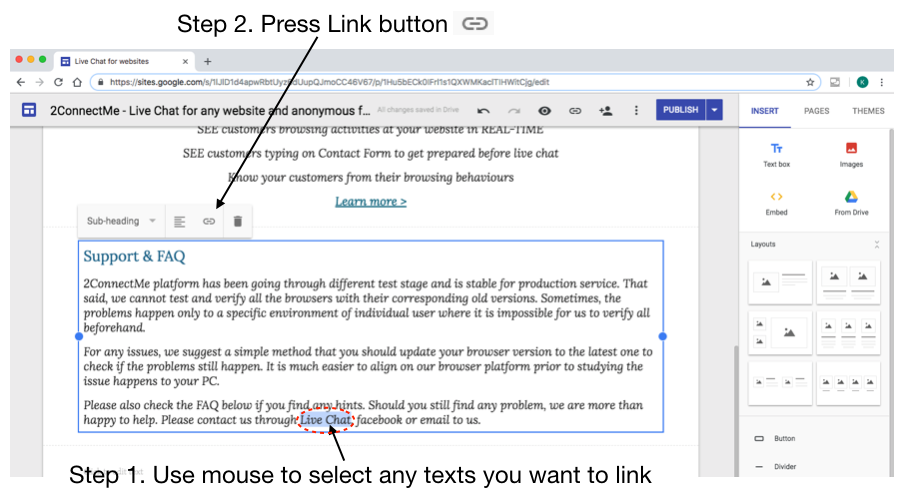
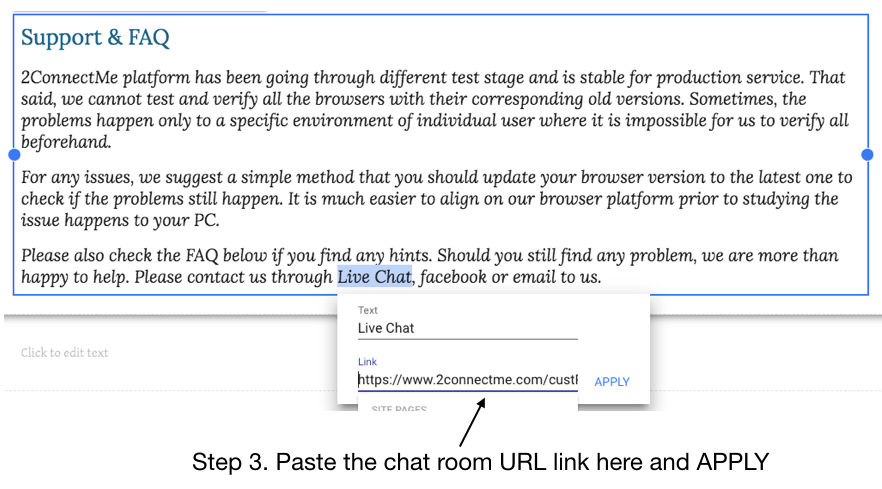
The URL link can be Contact Form, Voice Call or Video call which is subject to your business needs.
Link Image to Live Chat
Link Image to Live Chat on Google Site
Go to the location of your edited page to place the image, e.g. Chat Icon. Then, Click Image button. Upload your image or select from your Google drive.
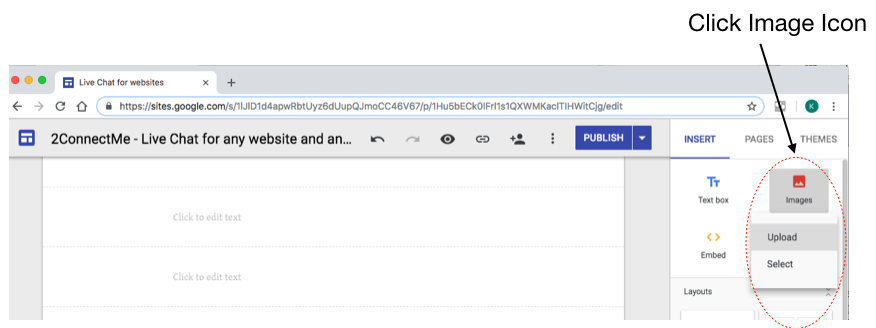
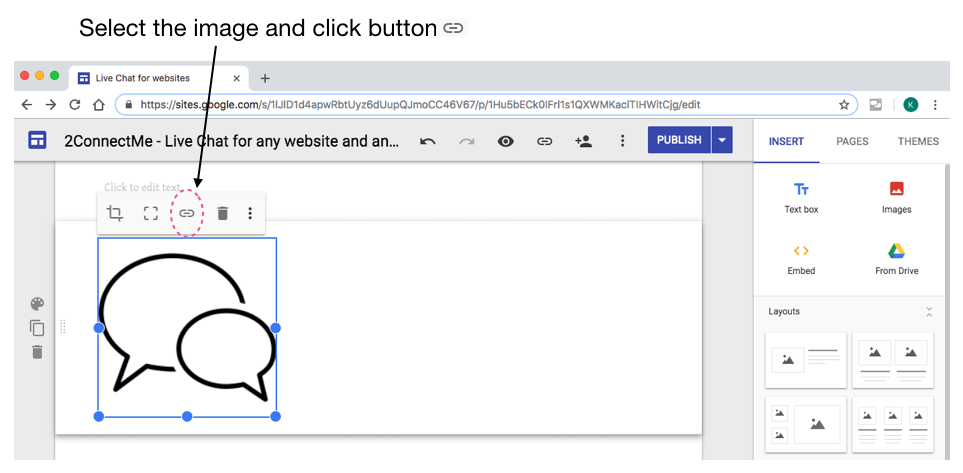
URL link can be Contact Form, Voice Call or Video call which is subject to your business needs.
Integration – Email Marketing Campaign
Below we describe the two most used email marketing campaigns using plan text email or MailChimp tools. The other tools can also be easily integrated by the same principle. Should you have any questions on any tools, feel free contact us.
Plain Text Email
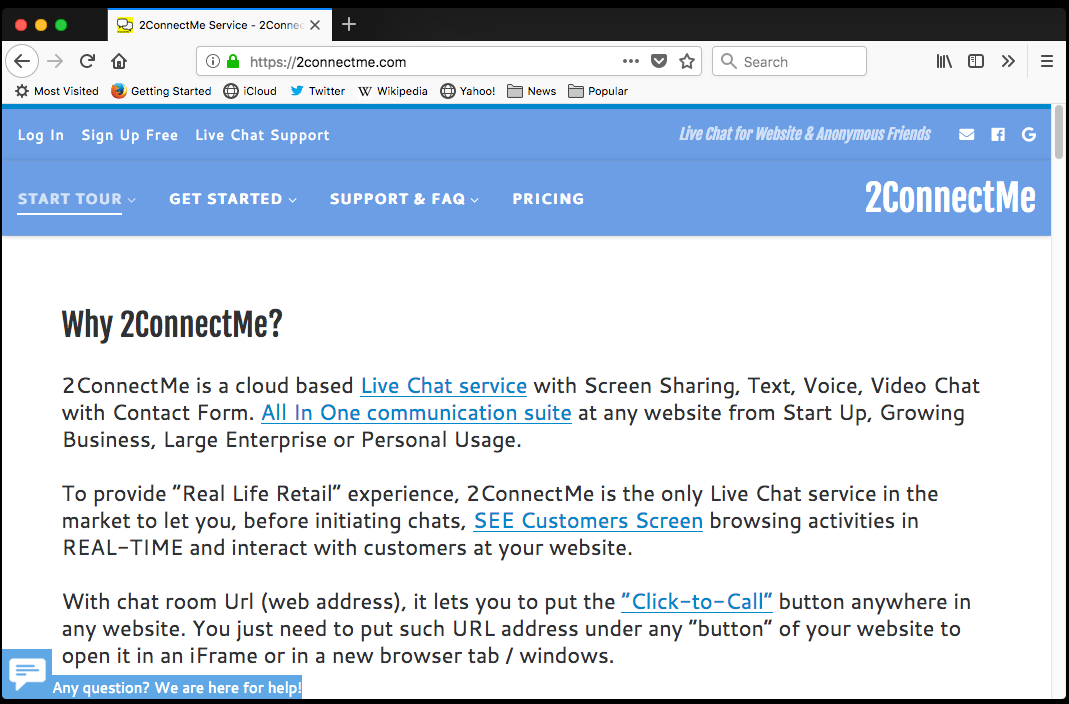
You may just paste the URL of either Contact Form, direct Phone Call or direct Video Call in your email. Example is that 2ConnectMe send greeting email to any new account where we put URL of contact form. User can reach us to have live chat at any time.
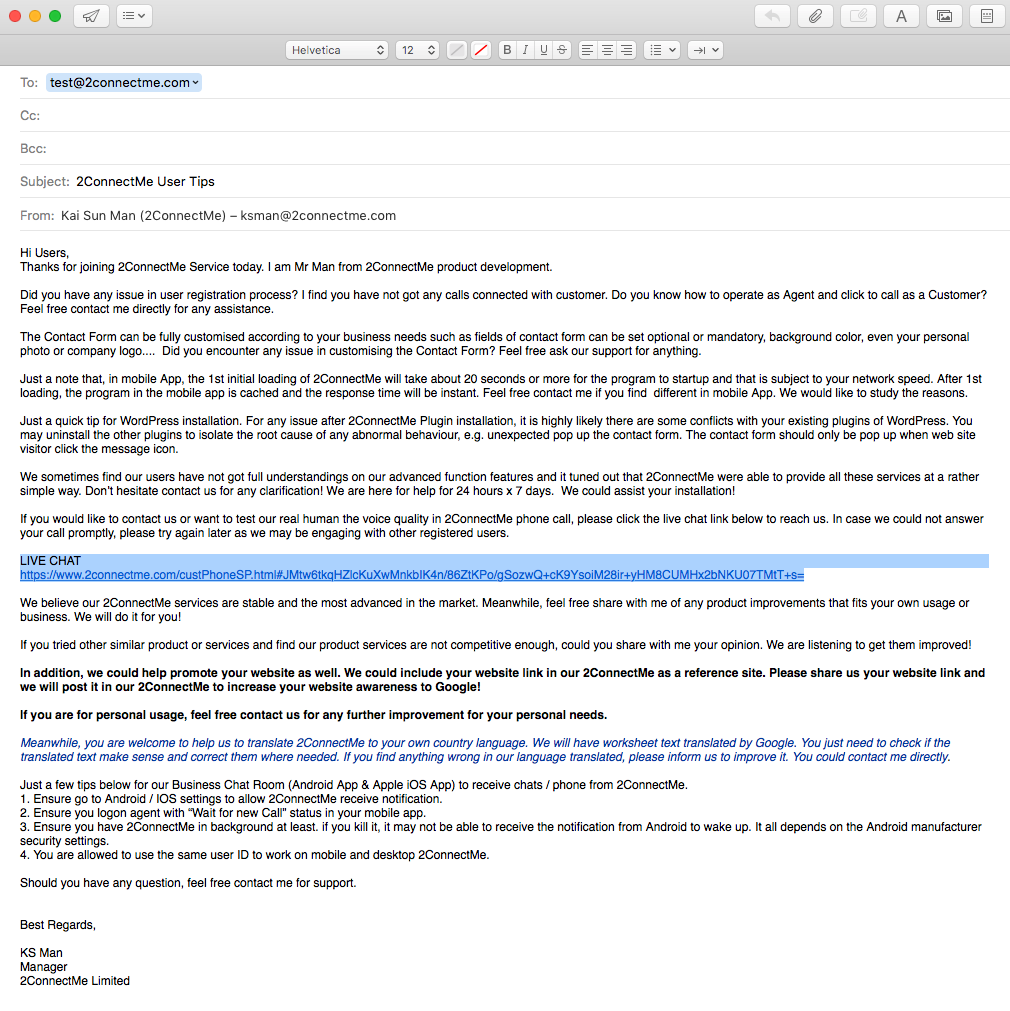
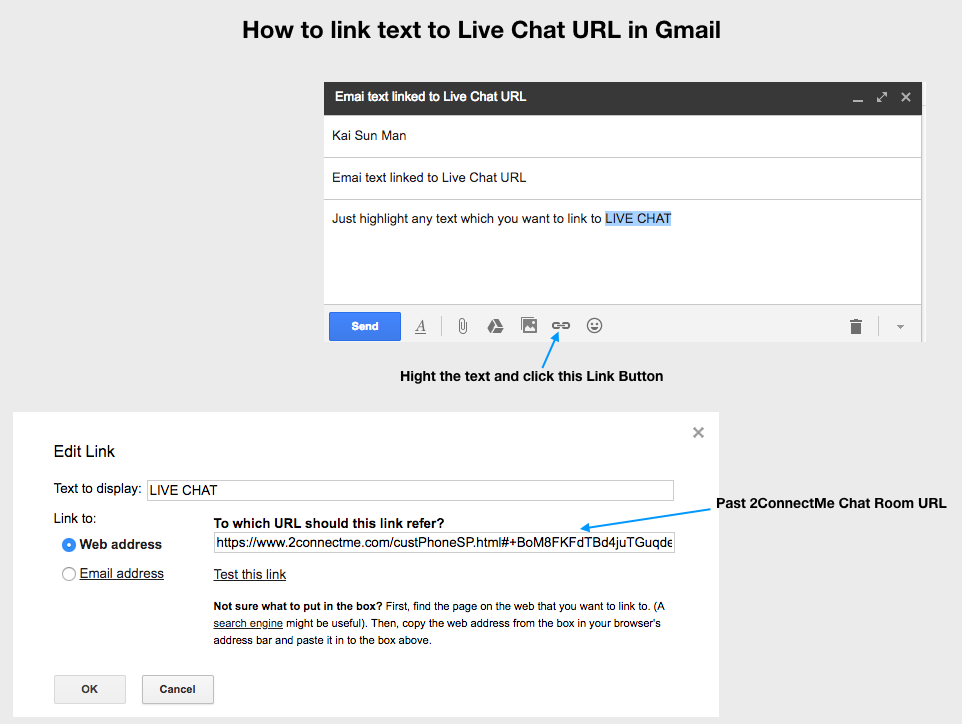
Email Text linked with Live Chat URLВ 

Since it is rather odd to paste URL address directly on the plain text email. It is possible to “hide” such URL address by “linking” the the text to an URL address. The following illustrate how to do that in different mail clients, .e.g. Microsoft, Mac and Gmail.
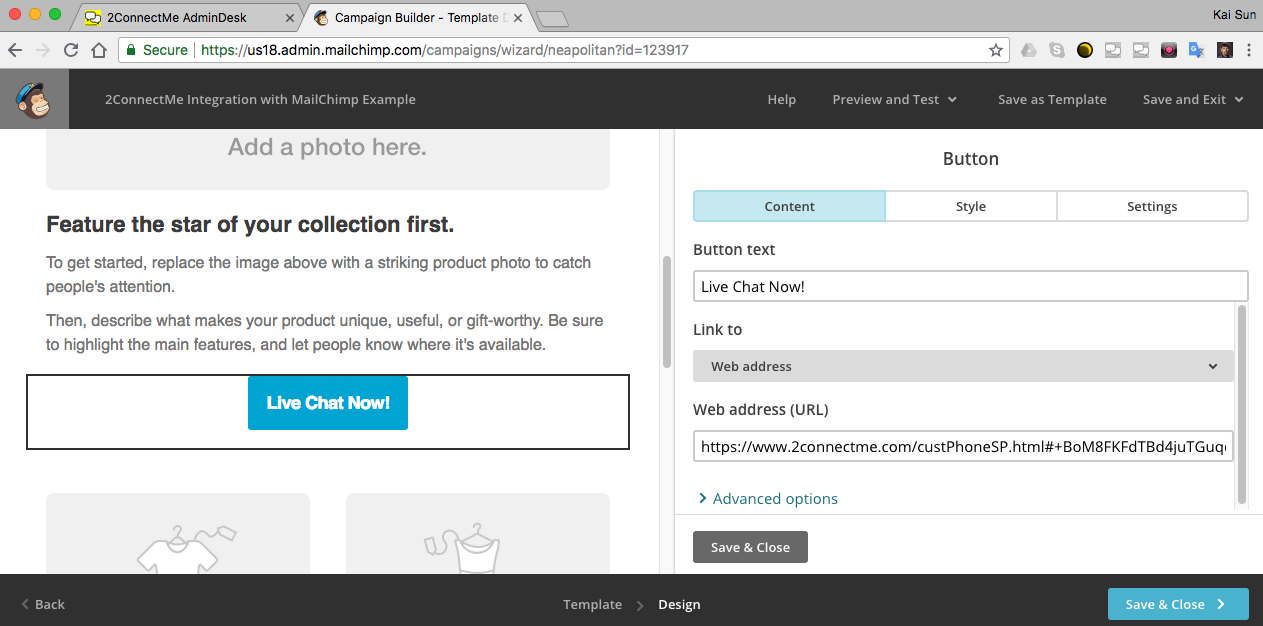
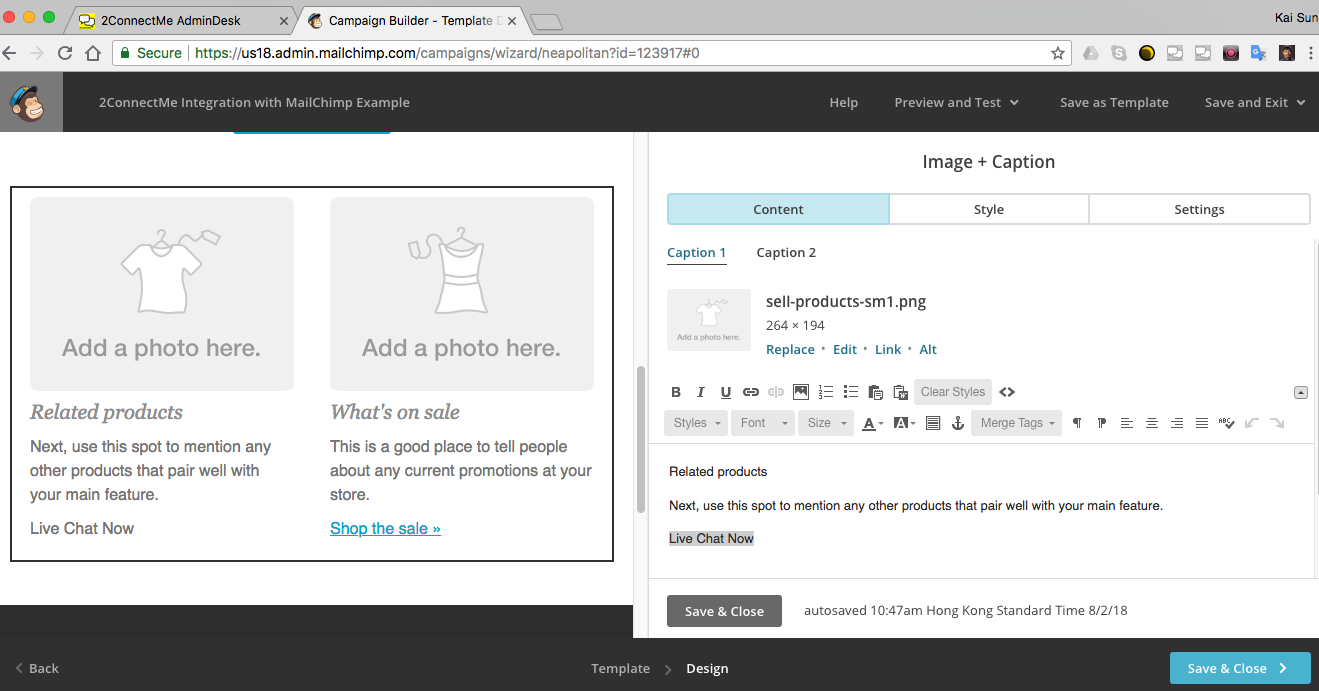
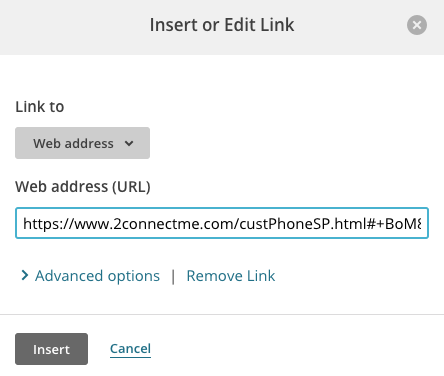
Microsoft Outlook Client Start by highlighting the text you want to link, and then: – Right-click and select Hyperlink from the menu. – Go to the Insert tab and select Hyperlink. – Press Ctrl + K. Any of those options will bring up the Insert Hyperlink window, where you can enter your Live Chat Room URL in the Address field. In the Outlook Web App, highlight the text you want to link and then click the Insert Link button () and enter the URL in the Insert link box that appears. Depending on the size of your window, you may need to click the down arrows (shown in the image below on the far right) in order to access the Insert Link button. Mail Client on Apple Mac Gmail MailChimp is one of the most common used email marketing campaign tools. The integration has never been easy before. Just paste URL address of chat room (2ConnectMe) to either action buttons or linked texts (MailChimp) as illustrated in the examples below. Create Live Chat button on MailChimp email Create plain text email with Live Chat link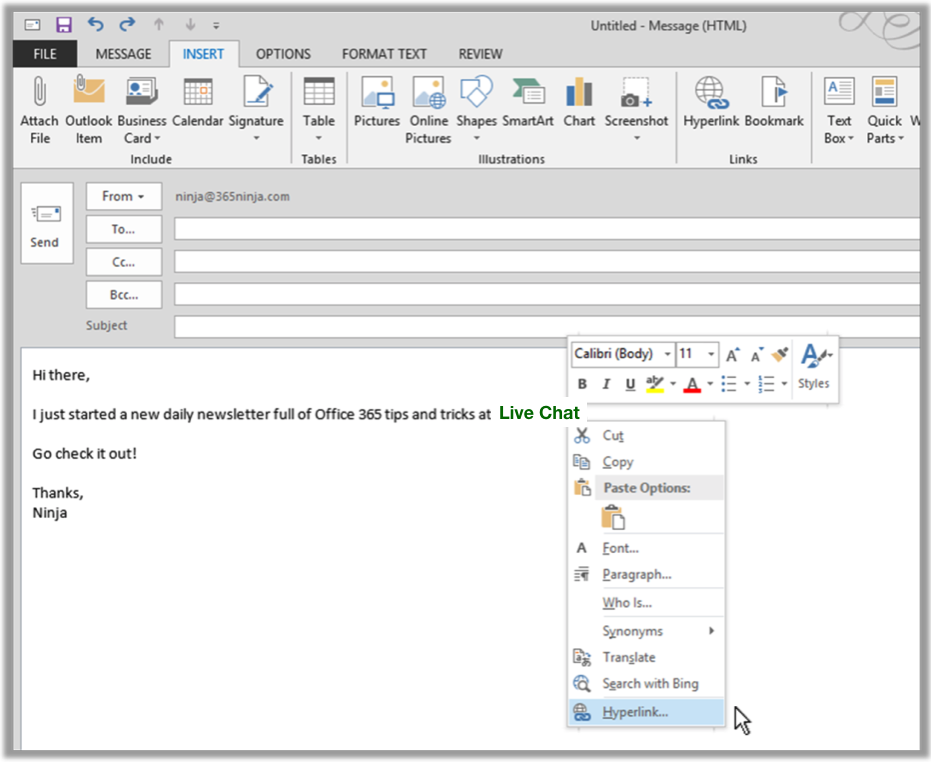


![]()
![]()
Notifications on Browsers
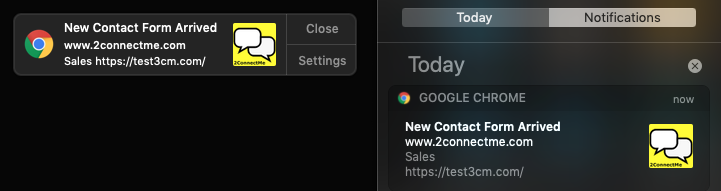
You no need to sit in front of PC to wait for customer / anonymous chats. You will receive notifications from Mac OSX, Windows operating system whenever customers open your website or open the contact form. Then you may directly click the notification banner to open the 2ConnectMe Agent to SEE what the customers are doing on your website.
With complete integration of notification on mobile apps and browsers, you have full tracks and views of customers from the moment they open your website or contact form to initiating the chats to your agents.
There are two types of Notification. One isВ New Contact Form arrived and the other is Customers / Anonymous Friends waiting for answers.
New Contact Form arrived
Notification shown whenever anyone opens your webpage with contact form icon installed or opens your contact form directly.
Customer / Friends waiting for answers
Notification shown whenever customer / friends click to chat button on the contact form to start finding an agent to answer.

Settings – Notifications
Two settings are required to activate the notification
- Firstly, it requires to enable the Notification settings of individual Agent Private Profile (Settings -> Private Profile -> Notifications).
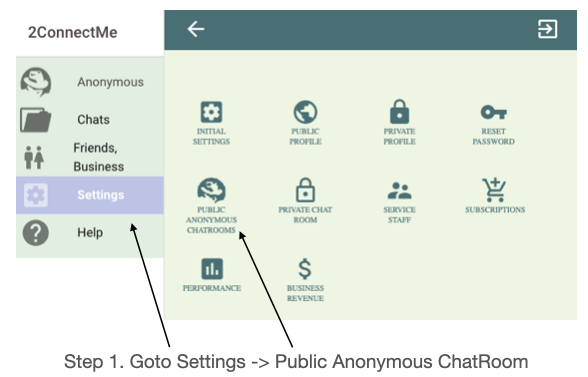
- Secondly, it requires to enable the Contact Form Notification settings (Settings -> Anonymous ChatRoom ->GENERAL for Forever Free tier account).
Step I: Agent Private Profile
Go to Settings -> Private Profile -> Notifications (Check the boxes where needed)

Please take note that
- Notification can only be supported on either Google Chrome or Mozilla Firefox browser.
- The settings on Browser notifications can only be configured under a browser as 2ConnectMe will ask the browser for the notifications permission. Browser will prompt you for permission. Please approve it when it is asked at first time. Otherwise, it requires to change the settings inside the browser to change such permission settings which is more complicated.
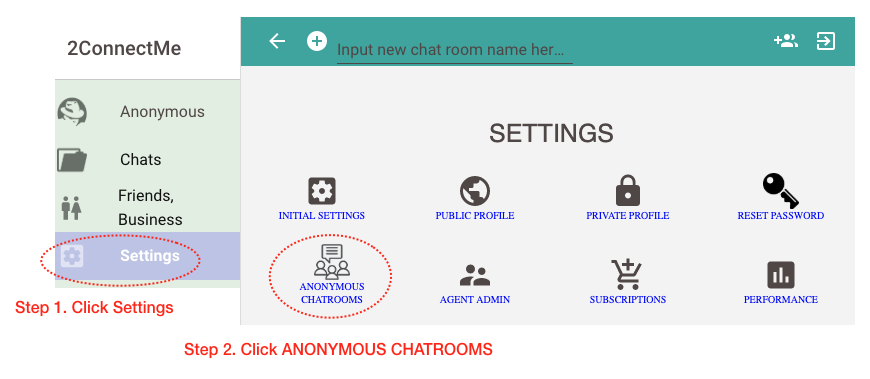
Step II: Anonymous Chat Room
Go to Settings -> Anonymous Chat Room -> GENERALВ (Any chat room you like to enable)В -> Contact Form tab
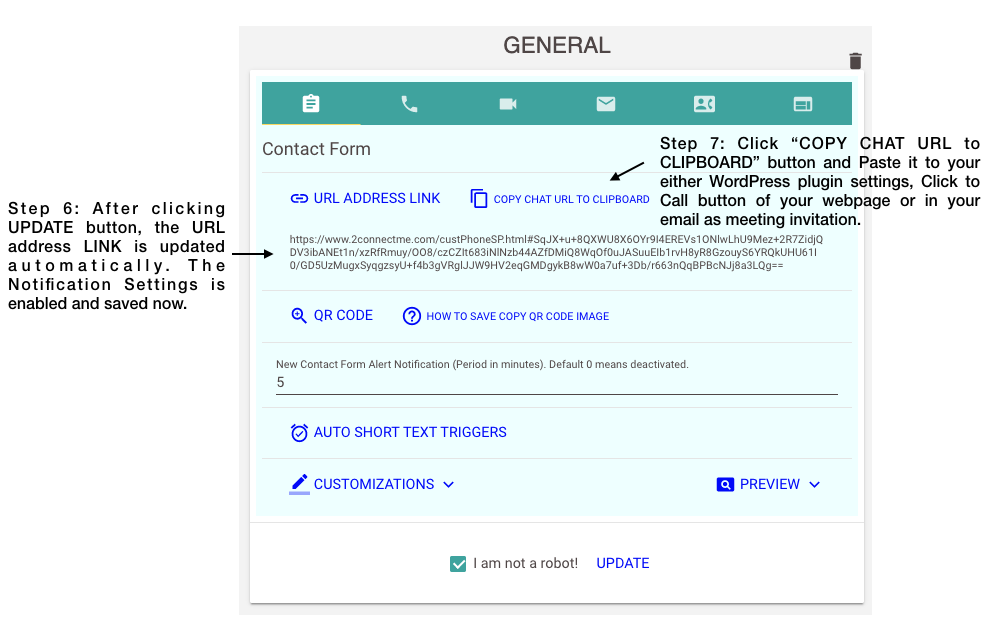
The screen below is the initial settings screen of Notification with “0” initial value, in step 3 below, which means Disabled. Please take note that whenever this is any change in Notification Settings and saved successfully after clicking UPDATE button, the URL ADDRESS LINK will be revised accordingly. It is required to update such URL address link in all those 3rd party integrations, e.g. WordPress Plugin URL, or Click to Call button on any webpage or PopUP icon on any webpage.

Why Notification is not shown?
System Design
The system is designed such that
- when the user already logon the service using the browser, there will be NO notification delivered to this user by design. It is because the user is able to see all these customer status from the main Dashboard. Notification reminder is no longer needed.
- In order to receive notification, it requires browser is RUNNING, at least, in the background.
- When the chat is connected to an agent and chat is terminated now, the customers / friends want reConnnect to agent again. With sticky session function, the customers / friends are routed to the same agent. In that case, no notification is shown as it is not a new chat.
Please check the following settings again.
- Is the Agent Private Profile is setup properly under Chrome / Firefox browser? The status of check box should be shown checked as indicated below.
- Is the chat room enabled with Notification? The best practice suggest 5 which means notification is sent again when there have been no new contact form arrived since last 5 minutes. In other words, there will be no more notifications within 5 minutes after last notification. It is to avoid repeated notifications jammed in the user Inbox within a short period of time.

URL address of Chat Room Updated in 3rd party integration.
- Please copy and paste the updated URL address of chat room to your 3rd party integration.
Browser Cache issue
- If you checked the above points done and still find not all notification shown, there may be the case of Browser keeping the outdated configuration data. We recommend clearing the cache data of browser to check it again.
Growing Business and Large Enterprise
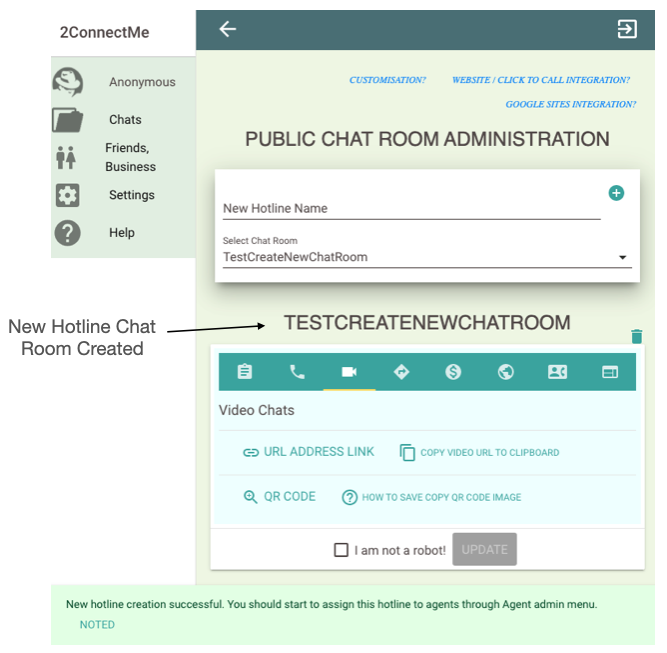
New Hotline / Chat Room
In order to support your growing business and higher call traffic, it is important to group the customer queries, in terms of the nature, e.g. Service, Sales, Support.., to be handled by Agents with skillsets required.
Planning
Assign New Hotline / Chat Room to Agents
Assign the agents to this new hotline / chat room so that they can be distributed with customer queries.
New Hotline Chat Room

Assign Chat Room to Agent
Go to Private Profile of agent and check the New Chat Room to UPDATE the settings.