Things to know before Integration with your website
What is relationship between a “Hotline / Chat Room” and a “Click-To-Call” button?
A hotline is normally a phone number for customer to dial for enquiries, e.g. Sales, Service or Sales. By the same token, in 2ConnectMe, hotline is an chat room with address url link, a “Click-To-Call” button, for customer to find a free agent staff for assistance.
What is relationship between “Hotline / Chat Room” and “Agent” assignment?
In agent setup, we can configure which hotlines (chat rooms) the agent staff will handle. 2ConnectMe supports agent staff handling multiple hotlines.
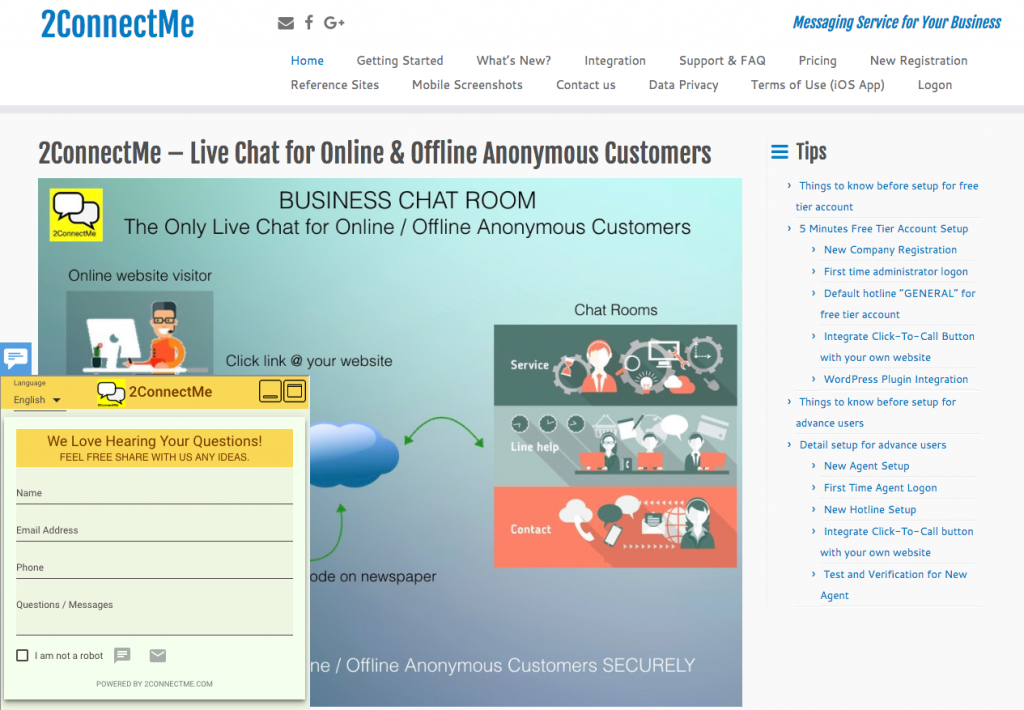
How 2ConnectMe works with your website?
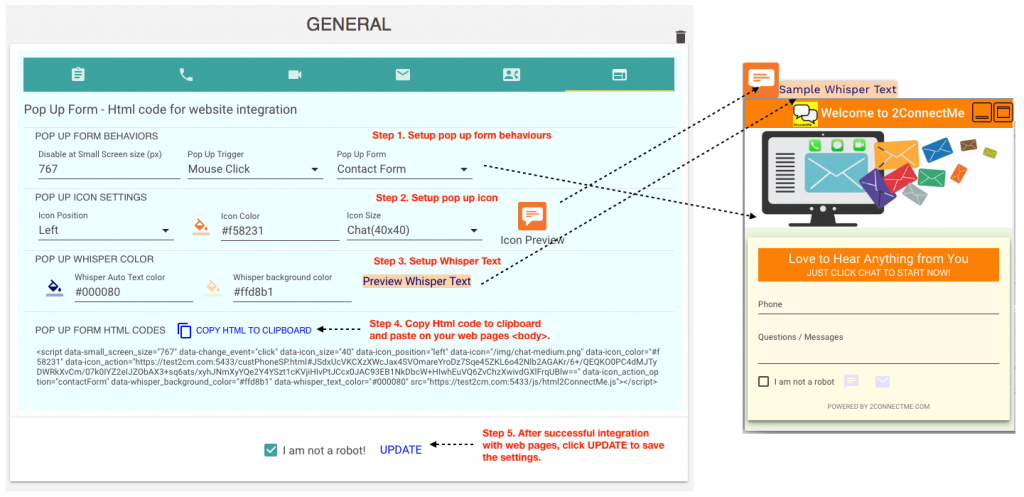
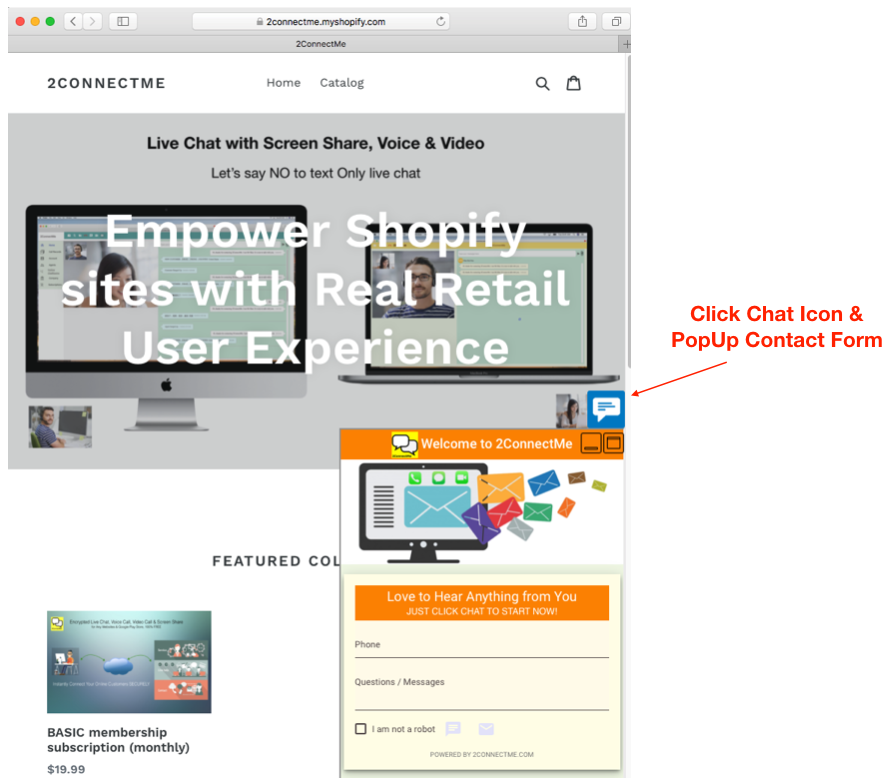
PopUp Chat Form & Sticky Floating Chat Icon on Web Page
Floating Icon and PopUp Chat Form sticky on the bottom of web page screen provide convenient means for customers to contact your business while they have questions on the webpage.
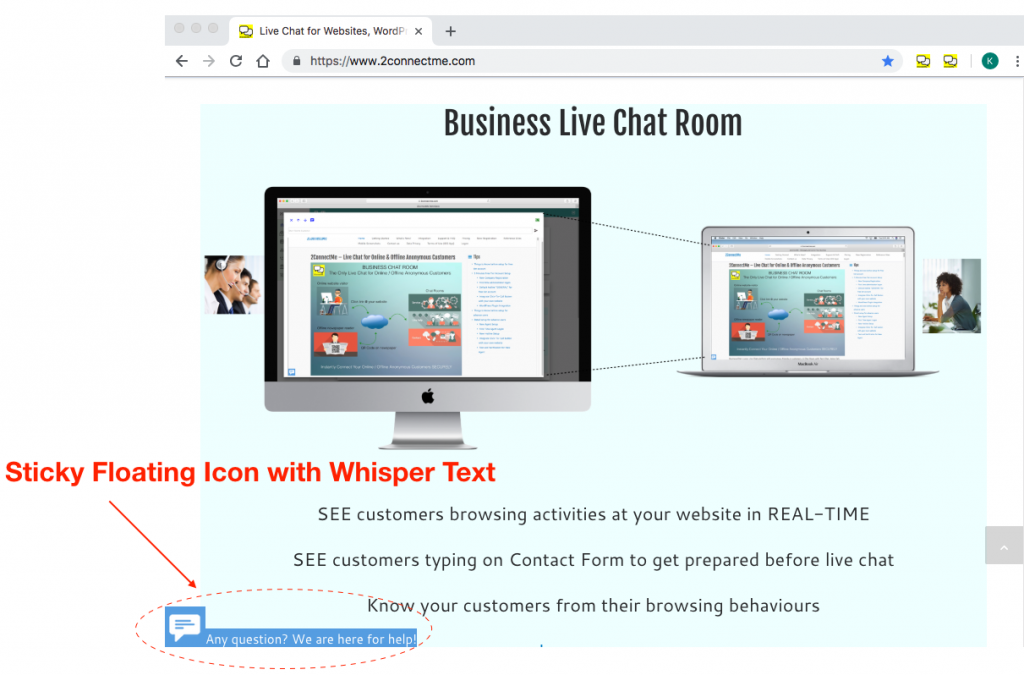
The sticky floating chat icon collects the real time information about what web site visitors are doing on the web page. Therefore, for those advanced functions such as SEE Customer Screen, Browsing History and Auto Whisper Short Text function, it is a must for this floating chat icon integrated on your webpage.
We support PopUp Chat Form and Floating Chat Icon on WordPress with plugin , Shopify or any other HTML pages. Details of integration is here.
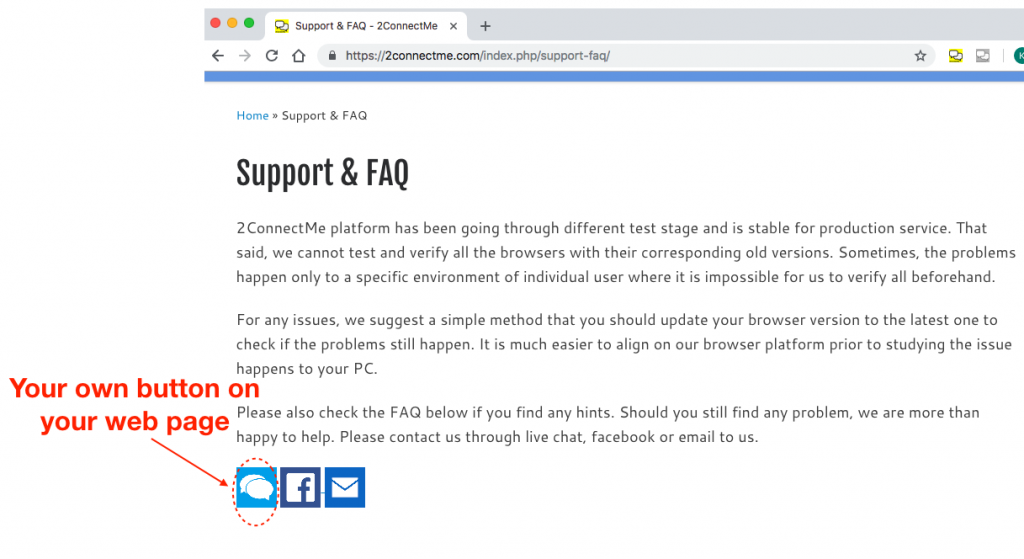
Click To Call Button
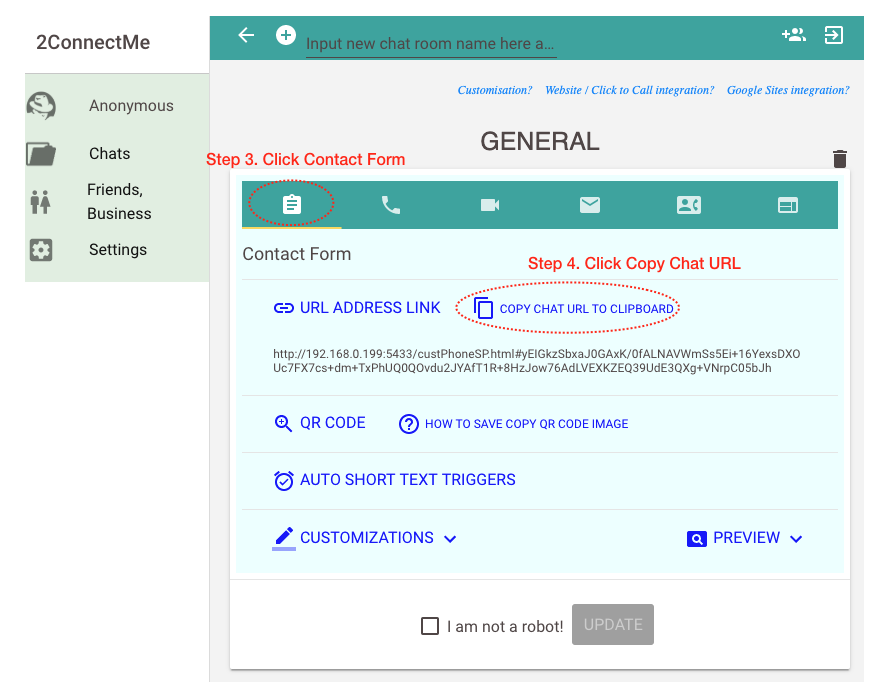
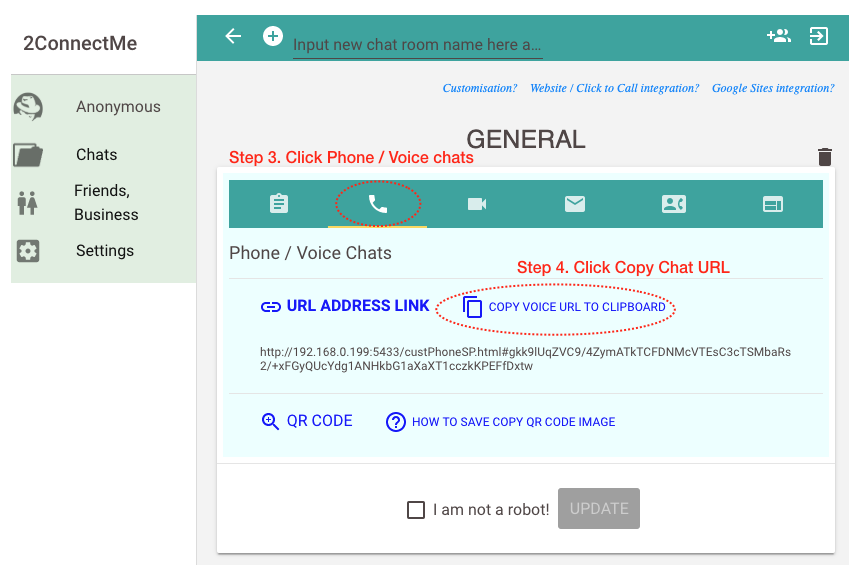
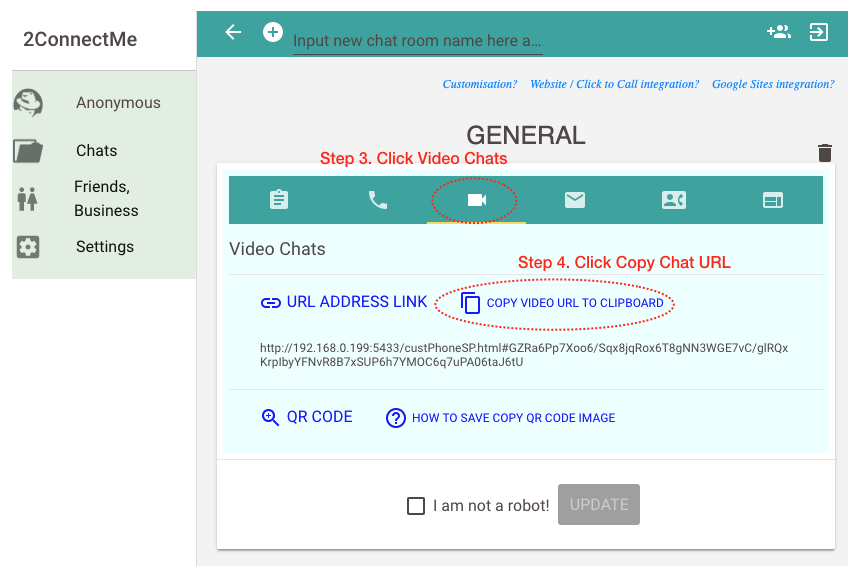
This is your own button on your webpage which will lead the web site visitors to go to your contact form, voice chat or video chat. 2ConnectMe provides the Url link of Chat Room for Contact Form, Voice Chat and Video Chat. Details of integration is here.
Direct Contact Form / Voice Chats / Video Chats
This is your display block of web page where the Contact Form / Voice Chats / Video Chats are shown on your web page directly. This is normally put under <iframe> tag of html page.
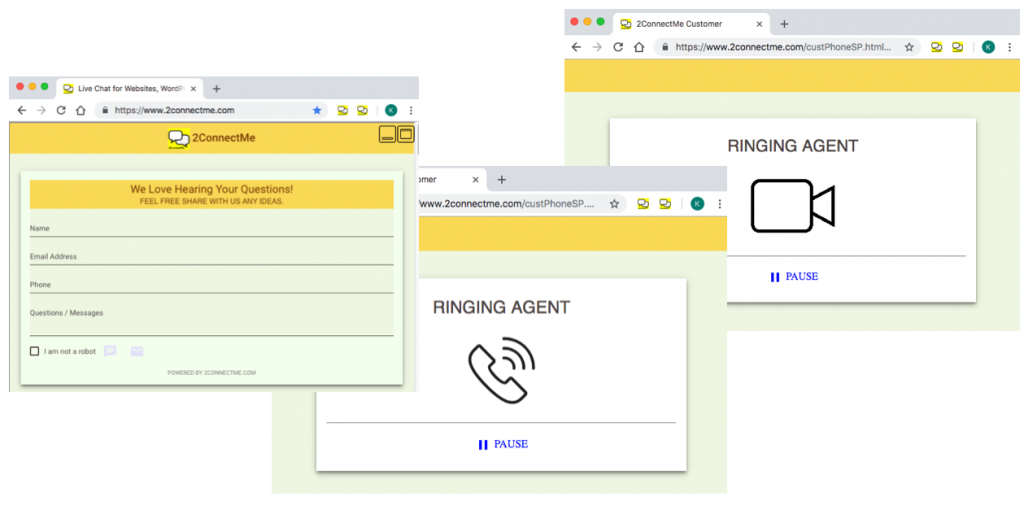
The size of the form is responsive such that you have full control on where the form should be positioned on your web page. The size of the form will be adjusted automatically to fit the screen for your web page. Details of integration is here.
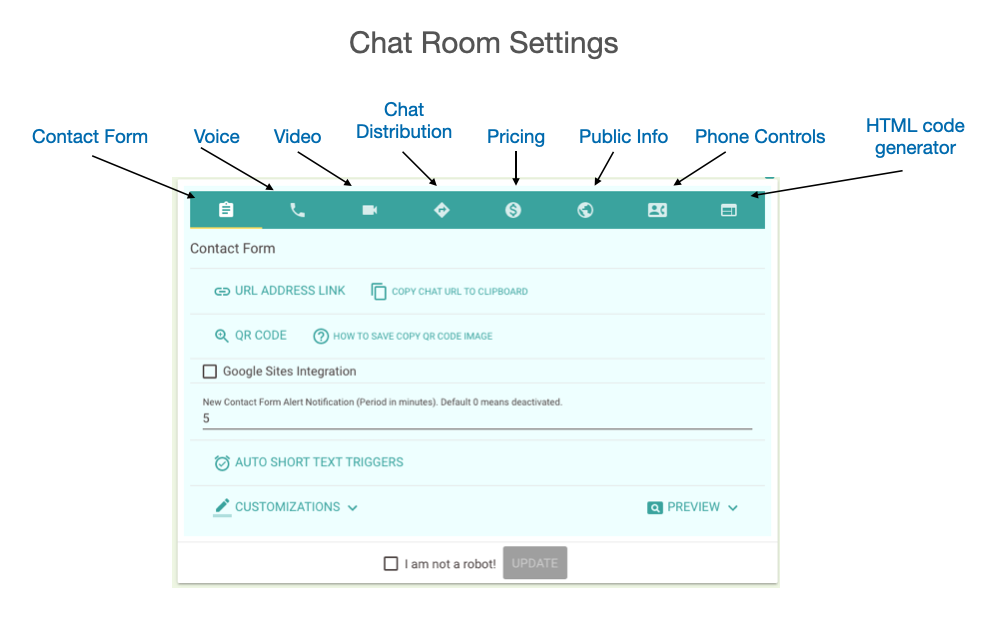
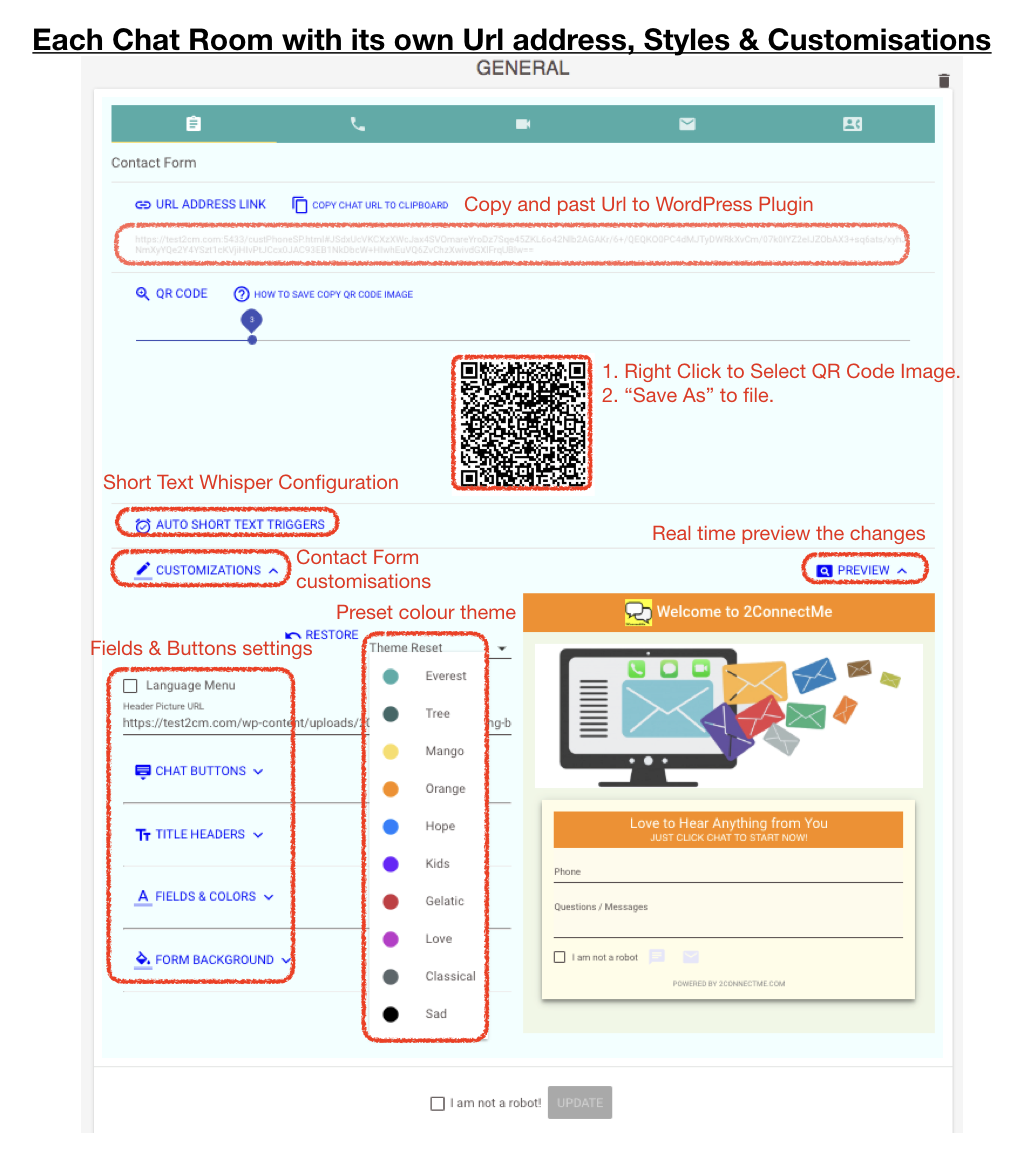
Chat Room Customization
Each Chat Room is with its own sets of settings which covers almost all the ways how to handle the customer chats. The Chat Room behaviour can be completely different according to the settings (Forever Free plan provides a default Chat Room, GENERAL). The settings include but not limited to
- The url information for Text Chat, Voice and Video Chat.
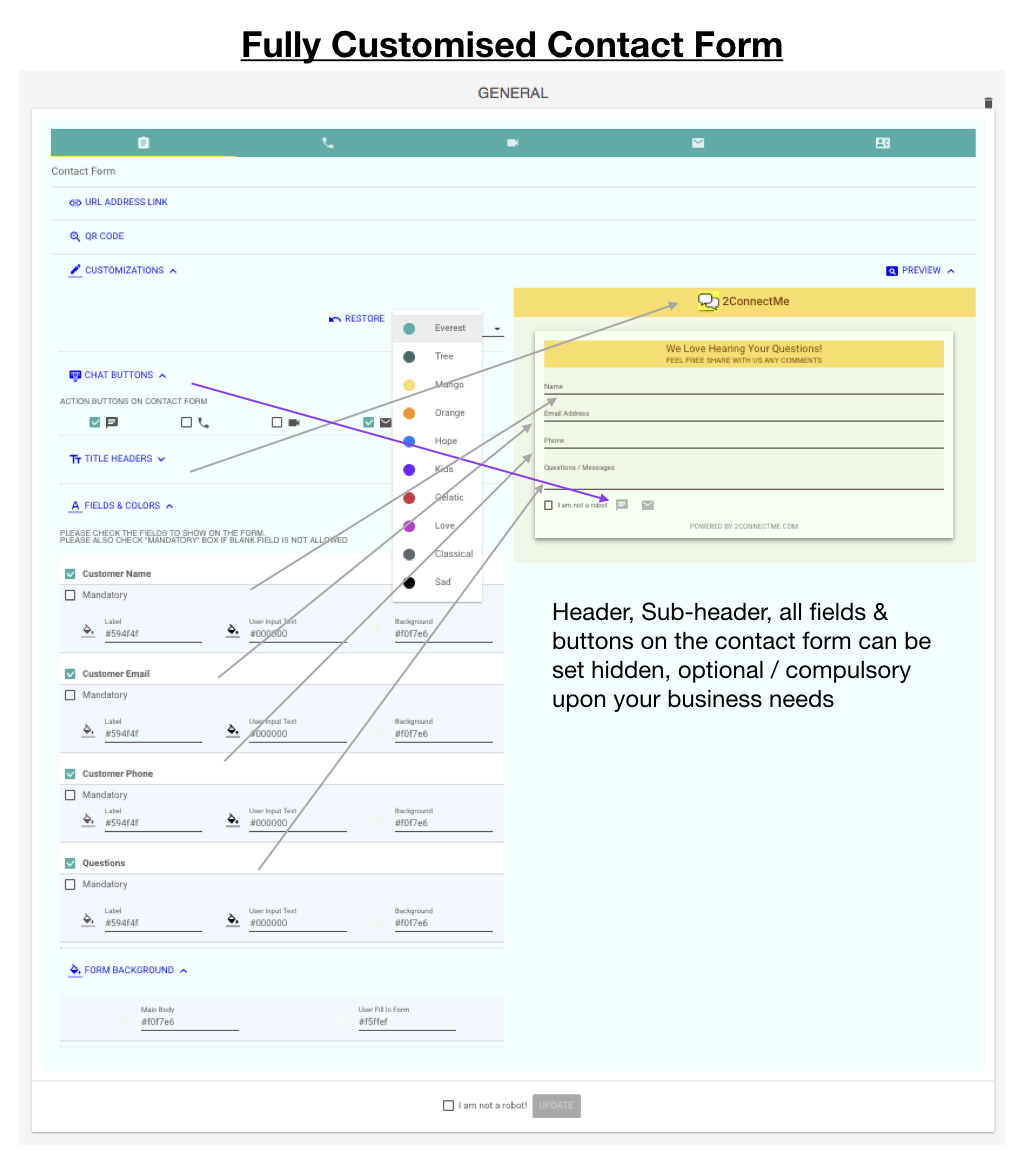
- The layout and color theme of contact form and the behaviours of contact form, e.g. Google Sites support, Auto-Text Triggers…
- The priority of how to distribute the incoming chats to your agents,
- assign agents according to the quickest response to the request,
- assign the same agent to serve the same customer in the future chats,
- allow customers to leave email message when there is no idle agent.
- or allow customers to activate email alert when the agent is idle again.
- In App purchase, either Manual Payment Request or Automatic Charges
- Public Profile information in communications with customer, e.g. email.
- Restrict the chat buttons on Customer Phone and Agent Phone.
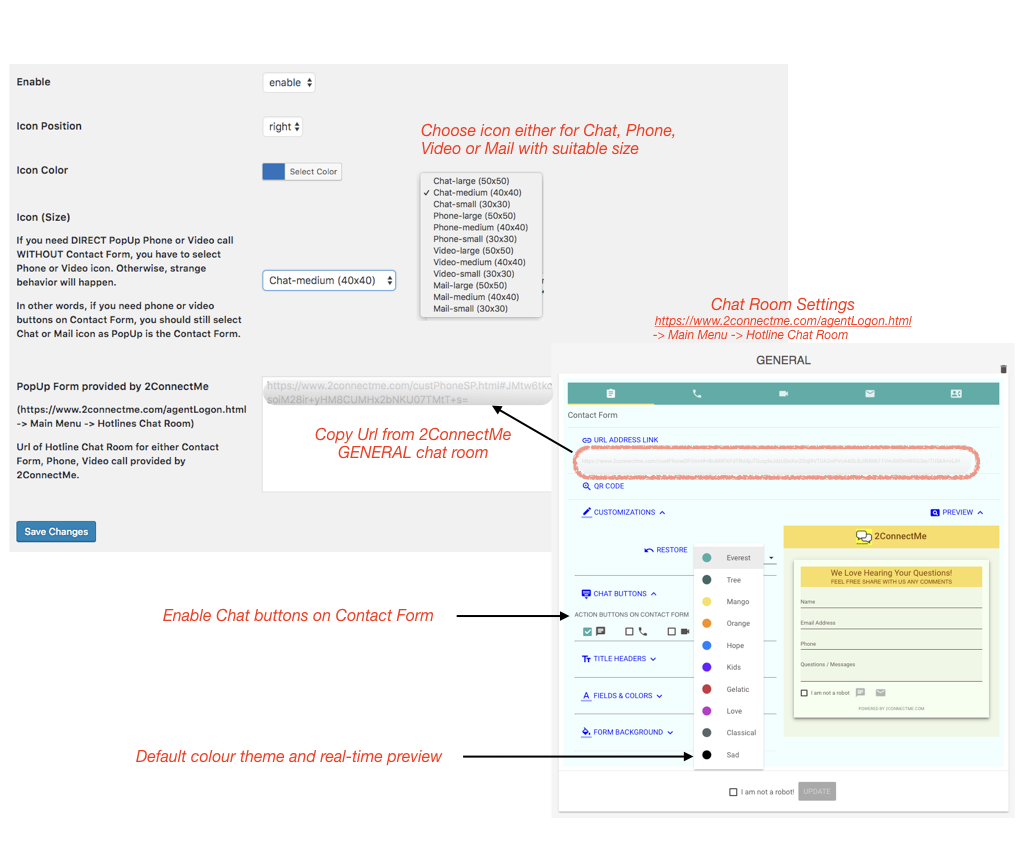
- HTML code generator for sticky Pop Up contact form on any html webpage.
Public Chat Room and Private Chat Room
Each Chat Room comes with url for Public Chat Room and Private Chat Room individually.
Public Chat Room will distribute the incoming chats to those agents who are assigned to serve this chat room. That means the customer does not know who will serve this chat until finally reaching to an idle agent. Particularly for addressing this “unwelcome” customer behaviour, we have options to allow to assign the same agent with higher priority to serve the same customer in the future chats.
Private Chat Room use the settings in the Public Chat Room. The behaviours of public and private chat room are the same except that
- Private Chat Room distributes the customer chat to your specified agent only. No other agents can serve such customer chat unless private room is belong to that agent.
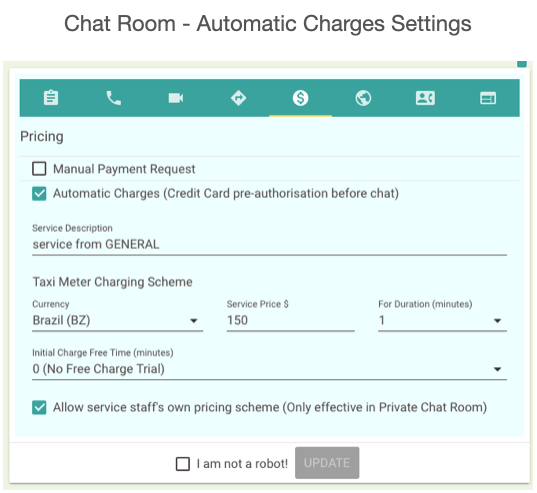
In App Purchase
Each Chat Room comes with its own settings of In App purchasing. Two charging schemes are supported. Manual Payment Request and Automatic Charges.
Manual Payment Request
Without credit card pre-authorization, Manual Payment Request let agent pushes invoice to the customer directly during chatting. Customer will then be able to input credit card details to complete the payment transactions.
Automatic Charges
WITH credit card pre-authorization required, 2ConnectMe will charge the customer automatically at the end of chats according to the pricing scheme in the chat room or the agent’s own pricing scheme in his private profile. The calculation of charges is like a taxi meter type, i.e. initial free chat minutes, then, first N minutes for $ dollars (minimum charges after free chats minutes), after that, $ dollars for additional minutes.
Integrations with Android or iOS Apps
Customer side
With url links for Contact Form, Direct Voice and Video chats, they are treated as website address for mobile apps to integrate with 2ConnectMe customer phone. Mobile apps for customer side can either directly go to mobile browser or mobile webview to go to the url address for Contact Form, Direct Voice and Video chats with agents.
As an example of integration, refer to mobile app iWritingPad (www.iwritingpad.com) which empowered with Live Chat inside the app.
Agent side
2ConnectMe provide the ready made Mobile Apps for Android Google Play Store and iOS Apple App store. Agents just download the apps and go straight to start using the apps with same user id and password. They can serve the customers using Android phone and Apple iPhone immediately.
Integration Cheat Sheet
The following is the cheat sheet for quick reference of most common integrations with 2ConnectMe. For the details of integration and setup, please refer to here.
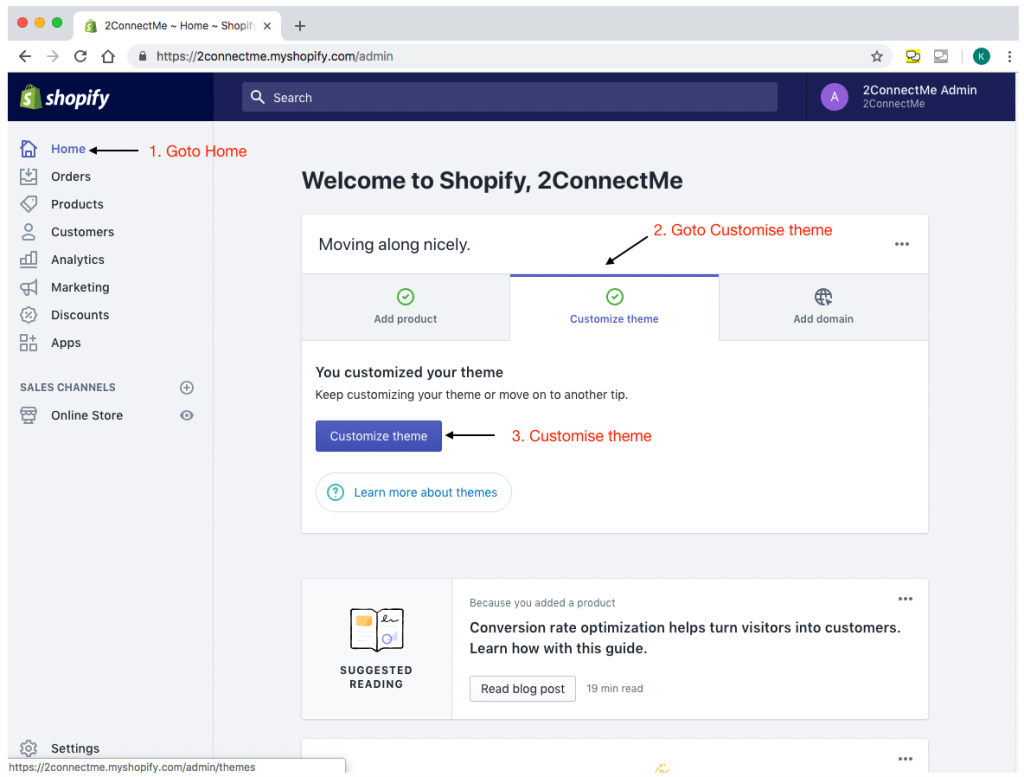
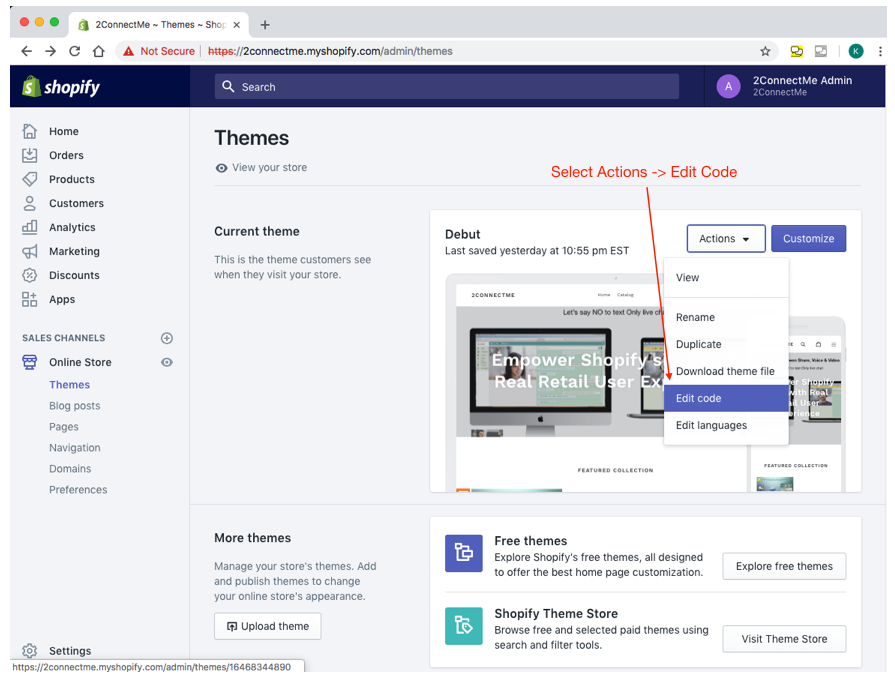
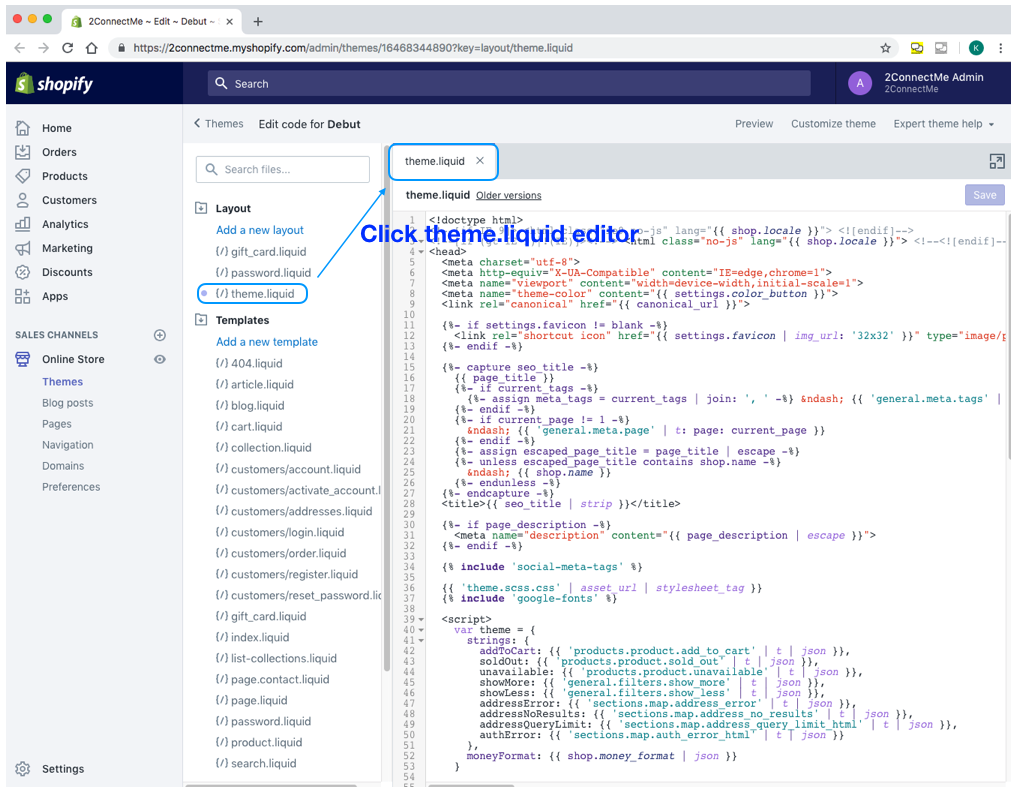
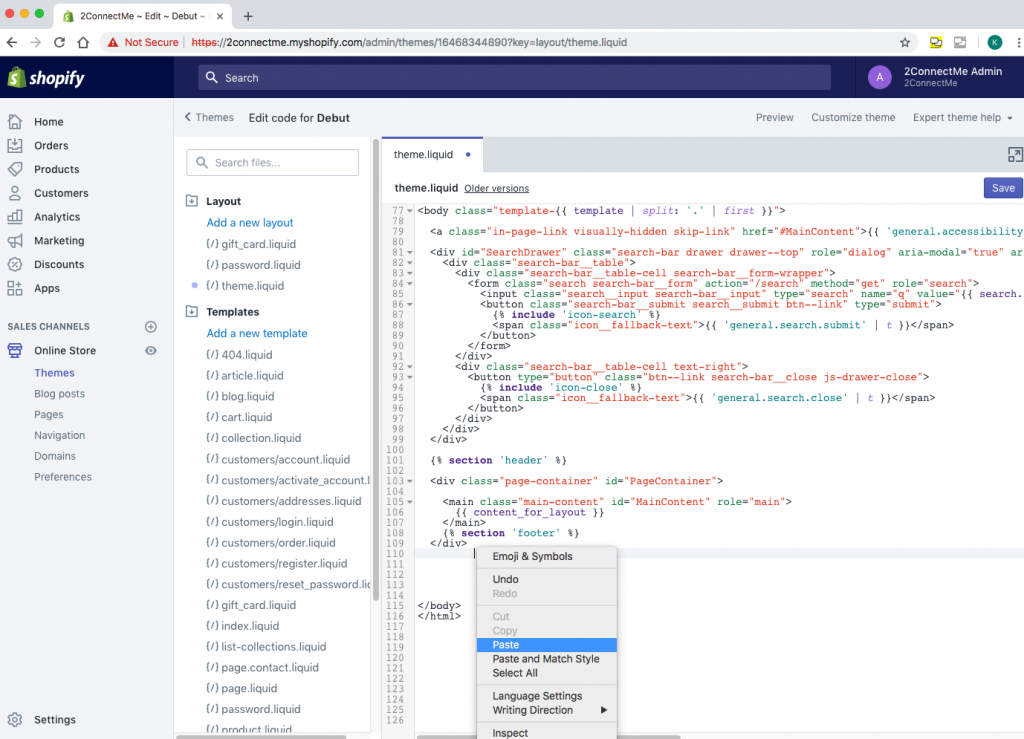
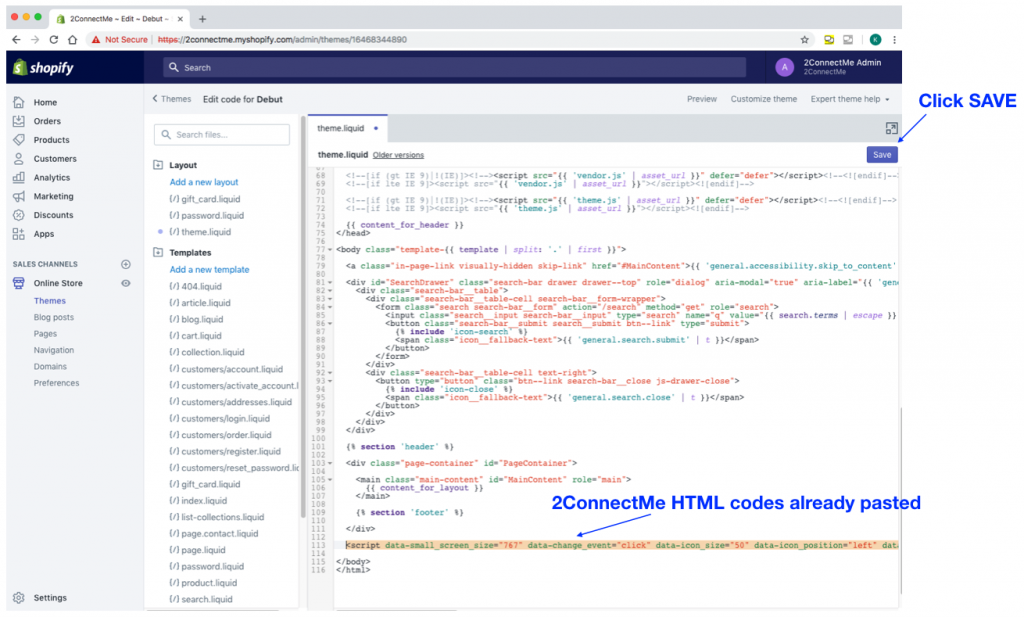
Integration - WordPress websites 2ConnectMe provides Plugin for WordPress website. Just install the plugin and follow the instructions to configure the plugin. The video below is for illustration. 1. Install “Business Chat Room – 2ConnectMe” plugin through WordPress store. 2. Activate the plugin through ‘Plugins’ menu in WordPress (Plugins -> Installed Plugins -> Activate “Business Chat Room – 2ConnectMe”) [Click Activate] 3. Open New Account in 2ConnectMe here – Only takes you less than 5 mins to complete. 4. Copy Url address for either “Contact Form”, “Phone / Voice”, or “Video” of “GENERAL” hotline for WordPress in 2ConnectMe and Paste in WordPress Plugin. Integration - HTML web page 2ConnectMe provide html code for the floating chat icon of each of chat room. In order to have sticky floating chat icon on the web page, it only requires to put such html codes on your <body> of web page. Integration - Shopify With 2ConnectMe Chat Room HTML codes generated above (Integration – HTML webpage), such HTML codes will be copied and pasted to the <body> of Shopify Theme. The steps are as follows. Click To Call button on WordPress, Drupal, Joomla, Facebook, Youtube, Linkedln, Meeting Request, MailChimp Direct Contact Form / Voice Chat / Video Chat Direct Contact Form / Voice Chat / Video Chat are forms directly shown on the webpage. It is normally put under <iFrame> of webpage. Due to new security restrictions of Google Chrome (ver 65 or later), you have to put additional security settings allow=”microphone, camera” as example shown below. You have to copy & paste your own chat room url highlighted in red below. Where is Contact Form URL? - Contact Form tab Where is direct Phone Call URL? - Phone tab Where is direct Video Call URL? - Video tab Example of Advance Use Case The example below illustrates a real use case for how to setup 2ConnectMe for multiple hotlines (chat room) to support Service team, Sales team and General enquiries team with languages English and Chinese I want to setup the following hotlines (chat rooms) Since the customer is coming from around the globe. I need to divide the customer call by languages as well, and my teams will also be divided into English and Chinese team for each of the hotline (chat room). How should I setup such configuration in 2ConnectMe? After creation, it will contain the above 6 hotlines (chat room) in Hotline Admin. ** Tips: The name of hotline (chat room) should be as short as possible. Partial name may be displayed in 2ConnectMe Agent Phone due to limited size in screen, particularly in mobile devices. For illustration purpose, the above examples are with such long name.
PopUp Chat Form / Floating Chat Icon on WordPress website / HTML webpageIntegration with WordPress Plugin (Business Chat Room – 2ConnectMe)
Installation of “Business Chat Room – 2ConnectMe” WordPress Plugin

Open New Account in 2ConnectMe and copy & paste Url address of contact form
6. Complete Installation
7. Customisation of Contact Form

Example Use Case
Suggested Solutions
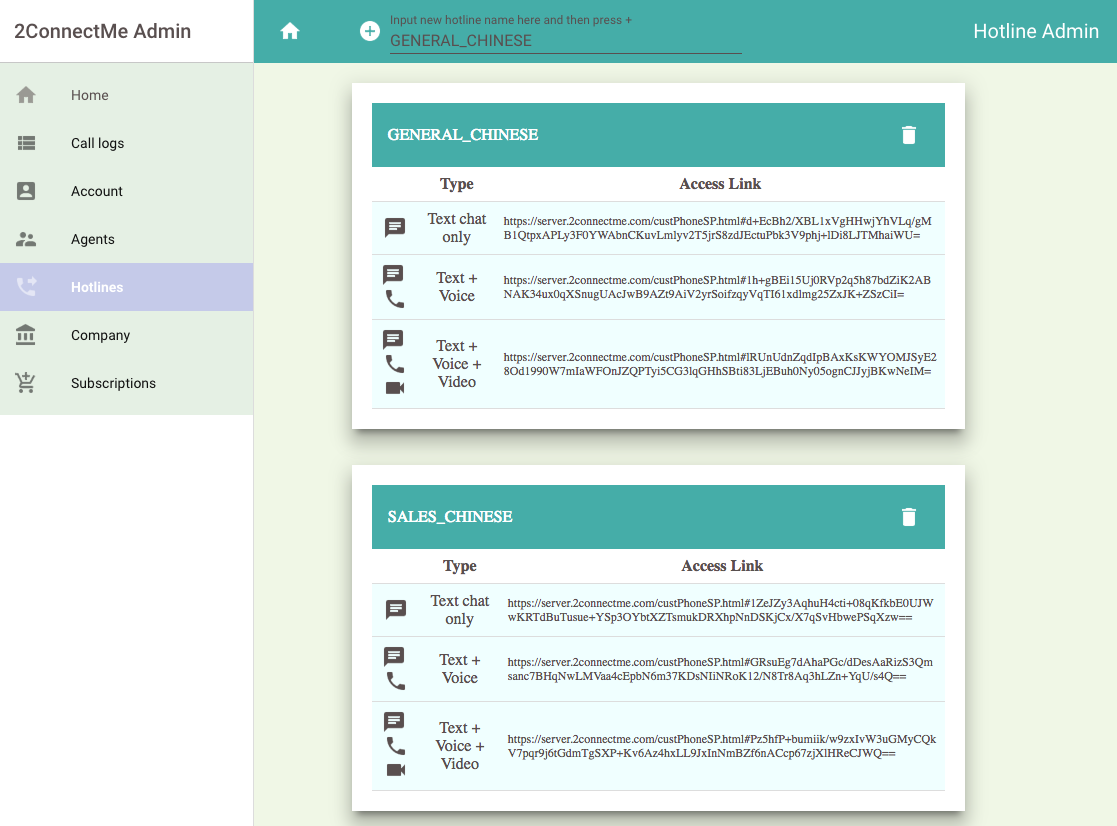
Step 1: To create 6 hotlines (chat rooms) with names below below.

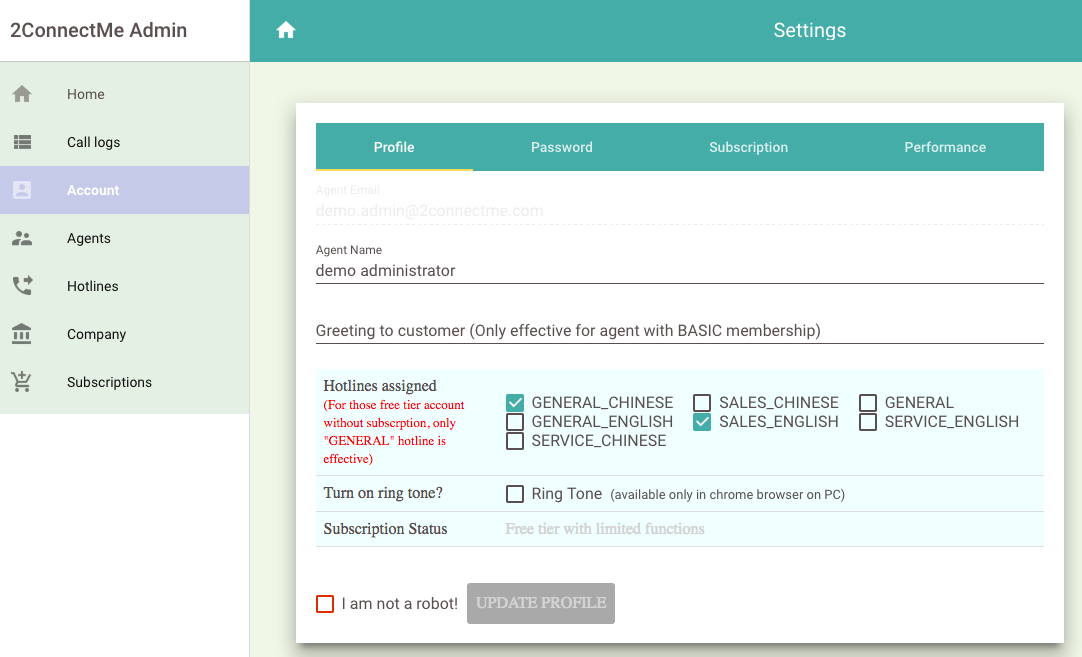
Step 2: Assign the hotlines (chat rooms) to each of agent according to his own skill sets. Go to Account settings and check the hotlines required to handle. Then, check “I’m not a robot” and click “Update Profile”. For example, the agent below is assigned with hotline “GENERAL_CHINESE” and “SALES_ENGLISH”.
Step 3: Put the “Access Link”, an url link, of corresponding hotlines (chat room) to your website. Please note that you may want to put url link under your own custom “Click-To-Call” button. The “Access Link” information is in Hotline Admin as shown below.